Nintendo64/Gameboy advance

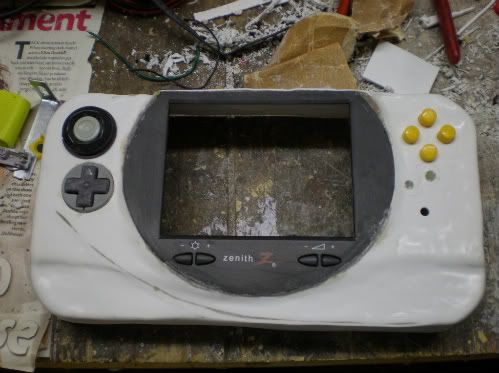
Many things actually. My top piece is not that big only like 1-2inch thick. So, the bump holds batteries, charger, the output jack, and the relocated GameboyAdvance cartridge slot.
 
because my battery is built in

Here is a bigger picture of my top case. The picture above is way to small to see

PB250078-3-1.jpg
 
I don't know what your asking, but the charger is in my system. To charge my battery, I don't have to take out the battery and charge it with the charger. I just plug in a wire from my N64 to the wall.

question: I was holding my bottom case and then finger prints showed up. What does that mean? That the paint wasn't set?

Also, I let my paint dry for a day and there is one part that set, but it really did. I can put it with my hand up and down. I will have to show a picture or video clip can't really explain it.
 
Try painting it again, and let it set for a few more days. Unless you really need to do more casework, just paint it and let it set for a looong time.
 
designer noob said:
I don't know what your asking, but the charger is in my system. To charge my battery, I don't have to take out the battery and charge it with the charger. I just plug in a wire from my N64 to the wall.
Um... Yeah, you don't need a charger built into the system for that.
 
What do you mean? All, I know is that the wall outlet puts out 126v AC and the battery uses DC. So, I have to put the charger in the portable so, the wall voltage can be turned to DC 8v or whatever. Unless, you put your transformer and regulator.
 
yeah, I know thats why you need the charger. The charging system turns AC into DC and lowers the voltage. I don't want to have to take out the battery.
 
It would make your portable huge and weigh more. If you have the power brick outside the unit, you only have to have it plugged in while your charging batteries. Example: Fat ps2s have their power bricks built in. Slim ps2s have an external psu.
 
If I take out the charger it will look unprofessional. I will have to solder wires from the charger to extend to the N64 . If I have a wire going from my N64 to the wall it will look a lot better.

Also, I have already done it
 
I just finished the start, select, A, and B buttons.

I will do the Left and Right trigger tomorrow

I would have to say the left and right trigger are the place where many thing could go wrong. I do everything by just kind of quessing. I can visualize what it would look like if I cut there.
 
I worked on the Right trigger, but didn't finish hope to tomorrow.

I have the left, right and two Z buttons and then I am done. I will then start putting stuff into my case.
 
Update: Did a little more of my right trigger and have started on my left.


question: How does everyone do their C, A, B, and trigger buttons? Meaning how do you make the cuts in the case or look good? You can kind of use the piece to sketch the design to cut and then slowly by hand make it fit in and look decent. But, by hand you can never make it 100%. So, pretty much how do you guys cut out your buttons?
 
Back
Top