You are using an out of date browser. It may not display this or other websites correctly.
You should upgrade or use an alternative browser.
You should upgrade or use an alternative browser.
Downing's 3rd N64p "The Nimbus II" Complete!!! Update Pg.11
- Thread starter Downing
- Start date
Downing
Well-Known Member
Re: Downing's 3rd N64p "The Nimbus II"
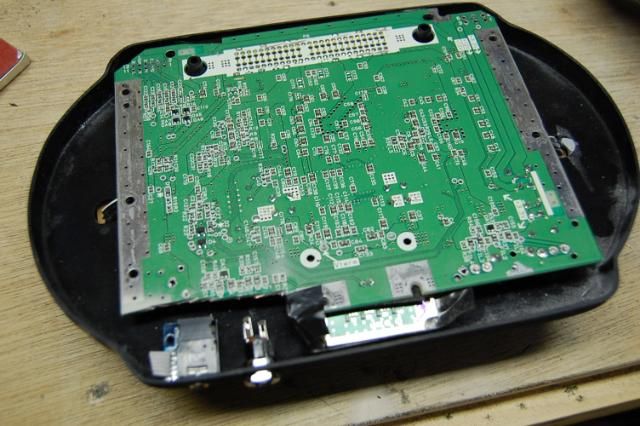
Moving right along, I got a few more parts of the case complete. I actually started with the rough placement of most of the components. In doing so, I realized that a bit more trimming of the board was needed.
However, I did not need to rewire anything on the board and in all actuality, I think I'll be using a different board all together for the final, this is just a good test board for sizing.
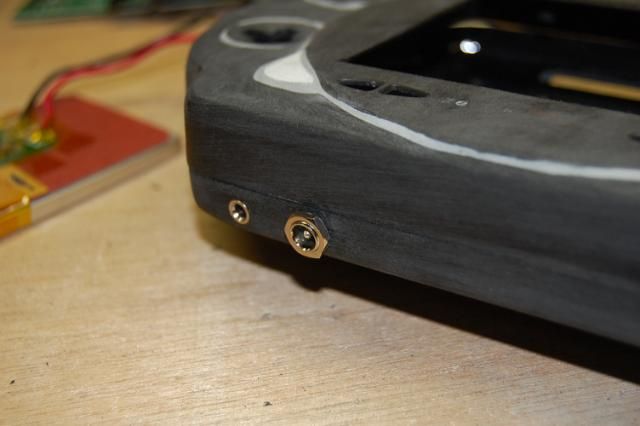
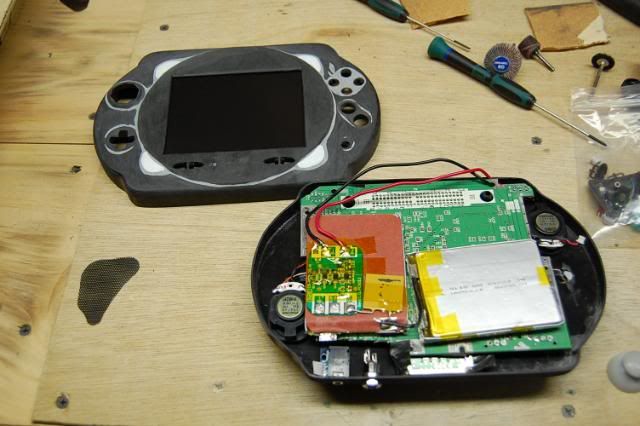
As you'll see, I got the headphone jack and power jack mounted. I had to cut out the 3rd and 4th player ports off the board to make room. I also found out where I will be placing the speakers, mounted on the back, one left side low and right side high. I had to do this because the control stick pot was going to be in the way on one side and the battery would be in the way on the other.
I still have to cut out where the power switch will go, I'm thinking right in the wall where the fan currently is, but that's not final yet. The only big concern I still have is with the Super Pad. If I don't have the right version, I may need find another controller as the caps on the board will be too high and traces will be a pain to reroute. We'll figure it out though. I need to order in some game cube controllers anyway, maybe while I'm ordering those I'll find some alternative to the Super Pad.
Anyway, here are some pics of the progress tonight. Keep you updated!
The Headphone Jack and Power Jack Mounted in Place
The First Trimming of the Board and Rough Mount
The Second Trimming to Make Room for The Speakers
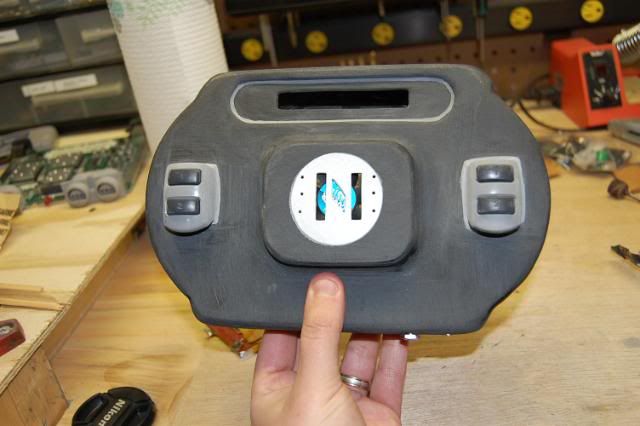
Back View of Case Before Black Mesh is Applied
The Screen Roughly Mounted
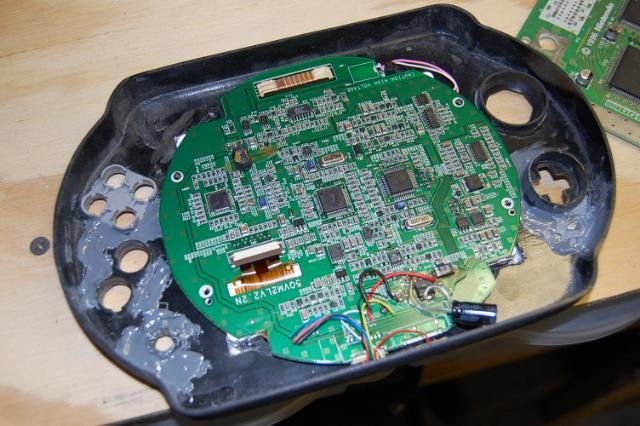
Moving right along, I got a few more parts of the case complete. I actually started with the rough placement of most of the components. In doing so, I realized that a bit more trimming of the board was needed.
However, I did not need to rewire anything on the board and in all actuality, I think I'll be using a different board all together for the final, this is just a good test board for sizing.
As you'll see, I got the headphone jack and power jack mounted. I had to cut out the 3rd and 4th player ports off the board to make room. I also found out where I will be placing the speakers, mounted on the back, one left side low and right side high. I had to do this because the control stick pot was going to be in the way on one side and the battery would be in the way on the other.
I still have to cut out where the power switch will go, I'm thinking right in the wall where the fan currently is, but that's not final yet. The only big concern I still have is with the Super Pad. If I don't have the right version, I may need find another controller as the caps on the board will be too high and traces will be a pain to reroute. We'll figure it out though. I need to order in some game cube controllers anyway, maybe while I'm ordering those I'll find some alternative to the Super Pad.
Anyway, here are some pics of the progress tonight. Keep you updated!
The Headphone Jack and Power Jack Mounted in Place

The First Trimming of the Board and Rough Mount

The Second Trimming to Make Room for The Speakers

Back View of Case Before Black Mesh is Applied

The Screen Roughly Mounted

Basement_Modder
He who mods in thy basement.
Re: Downing's 3rd N64p "The Nimbus II"
WTF is that spot in the last pic by the bottom right screen corner? Looks like a gaping hole in the case.
WTF is that spot in the last pic by the bottom right screen corner? Looks like a gaping hole in the case.
Downing
Well-Known Member
Re: Downing's 3rd N64p "The Nimbus II"
Ya know that's a very good question...I have no freaking idea...I assure you there is no hole in the casing! I just went downstairs to check on it because this is confusing the Heck out of me too! Unless someone hacked my photo server, edited that one picture and saved it...but that's highly unlikely. Must be a fluke in the camera or something like that. I seriously have no idea what the Heck is going on! Maybe I hit the unknown X-Ray button on my Nikon by mistake...
Ya know that's a very good question...I have no freaking idea...I assure you there is no hole in the casing! I just went downstairs to check on it because this is confusing the Heck out of me too! Unless someone hacked my photo server, edited that one picture and saved it...but that's highly unlikely. Must be a fluke in the camera or something like that. I seriously have no idea what the Heck is going on! Maybe I hit the unknown X-Ray button on my Nikon by mistake...
Downing
Well-Known Member
Re: Downing's 3rd N64p "The Nimbus II"
Honestly I'm not sure. I was originally going to put them facing front, but because the screen sits down into the case rather than above in the bezle, I ran out of room and the speakers wouldn't fit. I could get smaller ones (and I still might) and try to fit it above the screen but I've seen it before this way so we'll just have to wait an see.
Honestly I'm not sure. I was originally going to put them facing front, but because the screen sits down into the case rather than above in the bezle, I ran out of room and the speakers wouldn't fit. I could get smaller ones (and I still might) and try to fit it above the screen but I've seen it before this way so we'll just have to wait an see.
Downing
Well-Known Member
Re: Downing's 3rd N64p "The Nimbus II"
Got a question actually. Concerning the power switch and reset button. I'm obviously taking both of these off because there is simply no room for them. In regards to the power switch, is it easier to simply bridge the pins 1-2 3-4 5-6 and 7-8 directly, or is there another method to bypass it? And what do I have to do with the reset button, do I have to bridge any pins on that? I'm having to do a lot of things on this one I didn't have to do with the other two, so that's why I'm wondering. Thanks!
Got a question actually. Concerning the power switch and reset button. I'm obviously taking both of these off because there is simply no room for them. In regards to the power switch, is it easier to simply bridge the pins 1-2 3-4 5-6 and 7-8 directly, or is there another method to bypass it? And what do I have to do with the reset button, do I have to bridge any pins on that? I'm having to do a lot of things on this one I didn't have to do with the other two, so that's why I'm wondering. Thanks!
Basement_Modder
He who mods in thy basement.
Re: Downing's 3rd N64p "The Nimbus II"
Wire voltage to it. Wire 7.4v to pin 7, 3.3v to pin 6, and GND anywhere. This is the best way to wire power if you re only trimming the board down as far as you are.
Wire voltage to it. Wire 7.4v to pin 7, 3.3v to pin 6, and GND anywhere. This is the best way to wire power if you re only trimming the board down as far as you are.
FierceDeity
Active Member
Re: Downing's 3rd N64p "The Nimbus II"
If you follow the traces on the board, it will all make sense. Just do what B_M said. Also, You don't need to rewire anything when you take of the reset button.
If you follow the traces on the board, it will all make sense. Just do what B_M said. Also, You don't need to rewire anything when you take of the reset button.
Downing
Well-Known Member
Re: Downing's 3rd N64p "The Nimbus II"
Cool. Well we'll give that a look when I get home. I'll have to wire to the top side of the board though because the batteries have to lay right over where the power switch is...which will make for a pain in the ass when wiring the rest of the unit. But, I'll make it work.
Cool. Well we'll give that a look when I get home. I'll have to wire to the top side of the board though because the batteries have to lay right over where the power switch is...which will make for a pain in the ass when wiring the rest of the unit. But, I'll make it work.
Basement_Modder
He who mods in thy basement.
Re: Downing's 3rd N64p "The Nimbus II"
You can see it better in the NSF-lite. You can trim the board all the way up to those pins:

You can see it better in the NSF-lite. You can trim the board all the way up to those pins:

Downing
Well-Known Member
Re: Downing's 3rd N64p "The Nimbus II"
I see, that's pretty cool. I'm still amazed at how people can figure this stuff out. I mean I know the answers are right there on the board and following traces is the way to go, but I just haven't spent enough time staring at a board to really get the feel for how it works. Still working on the basic theory.
I see, that's pretty cool. I'm still amazed at how people can figure this stuff out. I mean I know the answers are right there on the board and following traces is the way to go, but I just haven't spent enough time staring at a board to really get the feel for how it works. Still working on the basic theory.
Downing
Well-Known Member
Re: Downing's 3rd N64p "The Nimbus II"
Alright, major update! Like I said, I've made considerable progress in the past few days with this, including getting the case painted and the cart slot soldered among other things. But here are a bunch of pics and I'll do the story about each one as I go.
Due to the fact I didn't want to relocate the expansion port anymore, I had to find a place for the expansion port to go. This didn't prove to be an easy feat so I decided to get a bit creative and vac-form a new cover. Seeing how this is the Nimbus II, the roman numeral II seemed like an appropriate addition. Made the overall thickness a bit more than I wanted, but it didn't matter much because where you hold onto the system is still the same.

Here it is roughly mounted in place.

Again

The buttons with the tact switches glued to the bottoms of them.

This is how my cart slot ended up being secured and soldered in place. Just bent the pins and soldered.

Here is the casing all filled and sanded, ready to be painted. Took awhile to get to this point.

Front with the second coat of paint.

Back with the second coat of paint.

Front with the screen and volume buttons mounted.

The Internals on the back.

Front with the buttons mounted. I'm going to be painting the C buttons yellow though.

The back with the fan mounted. I'm going to be putting some black mesh behind the N to block the view of the fan.

But all in all, it's been very busy but still have a long way to go. I'm not as happy with the paint job here as I was with the original Nimbus, only because the filler job was much more complex and hard to reach. However, it looks decent and I'm going to go with it. Let me know what you think!
Alright, major update! Like I said, I've made considerable progress in the past few days with this, including getting the case painted and the cart slot soldered among other things. But here are a bunch of pics and I'll do the story about each one as I go.
Due to the fact I didn't want to relocate the expansion port anymore, I had to find a place for the expansion port to go. This didn't prove to be an easy feat so I decided to get a bit creative and vac-form a new cover. Seeing how this is the Nimbus II, the roman numeral II seemed like an appropriate addition. Made the overall thickness a bit more than I wanted, but it didn't matter much because where you hold onto the system is still the same.

Here it is roughly mounted in place.

Again

The buttons with the tact switches glued to the bottoms of them.

This is how my cart slot ended up being secured and soldered in place. Just bent the pins and soldered.

Here is the casing all filled and sanded, ready to be painted. Took awhile to get to this point.

Front with the second coat of paint.

Back with the second coat of paint.

Front with the screen and volume buttons mounted.

The Internals on the back.

Front with the buttons mounted. I'm going to be painting the C buttons yellow though.

The back with the fan mounted. I'm going to be putting some black mesh behind the N to block the view of the fan.

But all in all, it's been very busy but still have a long way to go. I'm not as happy with the paint job here as I was with the original Nimbus, only because the filler job was much more complex and hard to reach. However, it looks decent and I'm going to go with it. Let me know what you think!
Similar threads
- Replies
- 0
- Views
- 2K
- Replies
- 0
- Views
- 2K
