You are using an out of date browser. It may not display this or other websites correctly.
You should upgrade or use an alternative browser.
You should upgrade or use an alternative browser.
GameCube Fusion, rev 4.
- Thread starter Ashen
- Start date
Ashen
GameCube Révolutionary
Going ahead without painting Liberty. Cases look pretty great now. Painting would be a bit of a waste IMO. 
So as I said, I finally found a technique that helps aid in the filling of the cases when casting. Its such a silly thing that it almost makes me want to cry, as I went through a Heck of a lot of dicking around trying to get these things to fill right, and even more frustration trying to paint the cases afterwards and having them turn out like flaxe because of minuscule air bubbles on the faces of the cast part. The paint would just bubble up where the tiny air pockets were and would look like flaxe every time. This is actually one of the reasons I took a long long break from modding in general.
So what is this miracle cure for casting plastic parts you ask?
Baby powder. Yep. It sounds ridiculous, I know. But apparently talc (baby powder) acts like a lubricant for polyurethane. If a thin layer of talc (baby powder) is applied to the molds before casting (I used a paintbrush) and the excess gently blown out your parts will cast perfectly every single time.
Now, I haven't actually tried painting one of my new cases cast using this method. But, I really don't have to. I'm happy enough with the way the cast part turns out using this method that I don't see the point. But I did check a few of the cast fronts under a scope, and the air bubbles are completely gone. So if I did want to paint them it should be possible now.
Spent two days last week in the mornings doing this:

I've got two of the cases all nice and trimmed up and looking good now. I'll be putting two of these together at the same time this time around. These will probably be the last two I build for a long while. As I want to move on to other projects I've had laying around for a long time after these are complete.
I've also been working on cooling solutions a little bit more and this is what I've come up with:

Yes, that's a stock GC heat sink that's been heavily milled down. Its roughly 8mm tall and fits those ASUS netbook fans nicely. It actually keeps the temps on the CPU/GPU a good 5 degree's cooler than my previous setups. Heats hover right around 35 degrees celsius under heavy load (running a game).
That's all for now. I'll be ordering/waiting for parts over the next few weeks. But I've got enough stuff here to test the thermal stability of these cases in the meantime. If the cases prove stable when loaded up with electronics I'll likely sell some if people are interested to recoup some of the costs that went into them.
LOCtronicz
Formerly known as zenloc
SWEEEEET!!!. Love the heatsink. I also trim my heatsink down to that size. However Mine is the same width of the fan.
Looking forward to seeing a completed version
Looking forward to seeing a completed version
LOCtronicz
Formerly known as zenloc
No I haven't cut the fins like that. I will give it a try. The way I do it now is cut it down to the height of the fan without the alluminium cover. Then place the fan like you did and add a thin sheet of alluminium on the top and seal it with heat resistant glue. This way all the air gets blown out as quick as possible. Seems to do the job in my recent portables.
Do you power it off 5v? Or 3.3v?
Do you power it off 5v? Or 3.3v?
public-pervert
Well-Known Member
I'm thinking how the heck you got the idea of putting baby powder on the molds lol. That's excelent news! That's some valuable infos.
Regarding the cooling solution, why are the fins bent from side to side? This makes the heatsink more effective for some reason?
Regarding the cooling solution, why are the fins bent from side to side? This makes the heatsink more effective for some reason?
Ashen
GameCube Révolutionary
I actually got the baby powder tip from here: http://www.myfluxcapacitor.com/plastic- ... ting-guide
The idea with the heat sink is that with the fins bent like they are the fan blows on them and hits the edges of the fins. Effectively cooling more efficiently. Or something.
The idea with the heat sink is that with the fins bent like they are the fan blows on them and hits the edges of the fins. Effectively cooling more efficiently. Or something.
Ashen
GameCube Révolutionary
Custom regulators all wired up:

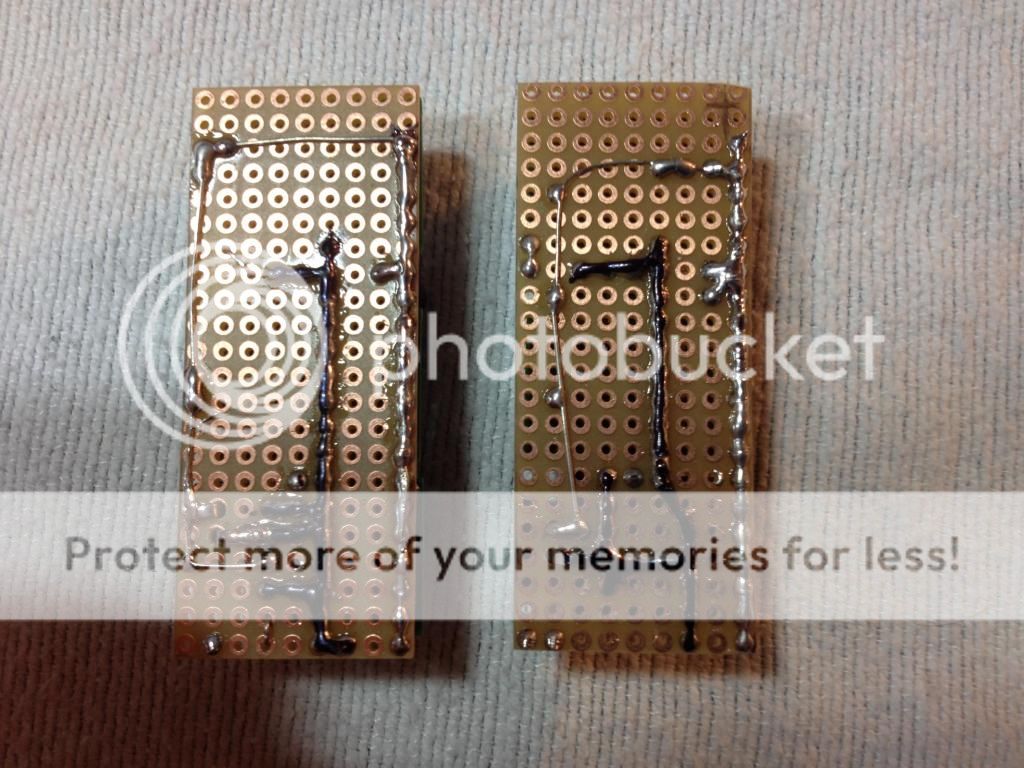

You can see a bit here how I've been doing it for the last few portables I've built. I'm not going to go into a great deal of detail on how to wire them as its been extensively covered by Zenloc and others elsewhere. If all else fails you can always refer to the datasheets for each specific reg. I find mounting them to perf board works well, gives me something to mount them to and then in turn mount to the case. It also gives the regs a bit of "breathing room" as they do get nice and warm after an extended play session.
Going to start wiring the controller boards soon. Still waiting on parts.
public-pervert
Well-Known Member
Have you consider putting some tube shrink on those resistors legs? It all looks clean, but a little close to a short.
public-pervert
Well-Known Member
I doubt that he will use hot glue, but if he puts some epoxy, then nothing to worry ")
They look solid with the system opened, but anything can push those legs and bridges, and make a short when he closes the case.
They look solid with the system opened, but anything can push those legs and bridges, and make a short when he closes the case.
Ashen
GameCube Révolutionary
bud said:Where the Heck have you been you had me worried sick
/imyourmothernow
Just been busy there brother. I never left though. I've always been here, lurking.
As for the regs, its all about perspective I guess. Those pics show them from an odd viewpoint I suppose. Trust me, there's nothing that's in danger of shorting. As far as when things are going together and the case is closed, I'll be taking a page from Zenloc's book. The regs will be completely covered by a grounded steel "cage" so as to minimize interference. So once enclosed the chances of anything pushing on them or getting near them will be slim to nil.

Blargaman91
Well-Known Member
STAHP
IT'S TOO MUCH
TOO GOOD
IT'S TOO MUCH
TOO GOOD
Similar threads
- Replies
- 1
- Views
- 1K