Mawile
Member
Hi it's me, Mawile, and here I am today going to show you the basic steps for putting together a PlayStation 1 fat portable. First up some materials and tools:
1. Soldering iron
2. desoldering pump
3. rosin core solder(lead or lead-free)
4. flux
5. PlayStation 1 fat(any revision)
6. Phillips head screwdrivers
7. Pliers
8. Tact switches
9. Hot glue gun
10. Hot glue
11. Battery(Li-ion, Li-Po, Ni-Mh, Ni-Cad, Alkaline)
12. Screen(PSOne, Zenith, TFT Backup)
13. DPDT switch
14. Charger for battery(unless using alkaline)
Step 1:
Removing the Ports:
To remove these ports simply heat the contacts and use the desoldering pump to suck up the solder. Continue until all solder has been removed, then grab the port with the pliers and ently rock it and carefully pull the port off the motherboard.
The large black colored port on the far right hand side is the parallel port which is useless unless you plan on using the PSIO which as of writing has not yet been released. However if you do want to use it when it is released it may be easier for a beginner to leave this port on.
The smallest port in the middle is the serial port and can be used for a PS1 game shark or a Game enhancer which allows you to play imported games. However all games can be played anyway with a mod chip so this is only needed if you want to use a game shark with your portable. Otherwise simply remove the port.
The last port is the A/V port which is used for video output to your screen and sound output to your speakers. You must desolder this port.
Step 2:
Removing the Transformer:
If your planning on making your portable run on batteries you probably want to remove the transformer board. The good news is you can!
To remove the board simply unplug the ribbon cable and desolder the socket on the motherboard and solder the three wires in this picture to the bottom of the motherboard.
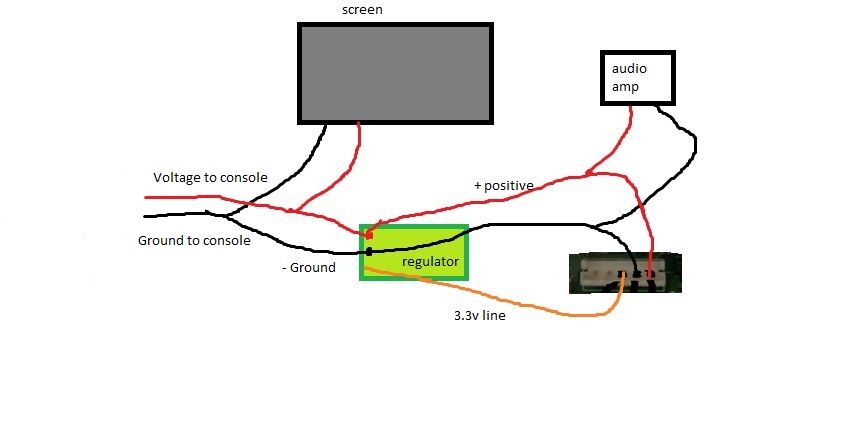
Use the following picture to wire up the power.
 and follow this picture to connect it to the batteries.
Step 3:
Wiring the A/V:
The pin out can be found here. If you want mono sound then simply follow this diagram here. For stereo sound simply make two amplifiers and use both of the audio lines to the separate amps.
To connect video to a Backup screen simply get a connector and solder the wires of video and video ground to the connector and plug it into the screen. If using a PSOne screen it is a bit more difficult. Follow this picture for pin out.

1. Soldering iron
2. desoldering pump
3. rosin core solder(lead or lead-free)
4. flux
5. PlayStation 1 fat(any revision)
6. Phillips head screwdrivers
7. Pliers
8. Tact switches
9. Hot glue gun
10. Hot glue
11. Battery(Li-ion, Li-Po, Ni-Mh, Ni-Cad, Alkaline)
12. Screen(PSOne, Zenith, TFT Backup)
13. DPDT switch
14. Charger for battery(unless using alkaline)
Step 1:
Removing the Ports:
To remove these ports simply heat the contacts and use the desoldering pump to suck up the solder. Continue until all solder has been removed, then grab the port with the pliers and ently rock it and carefully pull the port off the motherboard.
The large black colored port on the far right hand side is the parallel port which is useless unless you plan on using the PSIO which as of writing has not yet been released. However if you do want to use it when it is released it may be easier for a beginner to leave this port on.
The smallest port in the middle is the serial port and can be used for a PS1 game shark or a Game enhancer which allows you to play imported games. However all games can be played anyway with a mod chip so this is only needed if you want to use a game shark with your portable. Otherwise simply remove the port.
The last port is the A/V port which is used for video output to your screen and sound output to your speakers. You must desolder this port.
Step 2:
Removing the Transformer:
If your planning on making your portable run on batteries you probably want to remove the transformer board. The good news is you can!
To remove the board simply unplug the ribbon cable and desolder the socket on the motherboard and solder the three wires in this picture to the bottom of the motherboard.
Use the following picture to wire up the power.

Step 3:
Wiring the A/V:
The pin out can be found here. If you want mono sound then simply follow this diagram here. For stereo sound simply make two amplifiers and use both of the audio lines to the separate amps.
To connect video to a Backup screen simply get a connector and solder the wires of video and video ground to the connector and plug it into the screen. If using a PSOne screen it is a bit more difficult. Follow this picture for pin out.


