DarkWing - PIS2 portable

PS: Sorry for the double post, couldn't fit all this under one reply
Sir, this is high quality double-post content. No need to apologize. :p

Awesome to see this project getting back into gear. I can't wait to see more updates on it.
 
Thanks for clearing this up, was not sure about the forum rules since it's been a while :)
happy to be back, every time i was looking at that case I wanted to finish it.
 
Ooh frankencasing.

3D printed is nice, but I do appreciate a good frankencase, also your design is nice and looks pretty comfortable, and it plays MGS3 so it gets my approval.
 
@Kickback Thanks dude, It's quite time consuming but got good result with frankencasing so far and couldn't let this case to go to waste.

Finally manage to get some solid time over the weekend to work on my portable.
So let’s get straight to the update.

Screen board
To slim down the board I had to relocate a capacitor, remove all those gpio pins and solder the little board directly on top of the main board.

1jv9x5HOIUxRI1gCqJJJZqs0CjJItVjrqo96qZgzUwiV7nXRd3g8evqnIy40ByRgdqXh82RYyBx8FaVbqgjaxzs4nNYISMCKDfVuJ5gSyf8shscor1N4y6vsK1b7Bd6Q2Eu5beuUNQ3ODz2JCT4G9B4bswA4bPmOUlfLkkuf8AoENFNByFT-MCSrxfeFaAN8lsvvKsUCvLhwX6FWd0MaKdtFKU7Hsr3Z8c2BsiB_AHZ8phhO0tiBFyq71T8VaZR3cS4ALUeL6lden4D0TwchYY_xM89JO6H7U5IXsYV7ApqeWg93WpG0xqeTYwJIXytJOsjlpZJDM1d5DXONRk-QmuxBLUXwYIUuMXI34TkOM2js1I1LFMci3dDodqpAjm8hmYp1dYTyqyw1B7YWnea6JF4PpG5DzcT6_3a3ZD1rpg6x4-PiQZcdpAil5Gdw8mEgMFMZLDO-CM6m3PlHBWXN0xjRu3-jdaBRMCiBBj7C8Z9WqZ0-ouQvOg9TwIhwY8qsm-kzxA34S3qXlb8mZy-Vpe-XaJpwtlCwC6TH8p55Yd4EhaSsWZ6oo2qNnn7D83FGggrI_4Ei14vPa6AiQOej3f6Q5TP8pJ1q30o-6OnG9g=w800-h600-no


Did some fitting in the case to see how it will look, just have enough spaces for the controller board :)

kCxv7HvagEq8Eo6cX74uGTEs5fxari0XlCSAvzN9Z1ylrwBUJ8jp3v8gYanYzc3fxqGTjzd4p8MT-CH_T-SKbu39-dGjeVun_n-ovVBo4H-qeZXRUq5ZhwHEurVVD-PeI3WsH2i41jN1rK6--ZrN7gmZaIntBlJLyeazTmyYCqoN4bPKx6svyijig-BHc9Er5FGA5dW5fzSJRv2UQ_0JR_-5gXpqgYbHKB-vbJxBZYC7DDQGSYHtBN-hP2oT48OuCoXcYEnz_l0Ji0RTot7Ekzs3dWCB7LR5MZdO2vhmhkxsx4max6KEN7yUKgBfCpO8Xx_-3YLdY1pxpPExTZvC-X1mQrueYMg16qcgnHZzndlO1brngIlxUajjqLe8xtxkPkvQz-MQ6niniWn8vY-aEyVmE3jYtkR4n7yhKUhnxt9FB7Ndee0fM0ozty9kdtagYvFbOilBDdjUQV54vInJ1IRE18OPAeELseDCRYgrmtSIwvb4JQdqYnkOGlLeyzz70g_9rwgwhIIeDHq-aR-St2wBMn1f8mIAxR907gcm-nYsuZaIPegjKgRRQhIFW84Xr8_FUEIzUEg_NFFqH4mliZNW1dthhMo7k8FmKujLHg=w800-h600-no
v

0xH0oKZZ_j4mTk5cM-7M6UfmlFcEw4Bd8Oq2NTCv8nMq70ZfTUdyx7AZeRYWZVpnzQ1zGssY1soiKwZB7PGyqkGUszV_1kJHOL-A7EJz5-R7AJgkrnK3beLOzO-izpN3ENAHVznWXR5kItw-BQQy4bxnrEYPm1oanybQEl4RkMMqQP2zBTQ3n-RB3JG0Tdsiiwv3arZaN2WTDKt7I54DjLap2FN0ZqRGxwAG_juDOTMgZ1Ntypq9LcG_AoNHJXQyAwVuQm1YZDin3fCn3dZKfYsjVdTAvTAUzwVR8ta_4zZsaXkxurGkX6ANjCJgabSQbcDr6K3vTgj7lNHu3PGxRw4ZSHVdF3sQfqYWUv5NogCnBpMEOWEEC6UUNyONZP1H9mIm4TuJD5zmqE3zbg2v3sFfF9Ol5maTuPqNfpKo3edSQpJ-tKXzFC4Z4qB0rSOGJSvE8NRGxtj7zJzlOgV0vz-dmdskQbZBdrhU-rBqiyIGyOJpUbOOjrBwRC2F0fXVYDpkOKwWdH8MYhPc9OCZCYssz5CmEQgQzYKYgkcZTxg3Hy6QSLLYlN261fYItB1dcSaFQu-Mtc-i6oKelAIG9MSsGDB7AWM39JJyRCmkuQ=w800-h600-no


On/off Pi button

Finally received my ATXraspi board, this will let me turn on / off the raspberry pi with a momentary switch. Press for ~1sec for reset, ~3sec for shutdown and more than 8sec for hard shutdown. With this I will be able to reset the PS2 independently from the Raspberry Pi to switch games without having to restart the PI.

N7RoBvLPdGhJqloafTKij30w6YfFj5lqYOPvXuiZyA68n9R5rNSNyc-SeszVLFeTmJ4yWTxh9qhQmXhxWBUPvTF3lhnOL9-y_CCU8pWiNDEupMT1zCs8cmkOYE6gablgyR9RqSXOv1d3SX30KM23X6U_paADKGQPM_xaBy7c3uwp5ok_1f0mZn8deCWjqaN-AxEDzrTSPiNSXSdcY0eYf7q-S_26KUf-yC3GtJ1R_hI-J2_tbKW74dNQqG6tFg3VzzF775i5g8D_uRgYhdBjSkgM_zH8A204bLjkXqOJf1N3AZWthadeXhUnQHwiKYIFz-aBeEjWxgriCEALQXO4sgfEM21gtzUqoPI_Qly2f50L4irMwQ7lpIP28yQ5rM_o0R2aJdTNNahSPRYmus_AfbjswJhvIJZ2qfJPcLXy6uo4lENJtUzYg4RD78Mk-MmwBbxmwVd0rEeSkodepKy9havESf5i5zdEpu83Pti4qJZQxakQkQyQZRka8FoBL7ox3uZ9lfizN-hFTjqVlMepKwWS89T7M9M6XJX2H2UozXh0DPdTIHIcE1W6Z9GrYGptxPtxVOOnbiB_c8mgxrDT4TAzu678OZ6aq1b9LX70Tg=w800-h600-no

KzomTet50zIJa5Avy0paN87760G8n6M4UXO0DyTLKG_Iw23gaQ-kSYgW56RBd646PHLGhBaldzx1Gvcx7uCPIDsPPzkynWXyowpEP2YnzR43ZD-ihmYPos6Ldqtanj5jHTilISsABYsNaq7rWBvUl_qzFwQsAUClkZ7zKC7Ly8ehGyRcQucl3OAVNou2yj4xaGiUcmk196lhznD8VJKWY0n8deI6s24XTCZZbnubJgJNcUBtuq00BFO1dAZij9qL21F7hzrYY072CupgYb8wh7rsn7Pp39-WjDBIu1IBOcQbh2y0NyajVKGTjlto4GXCcJQThSoTScptnTeTe7QXNyo-HlW9_mEboqkfZ6N4CXDi4JMjx65IUM3xHgUyewGcq4fihFdjpCOALmDlc6CfSf_1jZkEnS3B4xxr-qKsEtkkAFCY_GL8GYFWW5wChdzaigLtoC2ls4BJd_OdW5pO16IliTTNA7ZIIeqPg6tSHGc32pqoVy_SOwZVv7nN0VP3CkXqQaDc39NkCZ3OJfQSA1jOUp3gRzge9fMd3-loZ8NyhlDfu3In5u6xUAB_AIbYt50yGc2t95bgF5x4FU_nr3jr3yXETSKpsogNbv1IWw=w800-h600-no

O1FAYGHsWKV951Ziu4KyoPgg1fIv7AkAb8MPQkYMFxajTuvkXfFQwatLAsjux79pESX-yuih2my6mInVV55RhfOXCMlmAL_7L-rg5onycrGJScsHPsQFkKVj5FjENwkG1oSMFE9QdSOcfJuZLV3tKr6uh40u98R_kh_5XPDl0fr_l8XmFF2OdJDIOUJ_omSni3J0a4PVPHhPIMCumVqqe5Mf9GcDiJCkr8EGEc70WK1-iKegkRklgzu2XKncF2BjG1rxcccandH-elno8O5FxCxDiCCQTjk30B23DOfXIiK5gwxue6Am5oDYf60sEhlPNuW7Vc-ZBgDQV0zgz7KsTFzZRoSa2MGOBCe2psoqZu6yIXyVPEeWctfYzd4luEdkPXQ0_kIBoqWb4E0NdYDgYvoNksKYPt3ubVC-7TdheK39PBfbWfBftFhdiNsSoPwP6rAjS_zIhrVblywNdoNgDXtHiwiSH1s2RxK6k1mK0QO7-PBOCzr8ZDVYpMnbwnznHBTWviDkxhiWe8tm-hiEKSBcAN88howtZ0TLMjXLarEJduueo84oQodAM3jXtaL2A_-6bqD5yhbmm93tSfING6FMbcdPCDLigqS5JNGT6w=w800-h1067-no


Case work
Using some homemade ABS cement I frankencase the back part that I made from another Polycase.
This section will hold the Pi along with the fan& heatsink and memory card slot.

3AhwvVeSx_-VK_YksjQW41A0dJCejJjQFIZ_Aj59AEvZErZSI2og4nyJUWVHUfuWW5eHaYu2oTagca33PgyUFhCi3q3wJUDqA78j0yMniu0PWpLHX0NfJ_JQ4hbFWHxi5Wi5dpMwrccvqpQYdlnK48PSf19UblYqT3FL9TXWg5989vPx0Kg8WxrcHDEk_yCZMUKXLw0hpt9DCuLH8Z5HqMG67_RmQ9ZGVqF_g33T0gn6_DgluftRmZ4LmaJOt31BqumWWQEp1rhQH4z4vPXms8DreAQ4xBETD4pQ3vsr_GO2Q_v6_ZEZXf4C8ZEajVUC7_m33MzD6w8UyiT-z8pYIKrUV1LsukcKp4A6G19mH8Wna7-5sB2DeH2Pt4oOB219yh0KhL4oUtyq9rByRlLL7R26XSqVwYPqE-pq3lMmI5quF9nVEDbEJY_Folho_3XPLeMKbl-m1pdWMHwvYyzHAxZuTYjJY8XFFHW7gQyjeN5Atv_ABU9WEVA6JJQ8VZo-YH9Zk5_Xi_33YeKExXARflSHZkq-HkXYtPZvBP11qWzlqsU5xRXi4_4nJyWpidA0zGa9NfuAywglLsbZ0EZUDp-6QucD6RsgSG2zcZZ5XA=w800-h600-no


Memory card slot
I went with reusing the memory card slot from the original PS2 for an nicer look, trimming it was a bit of work but the result looks great. The “door” got a few scratch along the way but it’s pretty easy to switch it with another one.

TFV5i24DxxzQwYxswZnpHgF3KUM53P4rNQA9lPYcGNnEGfkDhzhY88ugkgcl6L4P1zdakCxkugGp6u1obBDIETyJMbIBxUAMF06KOyezQbzYWiI8TIOwfcMURUEJ6PK0y8kMy7Wj__EInFw2Sq436R3EIffyAn9us2Br24oREfeA365lXXMJp8qwHNA1KXJ851lMddkRe1aow-81MaadXW_Z1fni-8g3HTEBIH7y9yeksHXxLlb6WR4URCPMHpTVlty1Pzioe62SYdDcfOd-R5upmBut2NbQERjYj0MH26G5CZg5O-2lUAi9CUqJhUHnx-ETk_gDtDjSK1y9FFAnpjWedhoAE7nM7dv4g-3kku-Qgf9uyXKWE9WVp4WtiMhFNa-jMirkK46NXW8TQ51WVdUBnfiR0j-S9SGmxIiSFsppghgD0r40Aoimid5eg2C3qaybfOTEaj63Mz2dHjyrPFuibk2s-Q8ByDJUJYyegdDgOZrTEcmDTlnY4upYfNKYt2dHaABtjtXElw_K-tMJ9rsP25Sh5fVDmDEk0-2HYB5Lc_PpwEUr5XswvS-N_cJQWjBa8Z3EFklDshWHR7mIA2CdAfhhOdIqWc6oKCZKYw=w800-h600-no


I want the PS2 board to be flush again the back so that the fan & heatsink line up in the back part of the case.
For this I need to modified the case a bit to make some space for that annoying group of capacitor from the video lines.

ok3TQ6bfzfnEmqq2jkJaUJd2h4YR7xymUQ6LnI2ATE13vCOzEZgCTXoJloLcYpr9GyqyCRcAr-Whqa3e80TMZZtg4MtzSQ2352sVL55aiIeAP_fqQip1saIncWgISGCLkLCSI2OSV8j7UZqGJpg0zEm18-5e6_VM34CWZMcAuCru8Qyl_YvmX5GSFhMLguw3xOr48sGju6foDNdGC1JyHkx8HkYdfPewKP5SX3zepzsPAWYfmGghoHCD8zbcDMNOa7O6V7xnD5H2xaTZKNsUB3TIr6VaMaF2-HDbRUK8P8K0G8M5p09LEW7RtmFt96mRul4l72vHQm24ZmQ23kXyKtg58sXu7Aqdjg6xM1FgI8mDipiGWNAfziPtDFn8miUe8tCaVYGqzgFhy_qScm-LvnCS_nCTaH2cqBq6qhMXQQdmcDkDBaUGEZmzrui7eZEzhKCGfLBxpF99lOu_bBykQCHuyF5U68-cR4G4RZIht5toaVcT2SQ33BcLyaMYE_N_7-3PzguRVRxapz9bBoAfChbvomZfgFHmIodm_2t8YJlKNlsOnXPOBPVLUVlLWVpBbU-UB7XjDdDPxUCus06hKhLmuZAF_bSCG2tTewOycg=w800-h1067-no


I end up reusing the top part of a spare PS2 power supply to cover that section. That thing was pretty hard to remove though, must have been glue or something.

4NGNWQ-R9fGOzsOu6MLOkNBcLvKAPzBEX04oDJNXDiE8YANWjXJtT7RixnMQYqdv7_mzw_97RFXaG6Irtd3LvvUiJcbVHLn9y4sfxkXQAemQ9LuQJJQ2nzGsb4whAqXIDo2bB9Iz3stawL_QfK6TaNzm3qxkgwyjOKBVoWpjas7DDBH8bO3KHq7KF2N7YM6A2KuhaKFgul4t9AeG8VZXO8M1sxwIlezkhAOdIJ5jla616MRvfmcqvgF9TF7ss9-RZSU7_48_cs94lH-afSL_nUFmvrfehoKAYAhIyNW_1OIjJ2TkCAfGQ55gfA_nXaG7sus3o9UNGGn34eq9y7CWeMg10OkyCWkMcr8YBkwscTeMFWQsxXTt5AJayzP0Xc1cWpKHvy5o9DP7w2VltIpSRqZumid5I5NykIZ54zKCvR9zF4vQ0v6bLq5PihpK-1aYtZeagxuVJlYcFOHX2_HSihkyWG7zSOh9BILwszdjSkZ5JcKOaumxCYdPK-n4nHfUP9kSP-x_wqhdaiIzHa4VhKjQHOozTbCecdyR20x6kP2QePOsRwDRX9BoFblj4WvA6qsB9nSqt6pkHPxH1yd3F0RxrznNVCXXiyTQGVi6AQ=w800-h600-no

p6GtjX9wttb2jVeoti4g5_mrBudIs51p-xDNtfpexvJhXMTPbQ2qX1anaF6TJxSNtE9RGtLoQ-YwY_w-YTKpyjPuaGXMwiVjZ2E8AADoSyUp5EwA6Mmyey_nBq9VK82SM1W0H9L1vm48F5PELcHJOEOZeye1Vgwu8TXTzruig2uW838wxsalvcLFWN8mGJ8jYeWjmsPem2mQyFBkpCuHQ7wXGZnlUSEbW35nipztr2rSU5TxXT6F-4rwvYQ3-E1LjgQcbEnKceg6-uRQc6A9GsR3mh96kcnpINrKRA1_5awdQOXGC6sBfr1oKQ4uIuh8DMF3wBYRHHArajPUbwQeTCHjkynfM_gTmF34F5SfX69FEvvWsv10gJ3c1D2jsHUD2v3Xuz1KZxUHGPAkW71prfsNDE8rFEvip0zuQj22ZZpnDVJKcyNFPbmcZG1cM5WUIORZXqSsow5uGH06mGRhryvAMIjF2yELVpPlFNOgQOSE0wr9VYnXL1sTa17cTLivO7IQgMUfdcaZp5eHUC1oxwnGgEtiBk1u72V8q-_h8Zi7Lpi2a7qAFxqbbc3uo7Qb5Yr6lnci2GF3SE18XxFBjBk_urWeMN8wNckvV6x6Lg=w800-h600-no


Next the fun part will be sanding all that smooth. Let the sanding begin…
 
Last edited:
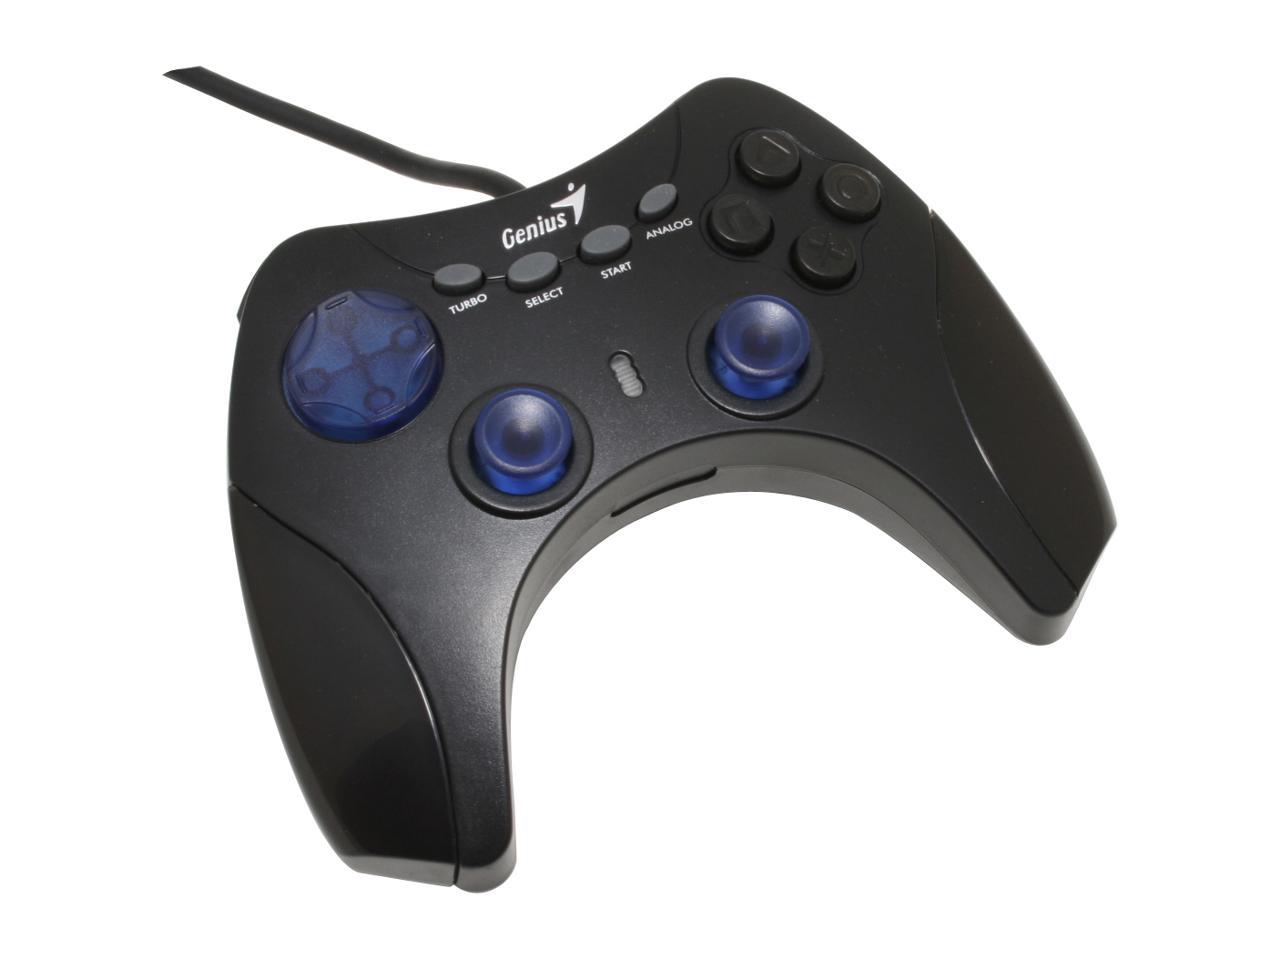
Also, just sharing some info about the controller board I’m using. It’s from a third party controller called “Genius maxfire blaze”. I got it a while back and was pleasantly surprise to see the board was quite small.

The gamepad look like this
26-179-018-02.jpg


And it’s made of 2 boards, the big one is only for the button contacts and the small one can be wired directly with the through holes.

_7ybHZOP5Y4h4SylYTuzDcmr73vpHH-I4SzZULBbcl7INCyWlYT0frdA2JT9Wt50o0YBDb8jgVuMjdWDCUb7WBm6FESbiCrwcLfuUflrYhf-Q9GONbUn9yuys6NBpvW4trlchsuyMDLO37vVnm8lVpkGDPrP2m6d5bo8csrmW70n5ianmuehdk2v0i5qNs013T9yxVOP5nqW0GC4qBa03ZE-JUFd0tBuYBa6M4wgEI3C1FrZnhiV9zU_j3oyGOg8RD4WHjNsEdJa9pNAk8ExXJD17z9pXooJzcaCcKDu0y3kEj8FIyLAeS1kynftNqR8lhFGElA94bcoN9dEHj9HSYXr479F7kNDfzfOXC44tKA2TB7J6BVlD6XW3BQQlLMOHpe-Dz2mG2UgRso91PQkkNTGrowN_aQQOMjwuYOpQxyhwSt0bGdBm0tNMUffYh3fb78qUtaz5GKRtdRA85YeSUFrjxUCSug3lfL8OXvOi05aGY3DQCYNNKXA7qHn8_Y6Dt8fJq0j0ysnOAY7UfD_zTvH9d7BB1g-vP2L5hKRt4WbU9dAqoS_7eoW9qdhztqLtDuBYxbleWAsgskB8TVSRXodbA8xPsxH122N7GbbkA=w800-h600-no

XwJGuyDf0GvSFRo18fZtXpe2tZnY4gElrRfjnbouwfQoxv7uBbSpyXDPmbex45BR9jAg54SP0Hu3aOkLbr9b2Csl7r_9rLAmXjK7Ybl8g5IaIhzu7haeCQlbqqS-S2DICD-FoWjDLe_saMiRe0NY4ii6Z8WW7rkOV_yEc_FYzQW5Fsx-LXUnkYC9UNe_EhCzmcSpd21dQ87RrI6jPUVN15tOQCSTBtmRyYnMGyrG81daiVvaBncbH3Nok5_l_PvXw3qujD0NIJiZZTTmxCY0L9sVX_dteXWxUis3FWWubP1KjFY1i2HzOiNxYXXQTyPqzxr3UKExwUdA5cKMKBJPqrOsj7rLVZH875Rh_jSyy3cDEVSJK3EQtF7WhrAAmlqzGQJfifBWTnNkW64PapFlAeZl7enFazYgGA7RSRtRfA7n-nPSjFUF-NzFsOc1_3tJ3r8iTusn2n7qzMPeaTVCHYIXQxJ2x8di2YkB2G-7DIe1KW-UltU8TBqUk78FPBIIYJ08U4QE_KSS3eAl-cDhLhCsKIRPrPjHaGcNaN-fLrvOCYBdQS4H5J7OXZUfmF7iDyrn3xoLLzo6re8WPIURKEiVj-iAyyJmd9IIgHQx-A=w800-h600-no


This model is not in production anymore but there is some newer revision ( Genius maxfire blaze2, Genius maxfire blaze3 ) which in theory could have the same form factor.
 
Last edited:
hey darkwing your design i awesome i am desgining your portable in solidworks would you like to 3d print it
 
hey darkwing your design i awesome i am desgining your portable in solidworks would you like to 3d print it

Yo walle, what's up.

He didn't put hours into his frankencase just to 3D print it.

You still have no reputation whatsoever. (The front face of an old Ashen portable isn't enough)

Don't get banned here please.
 
hey ginger i seriously want to build a portable for which i learnt solidworks i built ashen portable front face to show skill noah is acting like flax i am not interested in making new accounts on bitbuilt he should unban me i promise that i will not do any flax stuff again
 
Thanks for the offer @ModU but for this project I need to stick with frankencasing as the case is around 80% completed. Still need to go through a few sanding/filling phases, making the port holes, priming then if it looks good painting it and sealing it.
 
So I had another go at setting up VGA. When I played with that 4 years ago I already had a trimmed PS2 and had a few think setup on it and for some reason it just didn’t want to work.

I went back to my 5.6” Dalian Good display screen which was still connected to the LMH1251 board and desolder everything. Re-solder all the cable and solder the input to end of a playstation A/V connector so that I could try it on a “fresh” PS2.

And this time around it worked!

After a short lived celebration I then realised that the VGA input had larger black border on the sides and the image was really shaky, to the point where it was hard to read small text.

You can’t see this on a still image but the menu has that vertical shakiness
wVGHA2hUMKZqQn3q3XBuBnq6pXP4EiJJd_mjJ40OHkzxl86ySibP3YPN-qWH25lJOxOfIVlx5RiAFTReCC4ZNIYPPYvs2s5QqyOme9djH0NTFlQSR0T-5kSjZLZwW9-Xe0w0vqOYyboLrui3GnBQi3yDdvalVAXUlNu1vYb-zspll7Joqrqn7yrA84nr81cTHQFm2KGegdV2GQ1ZK_1oFSdKaiZCNUBF_ZJTizPGTLvzbzMbqPTI5_INnzD4DrbW-BF110HFMiggcXO0kAYR-dY43pcYQ0Lqu-gIdk_EHvj9gyIbFdjDk9aFIjuY35C8SaYUFqYpw602_M_-wkOtIF7x-qwFgPJQyGY9nqzVEWltxgJd2sdRq_QEBM4LAyTeAQnOe-ZaRF20-xvrmaOwRHyJ96i6qaaMxg1n1j-vu17LvDiE8Q36AmOdMF_r5cb5DKBRlHvm17wwCqAZV8XzquWRUTMV_2XS5OcbeUtbcet_iaEj_2gRFZ0vG0VeSF8ahlXTqmDdKGJ1pUgZn0gEIzFEppHjrQ0HceFaN1zgePZOhOZH1uadyuP6wuvCV5iG4hKCRozGzgoUlwef4UgdkLvSNXwT7YOOyruzpLXSCg=w800-h600-no


I went through looking for some answers online but couldn’t find anything about this issue, I also tried soldering resistor on different line based on the LMH1251 datasheet but nothing worked.

Then I realised that guys who did this mod are based in the US and though maybe that could be one of those PAL vs NTSC thing due to the different frequency. Tried a few games and sure enough the NTSC game worked flawlessly, the image fill most of the screen and shakiness was gone. The space on the sides seems to also vary from game to game probably due to the default game resolution.

NTSC games, no issue whatsoever
Va_fRZuMwZ50mP34CRHkohbyf4Vi3chIX1_SqSZsgXRddBYknaSA8CTwFZ7lfqlemdREOIZ7f78ySU8KNzqK5sNB1fybNq8x9foqmm0NuiISRHyoVFbcebO3yINt41gpPSRWYQtvgYLqVImih7Gby2uQwk3w6FI30GjNpTimazfE4vg63xXJvTK5-UYeFqX5vwmerT3JH4Qjzyh1A9b6lWfiAtf-p6dIH5GSGteh2bFqQdJvJbdcmORpSw1qI4Li8_5BnYvY7SuDKnnldk8hJrcHhyZANif-2W-FT79W7Ss5JhLzFlGemxSKozjqzSNN65PL9qUP6SC1tVa51ogimdZMTyrzZhdgLCepIe0LvnSIERD72TCa_K302zbEm8wdZJnAfDQA9ktZSzmKxYCJDVMOG5jz1BbHRA2OvmSsQhmQbDhiNxkV8TvZfTeRf7N_O5A_dS_47ai78DBpDjEQmDRECf5NdvC1KWs3dm43Ea55o8HFdDPQOOIkivqatAXwd4jh9hRFce7mflqTcVmAf89zQ8iFJSyCKaewgeLxpnAn0aWajeGiOCeUifmzU1KDph9sWm90bfKT_Hs5i46xLGLNVoV8t3L1-9JLrFEFPQ=w800-h600-no

KTKPu9daKJe9VJxAGf7PEZZ8cpty8e_x_NOeaBorrqs5ICSNsuFjqI4ZtLx23A7uUgGQad9LaCrQzvpIyROaMsZqoSdzFVWUj0mFFyTQ0JtaeNS5f6Dbr6eV3vljiIbWlDfOyADHXxFAtKPcZ7-z-mHc7Ekm9nmTKiwwlpDjcezd2atKVUMeh5OhXhAjgzM7F-C30qsq2x29M8I3_k0dj6neyYU1XD4iBTfyPP0Ksc2c9VeBIAFfPhxZjWJGAzuUYTx_l-sOsSlVcIMSd_NJ30M4jQapJllUKD09-51BIE_3nd7LK78slTgqkUJlvoLFp5aKEU4nDIQdJMtqWFN6b7sCmqpluVmcliS2rp7kKXFDR4z4QUlgzvPz2F3xT8T02_chf3WwqtlBeYY7a8Q1FZxsnHC3VUI_SgcGqGUrxiByz5W7Tatxl7-mbI3Q3eF_2q3yYbdWC75H6jQLg1aeGaG_nlBkRN_TwL7xulFNyOFTanVJiQntPukFG1fEvGdTpP90yfaAHhot7xoPXhD6xGYUSAI5BqH4a4wHyjPRkbn7VvCggw2TWzgpXbnBv1-X9Y1BsNuW8ia-3Jwd47rBk5nn00k09ht20h8WJLHF1A=w800-h600-no


I’m now playing with GSM which is a application to force a specific format/resolution.
Using this I’m forcing NTSC on PAL game and it works great it's just a bit of a pain to have to do this every time.
The border are much thinner, the image is clear and still.
I’ve read there is a way to auto load a saved GSM config but I'm yet to make it work.

Default PAL, shaky and stretch down image
ek77y8SeGE6eWGVsN1MzIATmarHi_1eDtdEQxygx_XZFdFtnW8f0nWzNhSZr9SqiW1bgJkgHX-fSP11B7k55scgCYOiTwqji-5ob53-omuttf4B0KCBOPEZWepk4ytlP3RoNGT99Ez9v3GT2gtfXb_DSyfBIGEkC1xzf6CdoKtwqBNv4tnYyd68582LtoiV_PlV6yvK5TqdG6IGku7sjgs5jk-fST9W5XdP6lhrvmvuPpEDIXMYa7nmbPkbuOP9_VkTstAwp5DNvmXxVd1JAbweszgg0-TtraiFH_OaBsWnFUw66pdxDfrZu6Sh2K0WhgBNVNwlmz_qQnguTwi9MvOYRdmM7-a_iUbL1k7PK1GeKjH0o1UKRrt1jdSsaZIjlipLCohcPA3dbx7n3ejEUu1tbGJa2UMNIagu7PYn9Xna1nlNwyR43yCXRI16Ii2TqDBA0o8h35zF3c-Jwlrm8zAaoyoC3crLwUG2QV91f2A7vREq-43wRpjco2zNvHKwZYONiQo3mjZpPPiwMh0hSReZgHXHSaJkyNcWe4V9XJ1kHrudbQro13ys6ejwfUvjQs8Y1It8N0DuiVydM_KiZvKmCIZsh3Wv9bAQ-c87gtw=w800-h600-no


Forced NTSC with GSM, clear and correct image ratio
T4Topv6qeXLIFkOdKmdA5OpPNDZuj3YHteaJbub51WAkdR9GWBY5sT0eHrBd6OGkaQcnb19mxpAULxTka6jbjZKsaTmhMFAudQm3aAUhyQkWsF035gj2YL16-cmZNWiiP_qu-g-95v5Opf31Amlbc4NLnudkGp0csaWIfrO80KauSXQacywUjFnOG6vOB1Zmuk0Vz-6PfuaAv3Ls_NS30TyVnwjjXMHXLp1HV1A5JxPChi29cewtOsKmedHaLLXBNXYeZC5tzLtFldhikyIjsXQWncrx6BTsFUhvtmP7bER59XMd_jeKHblhIZwy-jU4yiITGBAwfpS3RFSUSUA5_EB4Rn-AyD4k7E_4GovVW-2-M0RLILTlj310JXbwCrYWAJY4r_rrLG1_YZFy5KCqneU7ghgpzvCIyryy0wK-bPYXlG35NiTVB8PbgSk4Ctj5G727bXs-vL6EgAPD4b1rcZEP5o4DGdpw8G0hBWl9yAHz05rMRJnVdH4G2Iq0oTnPP41DbY4nSt17oTYEPQCsxhlcU9hlM1k5eVUKeiONvVJAXCYcCqDqkeCAEJ1zyTMXDieHSPtv6KmOYyQ4skpXle0UqgBAWK3mULmmRTz9xQ=w800-h600-no


On the image quality side it is better than what I was getting from my HDMI screen but I think a big part of this is due to the screen itself, those “Dalian Good display” might just be sharper and brighter with a better viewing angles.

The only annoying part is this “AUTO CONFIG” message and the screen recalibrating itself between FMV and menu, probably due to some loss of signal.

So based on this there is a few options available for peeps with PAL PS2 who want to use this mode:
1- Use composite to navigate menu’s and use OPL to load NTSC iso’s
2- Play PAL game which offer the option to switch to 60ghz which can be limiting
3- Use GSM to force NTSC on PAL games, not sure how to automate this yet…

Our basically getting a NTSC PS2…
 
Last edited:
Ntsc ps2s are pretty cheap. I am guessing you are in another country. But i got a ps2 for 25 with shipping. You could get one cheap as well. You would just have to pay a fair amount for shipping.

You could also use component video. I use that on my ps2 and it looks really good.
 
Got one a few days ago;)
Was feed up of seeing that fuzzy menu and hit a road block with GSM, just couldn't save the config.
Could be due to using the MC in slot 2 but not quite sure.

Which screen are you using? small LCD that take component natively are usually quite hard to find or are really expensive
 
It depends what size screen you want. A good 7 inch screen is the L7009 display. Here is a link. http://www.dx.com/p/l7009-7-0-tft-l...monitor-w-vga-bnc-av-input-stand-black-335866

There is a 5 inch component screen that has been made. Here is a link to where it was created. Only one guy has access to it.
https://bitbuilt.net/forums/index.php?threads/5-inch-component-screens-exist.1597/

And any screen is expensive, but if you are looking for a cheap screen, here is one. It accepts composite and s-video. https://m.ebay.com/itm/3-5-320x240-...3824?_trksid=p2349526.m2548.l4275&_mwBanner=1
 
Thanks, but I meant in the upper 200~300 like this Lilliput screen.
Those would take YPbPr and HDMI but are just over priced for what you get.

On my side I would also avoid going above 6" for screens as I fell it just become too big and would also try to keep a 4 : 3 ratio which is usually better for those retro consoles. So screen hunting can be a bit difficult with those criteria ;)
 
If you like, you could always find a screen that uses hdmi. Then you could find a good hdmi converter. You have to be careful with those though. A lot of them are bad quality. That way, you could save some money on the screen.
 
A HDMI screen would be 16:9 when most PS2 games aren't, the PS2 doesn't support HDMI and has one game that runs over 480p (Gran Turismo 4, for the curious), and converters aren't really cheap.

Personally i'd go with composite, looks like poo but it's only a small screen.
 
Hi...i am a new user here. I want to know since you're using that screen, why don't you try getting the H sync & V sync from the PS2 motherboard to the screen?I just wanna see if the VGA would still work even if you're not using the LMH1251.
 
hmm, sounds familiar... already reply to something like this in another forum

Update
So for the last few weeks I have been busy filling/sanding which isn’t the most passionating part of the project but needed to be done.

In that time I also received a PS2 79001 model(NTSC) which I order a couple week ago.
I tested it with the Dalian screen and as expect the image is perfect, no more motion sickness!

VGA cable
I use a spare splitter board to make a PS2 VGA cable, the plan is to have a home setup with a Pi and a large LCD screen and be able to switch between the 2.
F1tJujxxnEDrC-mzGcWIkohxhBYbAlN3LBJfHTF3SHUbqUaFqO4mm5GdfVnxtwh_SGoO7-it_nNW6hoXb50E1-V1HQOH49fbH3F4-ktAyt5y4UJxak8e-6FVYBG4fhWotSEd9MwIY8DoKdaVCGzPfAv9rYim3YuNAlJtDLHH_G5kugIMlDQfRr5NpccD-dern9oguq0elHDhvym7M34b1SE46OZxTVBfHOU_JyE4WCIQLMkGShB2rVzuxXBz8AA8fVQSCrI5CflCqTZSIYHx93tXAlea6RpFYDNLPM9EH2mcEFfDtK944g9NPhLjHPGq-os-Lg3OY57qDfto9wvlL6qUloZ0owJLYYe4e8GV3x7bDSDSN1YVId-7Du9HP5shWO3IPNVb-bm_pSoJDzC95B2PDzKtzTFRXWufHTh_N0MXC-WAs4FV3EAqJ2psAHuMjC6UmtLddRZC0aqtJazl5D0YI8HpeZ7jJOYoWmqUgaF3VzwCnyAV-2KW3Iiyz66egi6oXhOWllZahum04nZ2Pmpxm1LkilswOLf8L6RffiD8xFYGnHdG9VpYFey9i8bKfGuLD_j1uNesBxM8TiovB3u3pzMUBou60tdQ1z7kIA=w800-h600-no


3d printed parts
I have also been thinking about make the fan holes for a few weeks, after a bit of playing around I end make a logo for the device which works as a cut out, 2 birds 1 stone kinda thing.

I just made it in tinkercad (I know what you guys think, need to get on fusion 360 but time constrain and all…) then printed it through 3dhubs.
LhBNSBBWl3FaZPwEzi6SbrVfzg434ZMavMVgmPIZHZv2LAKWUH8wdDfu0N3WV3z_UrukZba43LXNwGrPqm7e1gIqxRMsLnJL9frO_i5OqSfvtayxdNmfyN4uontj-IJ1RvvSdR2l8_Kjs5VFLevTzTTxMgegqujY-YLy_tHc97ryrMqMl8Vevfo1sGv9mK3Lu_8iofeMfajGrPQ2RERtqWvlSVVWV6AbqIgaD73rVoggbvUrfHDFe_nUghI09uO5NZ6XR-i4pVhuxhEzrIi3RjjNhXhDF3Ak8QngFaNjxLJVkY2MJNEdixuw1eR-MJXJG0eJJhIeEVsOpy017fGxYZZtmWh6FLGW6YSzWUJTTsry2el4lJzPVgDroYyZjxc-tqi8rZgSbZ251JcVh-hKEcUQw73ClP1GojIcQZfhAwMm5f2_-BFvg6fU3ovntizfWB8Ng0VG2OiCFR3GGnOyW6196vaOV46X7V9v9jof6_ACXirJc2ayiL31rOEduBuzIVTjThxm2jaMSEvo0PJabEgu7oipAUcBJFCAoXxjN801Gw7JGQdLJVQmiOc2QPegr3XBfYjBwYxlTRkW1t26KGXqPFjtmUmYECf_zmenng=w588-h783-no


1gGllN98k9JDLg4f_JMNR8uHT2VJaKLYDoNuxge-wfA_BXtJeo3aJq4FSGmHedMzxYmrYx4gMSCN6sDszPOE3dWr49U9G1wzo6FP5AV9ISaPQOEHaDqzY0chFK8q6EijCdE6TGCJ3I5eZwRj8RE7ml_GbCmtNLgyj3jNlz3IxUvDXH9py8sOmW_IPjNcoa6HycqSXRtF7SrgHjbPDT6fNnRzufkmmz-7t5fvHqLJ887cA8tJn1J6q7W9xg_JrpEPG0PE32ci9uC0vLN9Q58YfDlNxW2zzB7zA28X1Tsexz_W-r9AgcsEru4FZDMTJv3Q7J0pCxH9N050WrWw8Tup05BhZnfUfpX-8v1ZsMjcs72d0wfJXIKZEYDzppi6RabmutKZMZdjomTrjLxXcPFA9kchN3bXqTZBqD_NFUvpydaaAKLkibPIOET44aXGiAcNa4H5rdCnB9pukipf7j6crFwJIjeRBsx37sg1yqybYOc1KUZ_NfxTzcuVyUCmnIVPFCy0XWIo2GBtmUFpUXnEA5IdsNhJan-p6cXYlJF8OQUtF8ys7eo0gobME-8TZZzJTXca-Jew4T9RWn5vgJOsaVAqmagv6LeV7LbZxF5z8Q=w800-h600-no


Using some homemade ABS glue I then join the logo with the case
T5gyJpcC3I5vOEu3b9N9Ch9zWQXFjLJw_Dt1jFm_X6NLMbD9zHon-IPRppera7qSuaX7X8itJ_T2CFJ9PmIsWAJUiWqIXm9B87hkr4HhmZQ_QtOxhYQpQH0hm3s4KH_N7GqOh4jEGLhWPAZTiCgzkpZ1wM2lQ2q-084lN_BAnMGYTZP0Op3EGrD1D4joyEJDhshnh23E8yK6hW5kIZJ_pQIBZwRdv_jiFROowpEf3qHRWLhwyRMrmYmuxL8bgaB0elihaybnX_Dud1mmSW7vpUAtDnZGbBfb_Q7bJlfIT1tFeS82t03dE4qAHK8-S3poyDwB3KD2FGjiZPYSvD_Vbg9rDKPVhgV_6XLadJ6cZ7-aYvxIjCFBF_Sa5ipYx3AvG0fPH9lCD_5wUSJrEe5ZCx6opqRry0OQW0AsBxLS1G-l0ihSiP2xgM5vBD_tOQsb3LvbzXaIq6sBPkyVoQ6Wd1lePb7f6Y1_ulMEUfz9-T_naZ_DnHMMtUfkp9u0QgS_ErLQiwokg0oJv0SPOXCNuIMeB2VHJWvZqCTefzjoigk4DWNdD0y-mEZcWffqATBUy-gDOiU-k8DwulL5h-xuPfITEQKFQjaWb46_zSAdqQ=w800-h600-no


And after around 5 or 6 rounds of filling and rough to medium sanding, it is finally ready to fine sand before painting
0xFeTPq68nqJe08elKIMaTCUwSLepoEvPmVWymCmhguWp3ZKPFDBAmFmUQg3nzLxu8Du3iCQJ3sm6KRIklgydGXa-EbHZakuQgUZlJAeJ6pDmwcgPFGhuHuEHxbbhEOCzIj6z1Hn-_GDpRsfor865YTY3BClegXPnERsXxI-cp83ERdNwbtW_mvrwiVcg8wW27jJtRm3DLJGQYgsoL5inPPpQziwsNSoRoTcpHilwOwH79tZzg1Wr9Om49w9BxAACD2nrtFGAqpUvOypmck5zborHGSwv3FA9TE6RghGLfygsZ5C5Ld3AGcspADO63wIgobBPT5HPxXa138cOJVKscV5RhIob3WtQ4ylNYXp0xxDeNK4wHimCkxGJOrbREuFOz-b3lbpHY3gqholnUxm1uOLqLPogbBv8_hltblpmDGfV6OEUcDQ3LnKCOfiVrHo68a5dN7-Lh-GnHVO9fxmugGhmiYwzuPjVoWRZ_4qUOzQpcDzlB06DJWylI-UPCWOe9vd8KOG5OgnI5T7MsbOr4uc3UL1qrOQYIApnWN_0w1zk1qcUEg84c_F5-HlSKEwDJfbN4Wzqg-q64biBXfRTuhJi4E1sp1OmTFHxSB1vQ=w588-h783-no


Back ports

I also hack a spare ps2 case for the fan exhaust and merge it with the case, made a hole for the micro SD card
QWkjHSEli_xMdQi5oUnCsv9yGAI37H4unc_Bu1EnvxaXrO70OTu4n5TCJEVehWzY1GFPAvVBbr32kyVjivnp5XRjL-Em6yxC03LxBTQL-08YqZFeIcrGn5KYX-4N31aUm1FkWyx_m5A9p1tTTh2IEeS7-oWHq02yMCDRj_hcciN7SZsA6A9On1MdT-R41AwBQ6IIFHxunCJJDu_otHVXlC-B2i-Ul8b79uumBX1bCbeEESBhijlLJ7ueeU0EtcRiVGyzkhdnv5gb6GLa5ofjn5bplOnJA8OoZWMh4yNwvMO1m8pIFTC-ZzSfTjp9Hvv821RaiTEfgZSJ3rm1v1NECj-rMWmHvc-zOSpKpHioIFpEt7qMEIFBDpaNv14YpSXhqTKVgi36EYZhFIb3AM7qBKEgro20VQcEQkrNRjOA9adqqL86IOb4VQuE-Z9Ci3FrnZ2Au6E4j8_khXTOkObaZP26AlErQUh-PNIZ2XHH93zTmrOwiCfhcu5zz_C5oIWauwryUeDQvVzH1qztxnktnz1QmoGrCjOxoMV957i-J_afuVq90BuA5XA3_EHODTgO-LpruDSsMC6udWO5hR6nhRUYDbrEI4i5E3WBW2gRWw=w800-h600-no


and holes for the Pi USB and PI on/off button
-Tqa0jVZhNj8SmVz0QicDDyoJvOqwUn6SxlRqxhpxuY4TiDvGgUKPWRNBERC-Y3ORXVGw1uIUxAMDZrdz7cWwozTDCa_XMAnCVAexQ3_QiEjlWkSfPDCQbH5OdmTEmlBxKe15OxT1hV0ZeVyLUwSAy1ceQUSA60mR5gVrkf4yT0g90_29aJ5MWxfU4bZFzt0av0RhCbhwIYokl-YJlDWq3K-h6VlcLmLSYaw7GlnJdTpfI_rUce98IzMlBm67Aro9_zweXr0cPQ119b5qhJjct-8XWZZ7fHRjfi3ek7kU5O2xzjOMn2uMrptekeTIVwd6JPnqeA5qwCy2xvmTNW08eRpuZrtgVwye1CjTbbqU9njdCzvfYbZe2cOj93HKw0yslqsxDXJT6ro1k53dGRru3w8vDyGGxrhnKXcnFaFmo48pGzQSpYsES-sEiJ-N8O0AIi_1OPvly7C7Zj_7t9nHiMhZ0IvPXOO3pSpb-bFL4UgWvkyi1mW_osXj7LHtGX9OW7A-DOuItPDtwqSntSV4W5kSXKjbzcSQlrJlBcBDvbAto4EkaU315N-rF7nrWuQoKK6XkSQAH7IwrkVLVQcgKbaS12aN3o4aLWyofE8Ag=w800-h600-no
 
Last edited:
Back
Top