DarkWing - PIS2 portable

DarkWing

Member
Hi guys i'm back with another "winged" ps2p.
I don't have a name in mind for it so i'm open to suggestions.

This time my goal is to make a more compact ps2 portable that I can take with me and use in my daily commute to work.
To make it slimmer and lighter i'm going to frankenscase the button to the case, use a slimmer heatsink + fan, think about another design for the disc drive and use a smaller screen which as a better image quality.

Specs
Ps2 scph-79002
5.6" Dalian Good Display and VGA chip
Genius MaxFire Blaze 2 controller
11.1V 6200mAh made of 6 ncr18650a cells
Texas instrument ptn78020 switching regulator
IBM Lenovo 05K5494 Laptop Fans + heatsink
Optical drive with extension
for audio a 5V mini digital amplifier board or a bb mini-iStereoDock (thanks to AngelArm1110)
ZN40 from Polycase

I'm probably forgetting some parts but that the core of it.

Diagram
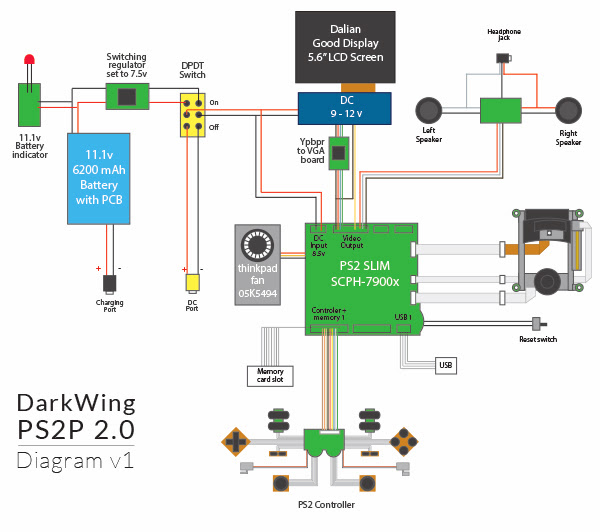
diagram-v1.jpg


Design
Design wise this is what i have in mind base on what i'm going to frankencase.
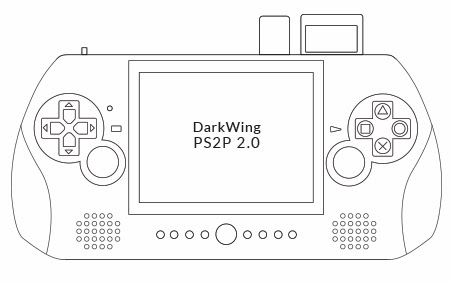
DarkWing-ps2p-2.0.jpg


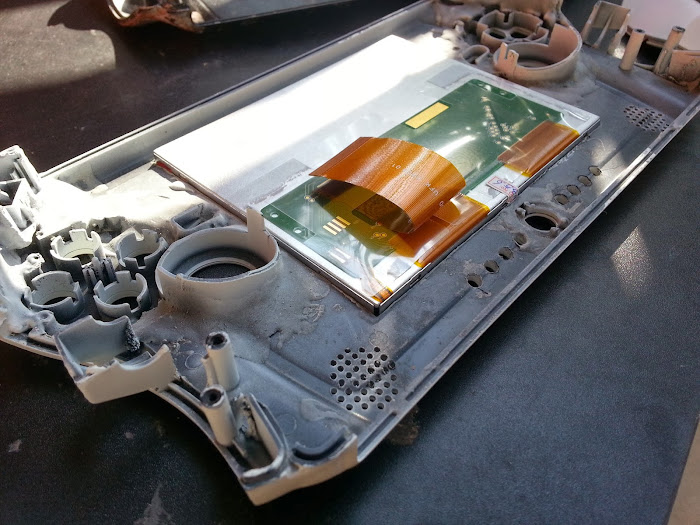
I have tested the screen and find out that it can work as low as 7v so i'm thinking to step down the voltage for both screen and ps2 board.
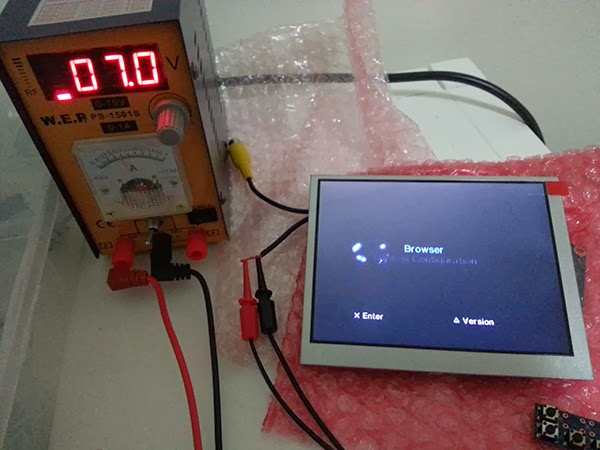
screen-test.jpg


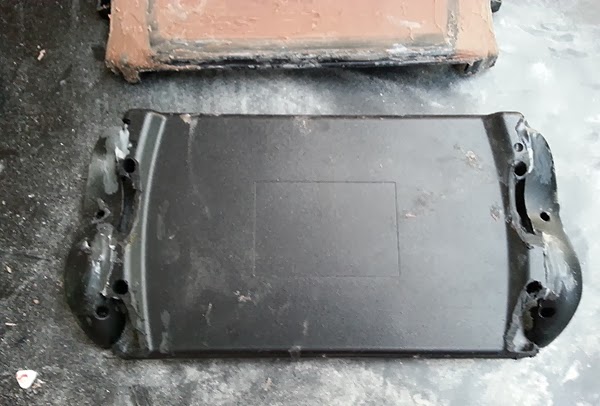
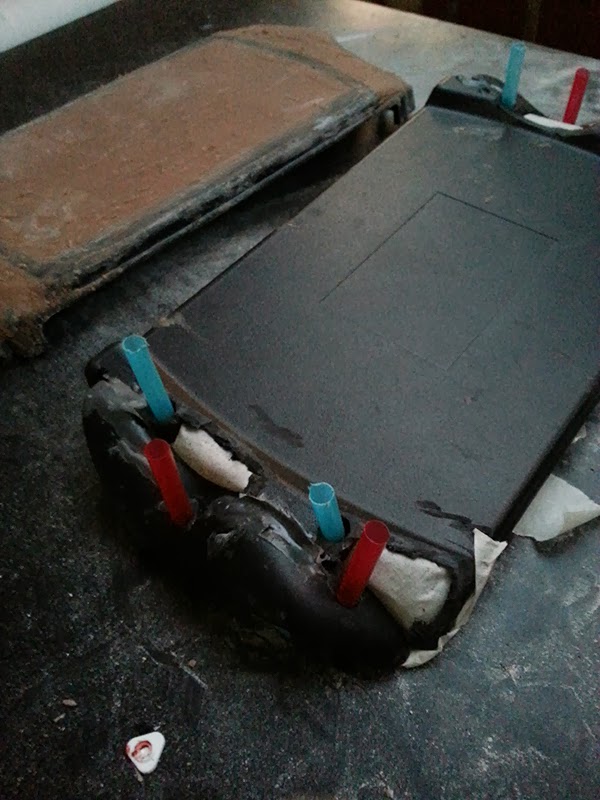
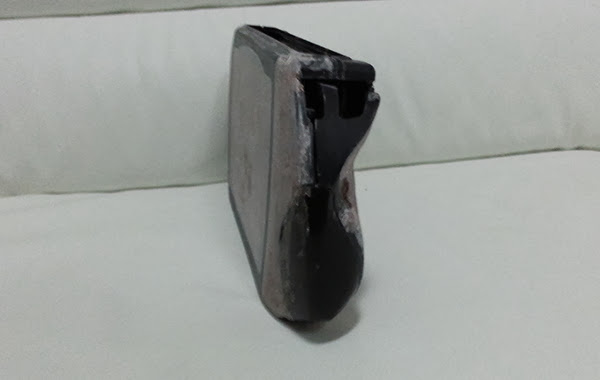
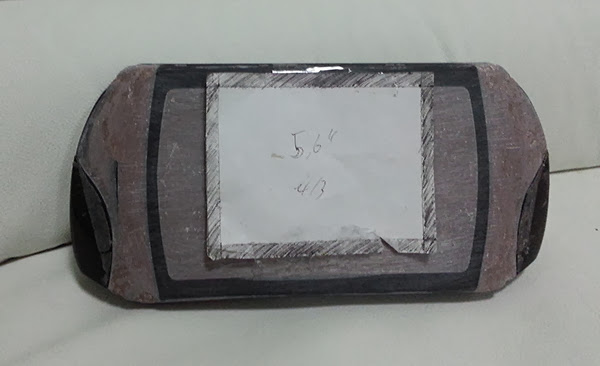
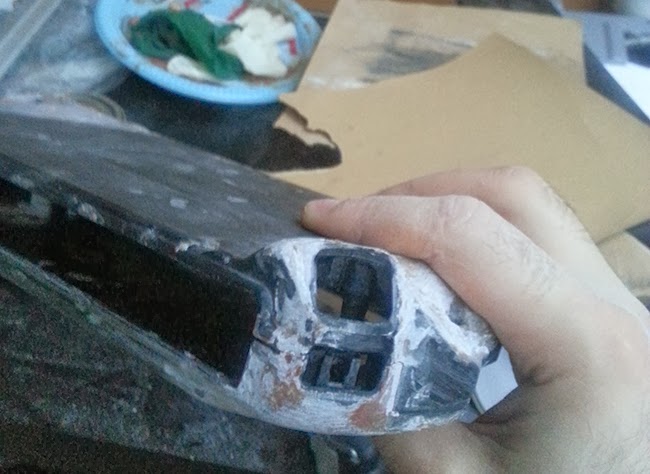
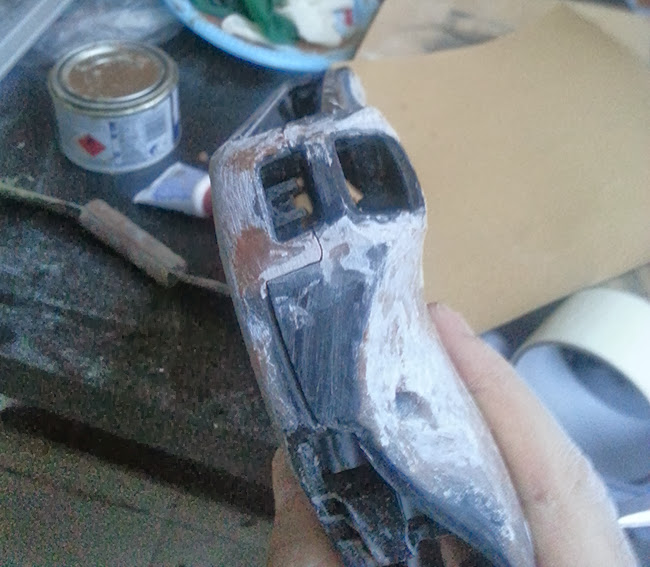
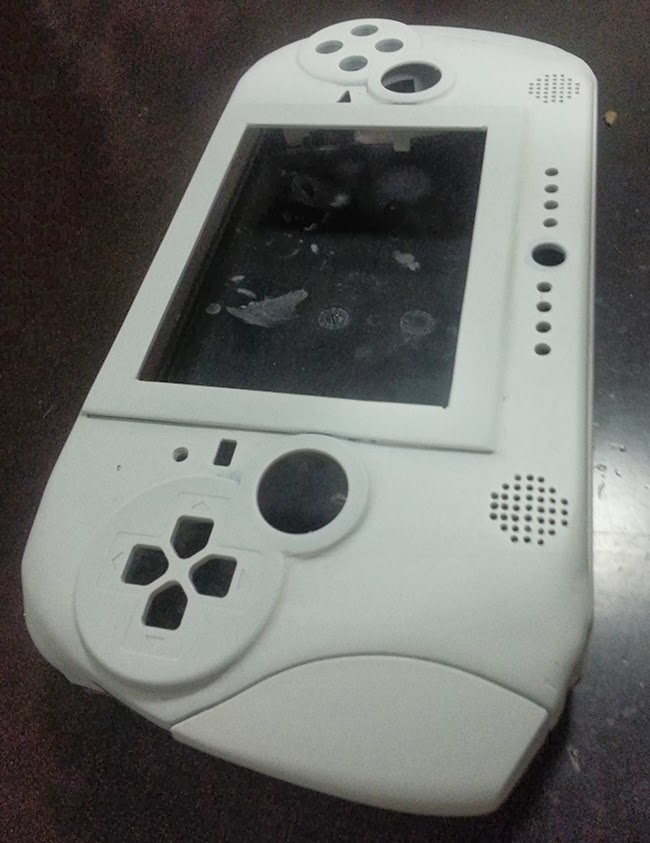
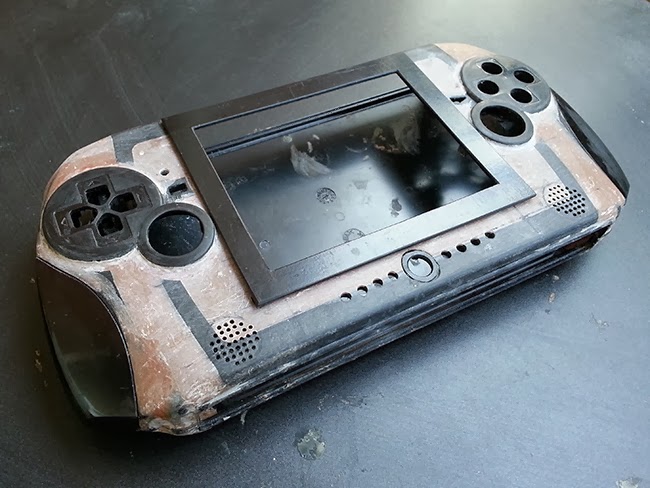
Also i have started working on the case, cutting the sides, applying a layer of jb weld and a lot of plasti-bond filler (similar to bondo in the US).
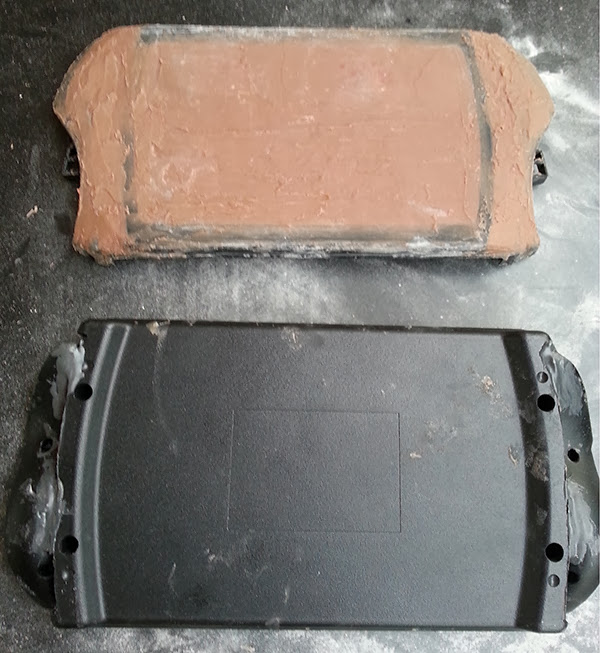
01.jpg

02.jpg

03.jpg

ANd after 2 hours of sanding this is the result
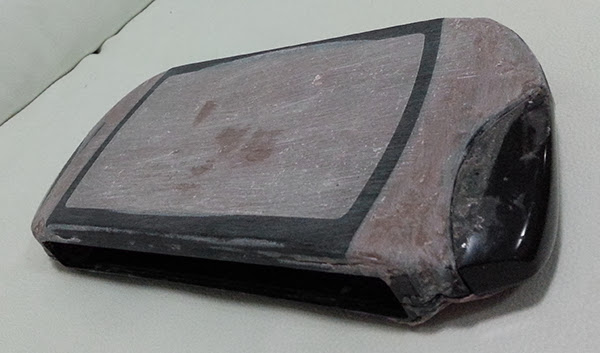
04.jpg

06.jpg

07.jpg
 
Love the shape you're going for there. I can see that being very comfortable for extended periods.
 
Thanks Kyosho.
I'm trying to make it as comfy as possible, hopefully it will workout as plan. :)

I have frankencase the shoulder buttons, i went for ps3 controller shoulder button because I find them more responsive and i like the trigger style l2 r2 button.
01-shoulder-button.jpg

02-shoulder-button.jpg


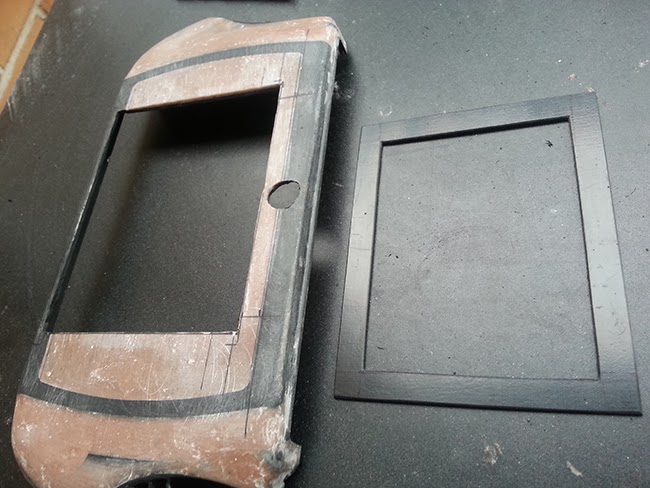
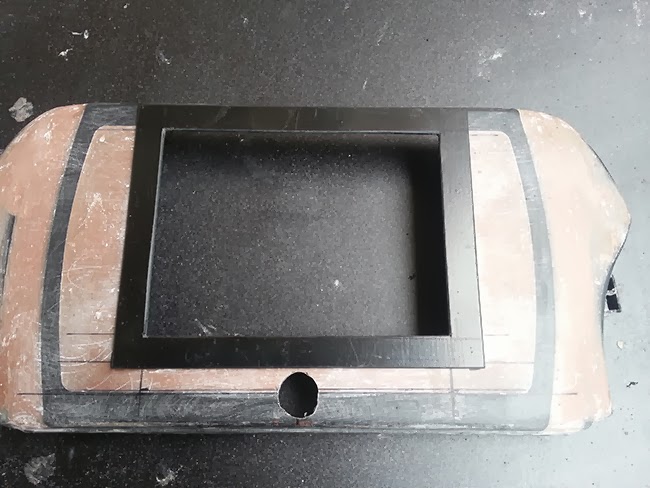
Then cut out the screen hole. I actually cut the exact size of the screen including the metallic parts and i will put a frame on top of it with some epoxy. doing this will save around half a centimetre and keep the screen in place, it's not a lot but that can make a difference when putting the whole thing together.
screen01.jpg

screen03.jpg


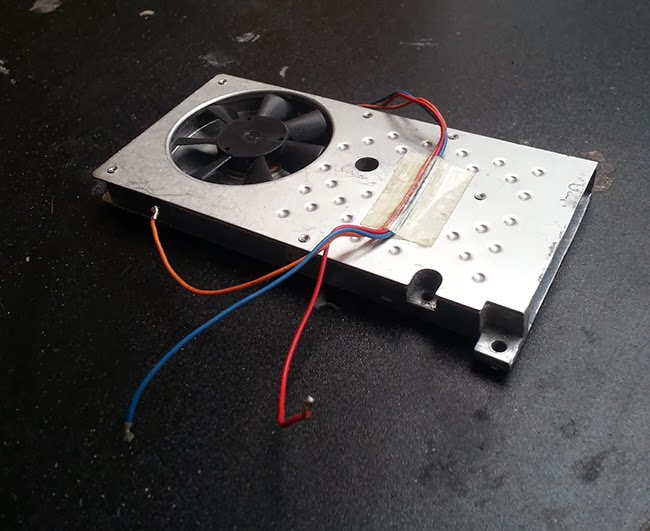
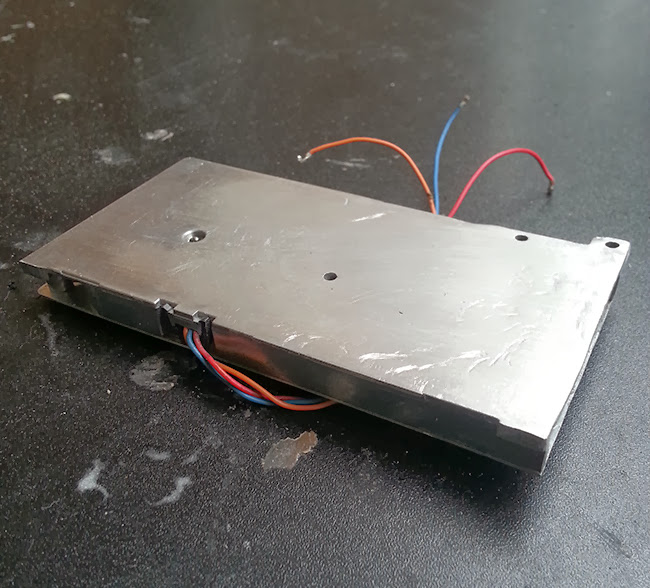
The last thing is the heatsink + fan, i had to trim a little bit on the side to make it fit in the case and cut out the base to have the heatshink laying flat against the cpu. Removing the based was more involve than i thought but it is totally worth it and now the board + heatshink is around 13mm height.
fan01.jpg

fan02.jpg
 
Quick update on my progress, the speaker and option button holes are done.

Just before cutting the space in the case for both part of the controller I broke the small aluminium piece that hold the tool in my Dremel by steeping on it :wtf: . So i had to use the unreliable technic of taping the tool to make them hold inside the Dremel. I don't advise anyone to do this because that can be pretty dangerous but i couldn't wait weeks to receive that piece.
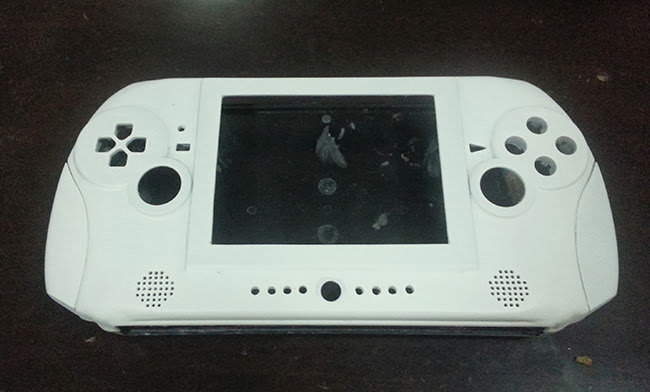
By doing that it took me twice as long to cut the pad outline and after a good layer of jbwield which i let dry overnight, 2 layer of filling and a lot of sanding i arrive to this.
03-sanded-controller.jpg


I still need to sand down the frame to make it thinner then JB wield it into place.
I had to remove the top screw holes when cutting the space for the pad so i will need to make new one on the
sides and need to do some more sanding with a 400 / 600 grid paper and it should be ready to paint.

The next thing will be the back of the case which will need to be heavily modified.

I had a chat with one member, over at bacman.co.uk, which was asking questions about the test i had done on the Dalian screen and I though i could put that info here too:
During my test the screen was working below 6.9v, all the way to 5.6v at 5.5v it shutdown.
In my previous post i mention 7v because if the screen goes lower than 6.9v it can not be turn on again if it is off or in stand by mode.
If the screen was already in use it will go as low as 5.6v.

Also this is based on 5.6" with a GD567M03 board, different boards may have different voltage restrictions.
 
A quick update on the last few days.

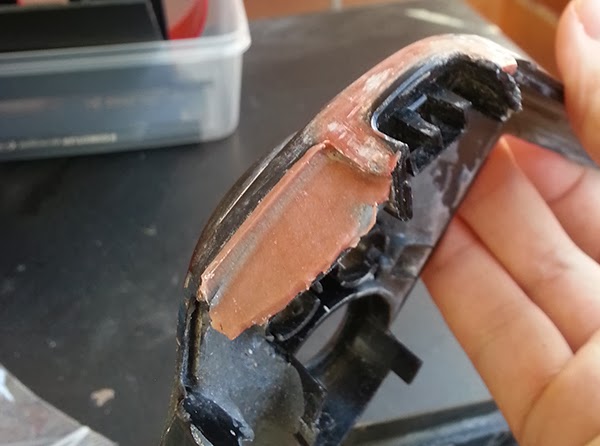
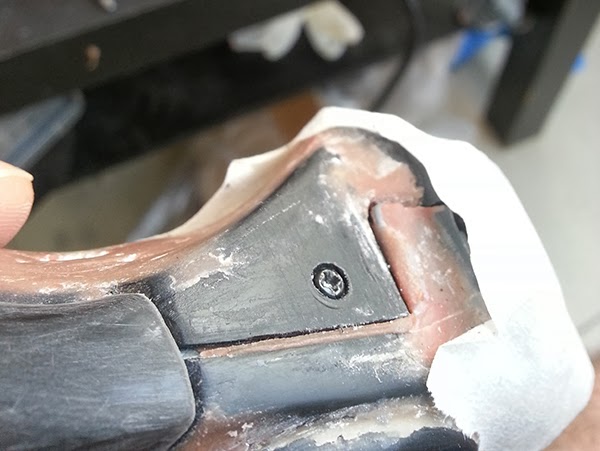
I had to make a new screw holes on both side on the case to be able to hold the top together.

I used two pieces of abs plastic that was cut to fit, I then used some Bluetack to hole the piece in the case so that I could apply a good layer of jbwield and let it dried over night. After the Bluetack was removed I used some masking tape on to protect the sides of the top of the case, put a good amount of filler in the bottom of the case against the side then just close the case to end up with a nice negative shape of the inside.
01-part4.jpg


Then just carved the shape of the screw head and drill through both side to end up with a this.
02-part4.jpg


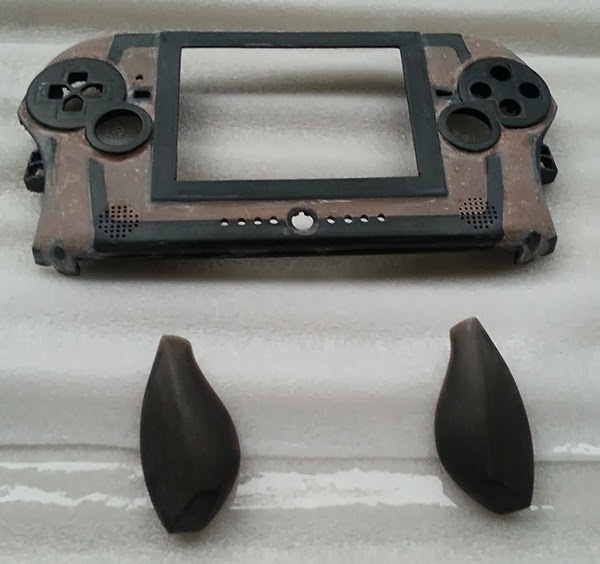
For the case, the frame has been slimed down and put in place by two layer of JBW. And did coarse, medium, fine sanding on the top of the case and only fine sanding on the side, I lost a few nails in the process too :p.
03-part4.jpg


I went for a undercoat this time, because i don't want to go through the same issues as last time.
05-part4.jpg


A few small scratches are showing so I will have to fill them and do some more sanding.
04-part4.jpg
 
This is looking pretty sweet so far. Keep up the good work man.
 
Thanks Zero.

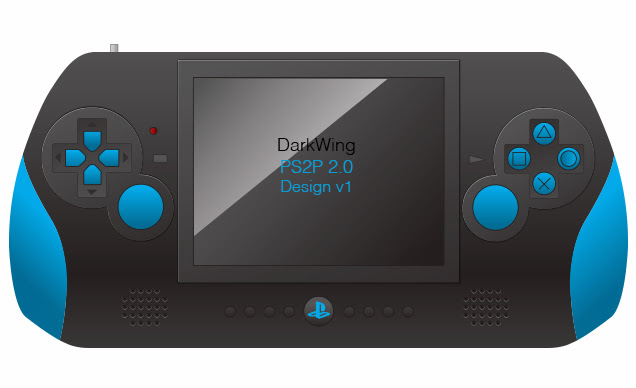
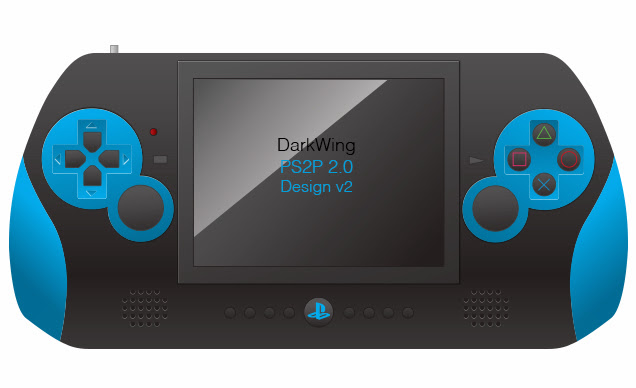
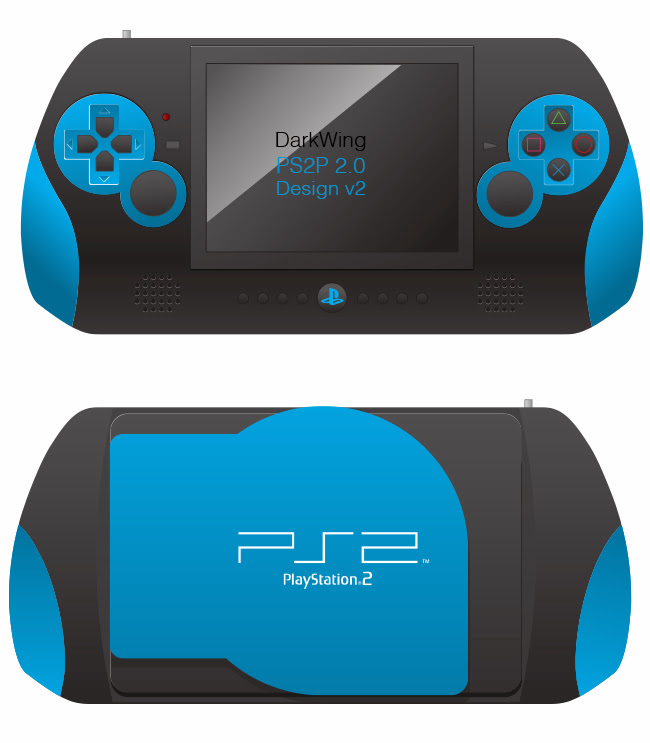
In terms of colours I have two options in mind.
With this one just painting the sides in blue, the body in a glossy black and buy some blue replace button from ebay.
ps2p-Darkwing-Design-v1.jpg


Or just painting the the control but that might be tricky to have an accurate outline.
ps2p-Darkwing-Design-v2.jpg


The next big thing is the back of the case, I'm still trying to make my mind on the best way to go about it. I could reuse the original cd tray from the ps2 case and just chop off some part to make it smaller or go Ashen style and do my own cd tray and lid. The latest will take more time but it might look nicer, if i can make it work.
 
I'm going to act like I'm very artistically-inclined with this.

DarkWing said:
Design v1

I like this design particularly because there's something that makes this look sleek in a subtle sense. The uniform black-and-blue theme keeps the look clean.

DarkWing said:
Design v2

This look feels bolder than the previous. It also looks better, IMO. But as you said before, it will be difficult to work with. :confused:

Good luck with deciding on a color scheme.
 
Why not just make the entire thing black. In any case it I am guessing it is better not to recolor the sticks/dpad/buttons if it isn't necessary. In which case the 2nd design is better.

What you could also do is make the entire casing blue, but make the grips black. (in effect the grips would match the buttons/dpad/sticks)
 
Thanks guys for your feedback.

I just placed the screen in the case to make sure that it was fitting properly.
t-QYTgAwOIHCupAmRpiBa_2urkE4sU-3lUXtbKzukkk=w700-h525-no

20140105_170425.jpg

When doing the case I have done a lot of this kind of testing to make sure that all the part fit in the case.

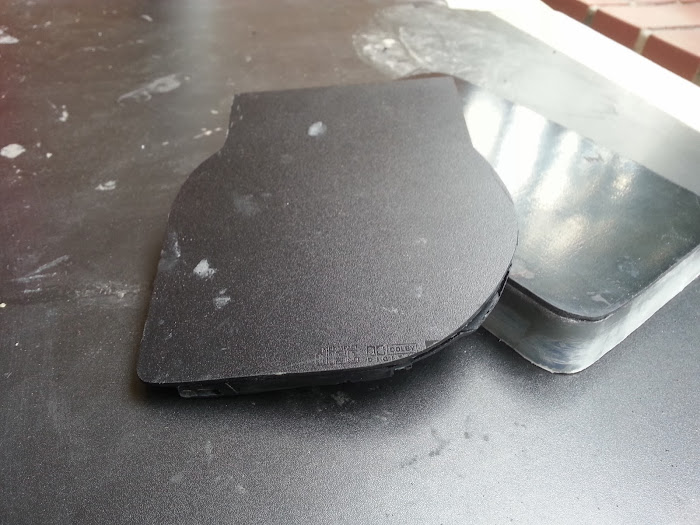
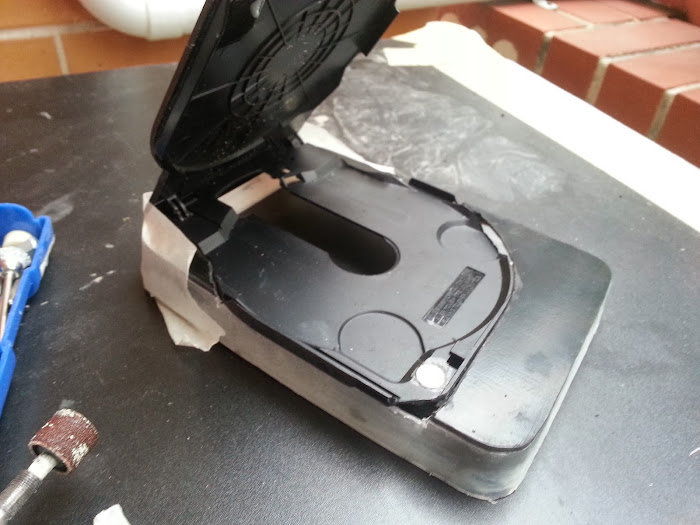
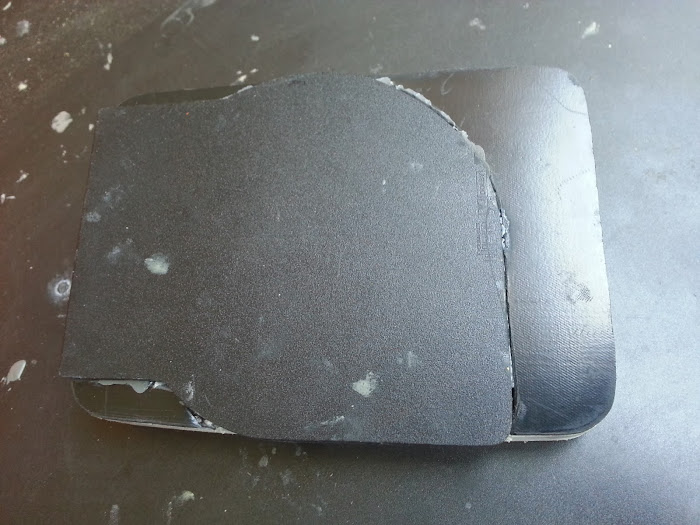
For the back of the case I went for the original ps2 lid and modifying it to make it more compact.

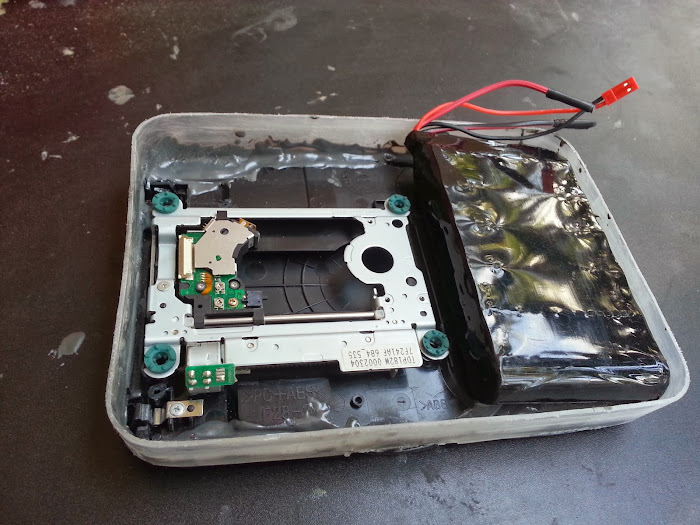
I had to first make the part of the case which will hold the lid and my battery pack.
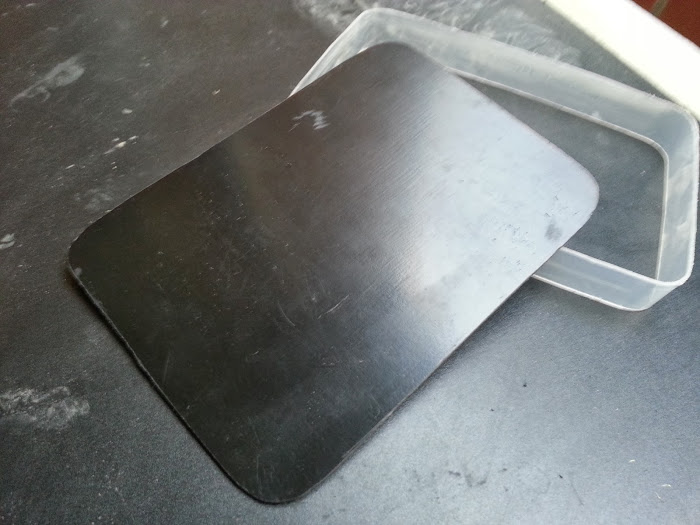
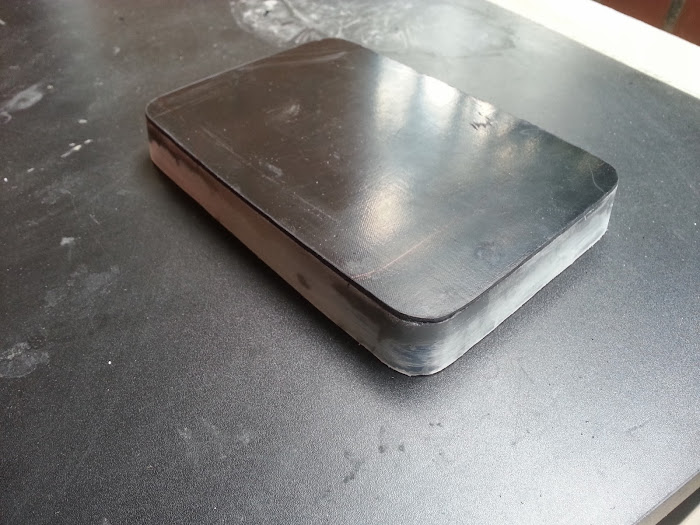
The side is from a thick Tupperware box and the top was cut from a 3mm ABS sheet.
20140111_191346.jpg


Using half of JB wield tubes to hold them together and sand the top part to make it follow the same shape of the side.
20140112_173703.jpg


I endup cutting Cut the lid, I kept the springs which make the lid open but remove the closing system at the front which was taking to much space.
Instead of it I went for a simple magnet to hold both part close which is in the bottom corner.
20140112_173715.jpg


JBW the lid and the case after cutting a hole for it.
20140112_182014.jpg

20140201_114154.jpg


And a picture of the case with my testing optical drive and the battery pack.
20140201_113921.jpg


Design wise I'm thinking to go for design 2, after a bit of research I'm a bit more optimistic into making it work.
I have done a mockup of the back of the case, I'm not quite sure of the best way to have the logo on the back thought ( decal, sticker or painted on with a mask). Any suggestions?
Ps2p-designv3.jpg


I'm also in the process of looking for a new job ( I can't stand my stupid boss anymore ) and for that I'm redoing my online portfolio so most of my free time will go into that for the next few weeks. So my next update could be in a little while.
 
Hey Dark Wing the portable is looking nice
Do you know where I can by one of those dalian 5.6" Dalian Good Display and VGA chip you used-any links?
 
Thanks Ashen, that means a lot coming from you.

DarkSlkayer:
Thanks, the best place for a dalian screen is aliexpress.com, that the one i got and for the cable you can shop around between amazon.com, ebay.com or dx.com just search "Wii/PS3 VGA HDTV AV Cable". I got mind from DX because i had to order a few things from there anyway.
 
DarkWing said:
Thanks Ashen, that means a lot coming from you.

DarkSlkayer:
Thanks, the best place for a dalian screen is aliexpress.com, that the one i got and for the cable you can shop around between amazon.com, ebay.com or dx.com just search "Wii/PS3 VGA HDTV AV Cable". I got mind from DX because i had to order a few things from there anyway.
thanks
 
No worries.

I have been looking into mod chips to be able to play imported games like Suikoden III which was never release in PAL. After a bit of research I came across this chip.
HdQDeIIbz9c1IlYAReWcpFEGRy_py6z3PTHnyrXEx1Y=w700-h623-no


It's a Matrix infinity clone like all the other Modbo version but with a nice bonus, it has a customisable booting menu which let you choose between 4 homebrew app like Open PS2 Loader, USB Advance, uLaunchELF and whichever app you choose to setup. This menu can be turn on and off so you can use it or launch CD/DVD games directly.
You have more info on that page.
This page is about setting up the launch menu but beware of the google translated text :p .
So it's basically a mod chip which let you play imported and burned backup ps1/ps2 games but also let you load backup games or any homebrew from the USB all in one. Well that the idea anyway, now the tricky part will be to solder all those 21 wires to microscopic points on the board.
 
Just a thought:
Is it a good idea to have magnets so close to the CD drive?
 
Nah, it's not like a magnetic disk drive (hard or floppy) or a tape. It's an optical disk drive, meaning it uses light. So, keep all incredibly massive objects away from the laser.
 
So after a short break of… around 4 years I finally got the time/ motivation to finish my PS2 portable.
I couldn’t stand seeing this half finish case staring back at me, begging to be completed.

For reference this is the link to old post:
http://forums.modretro.com/index.php?threads/darkwing-ps2p-2-0.12561/#post-157090

Anyway without further ado let’s move on to the updates.

Case

I’m actually surprise after all that time, moving out from 2 places and being moved between different boxes and squash between things the case looked almost like it did when I was working on it.

This is the case as of today, did a bit of fine filling with some Tamiya putty and sanding on the front. Cut the back to add a section for the Pi and the fan. The back will require much more work to have a smooth finish.

All case parts

AzDgBMStQtlFRWYTX9q6Pu0s1R1l5DLZaDvLB3WuH6vPiIWhU3xFTepjseVdjNvK78SCWW3RNnXWlmNsLJY2SyofSc_VU3WD-s6GoDebsl9zJ6kM3xjk_GehDR_MoT245Ed2GaPrwET9KT9RcCQQzdCOhtSb8lqdb0bAeSLaPhjvgI5MraR3cuqMusK8uO6Tv2z6MO404laD1sApQm4MramjSOa7_hkwSnAnPwuLgeeFBMEUJwnjsFNRqDknkJ_Dnm2yJdJEhT6C21EQ-sfeSAkYp6lcwVZezH139MnGvS6zxyEGz3fewQOLtGcFcTtHWyqVXueYA707ElHY9vb8NvgqD5wmYSvhOaebDtxuyq532BseN7d4nhL4jh7446G4neLZkszbIMTuIhtxBwerxQKwOe7GkA78ZjUF2n_d9SVuQyPrxJ0EL5e7kir5BeTEBYq25rW7zxzorOgx6XRNm0H0FcGcGtI84FpzOB5OEPlhJokoy9JVRKGsCxJPA-k28lr7fM1iFoPrHNKf0yI8zxIUkW2RlMkoPeBo7HtVA32P_kpJnImfbwnh9VkqvSMeRGvL_DkytI8zY1v3suDbk0HZtPQCahMneqR2y-3MGA=w800-h600-no


Front

XSqfXPTpCJ8jYorBK11hQz_xL2AbVMSnWzsI5kb7aSnskDMjv4ygjPYUHLpLaVEN7VVWfuM2n4onJ0ZbjsPta4TpfqZKsAeX3l6Ccww3tlHfDrIexfn9NW5OWZSw7BquYdpUvMg7w_HrqoYxs4zrgkLzfjqNcdSSPbqBjLaUhaj34llDvU4hid92HKy8uTG3WKKI5XePJcj019LZ3-VtJFhFB9WfHQWjkh0MA4Vph6Ag2kGTPRxSY3bdU43lueLwO1wdOUD_AnzHqy9Y3dWVNmkydKM_3FtbcspnPUuHYq_ujrLv0SHeYuO8LFPOuRAkGyQTJEFUhvOq2V1PNLr3drCT3dDkx3xPAK2HSYPHUbetNCRGFTHAaZTcmzCfYbjXQU6p0rEtarSr817JqFYcoa-qDehyo61xe3dqi4BPl9qgxq0ZeAcnW_TASDB_fRruAA7HsnYIKUj5rT9lmBIaI2GVYP06RfLr96qYNUULQ6_FlKix3jCWGDrHvkqWw1mApL65SxpT3p0h_4uxAQ_DBD1pfJYeEtcRSMPoW_hc1cx-cmDxhf2NpwcBJn0dNmbljCExsC4WknU4eMnA1nuAfKrLauud4NHATKgDMbzVWQ=w800-h600-no


Back

zbEVEt90NDgeku2PisR-x4ZLzWtynFrgtJoeJS4Ps_AAWusw-cg_844FAM0m4w8NdWOoTWI0KYRHzSotMc3i5tz4qqgRYIMeiMTnomWHUHK19T-JCFVgEcfwF5KrN2wArLlu8mQXmuNjAEBiqzS9u0Ci2RZw8ksA4Lnmb_Zh3LnCZFlUEevO6tdX-TWb1Y2iMU5rE2iS5msFcgteGLStlzoUvczW8sXaXYozu1gwyQE8wUZ87mAX4SLzyaH0zWhnUF6yNNocacFatHpFtRhaK1J3g-Wfz378NQKk-2rIOTb9JMdHhzSWHZLN7VEjhrG23J4rOwQrFtdmjLxhfMMFbmza9YL_n4sh5LxkAw4RYPbHVLvDNzLTxjOB1QTUs6PjFkn3ChHBS2W5lO8YzfbL_HKljVLcUf6dfGxHA8kidM6TLwPA8TCbABN1EY9NEpd1cTwKGpIfWERCKTQ31c3afdWQhYOx4Ig8U9oYMH8kkRKdjOhOSTMNgB8bPrQEPBqEUM8shQiVUtm8JSvYLsDtdm8igGJxMHAxFRrsseH3wRxlbAa4yfq3lf4Zkpysbzdb34JXzgNyQlM9rn4dKJHA1cz5vXzmEJrV8pZobiFHIw=w800-h600-no


HDMI board testing

I have been testing one of those PS2 to HDMI boards and was quite happy with it. Nothing magic going on, just converting component to HDMI which look a lot better than composite. It’s hard to see but in those photo but the colour look washout and rendering look blurrier on composite.

GoW AV

wqFQs1bEjnEGDIXnpZgYQvHDkGg31itmNBPlzJpy1b-4YSvgOoupIbgsYBvOoYDlhGuOW42KGlYC8fyS4-c0kKWLUlHRyCkm9r5VOjX_4xGxzlyVKNbzMibXOYgAdGPwUsMJ36NH5zr47UM5pLj3Mn6t9W0UiG-WKwyeexcR3nVbaVaRDIA--wTrDdh1-QysgOtJjHBfdawmxMHeaBvKZk4O8an8Feeq3E2Zk56n9pi2hldSMrRJqBwPPD9DM7tTDUushWS2sg98em1R98nDXPNl3STxqIvB_ooWMX6V1pmDjo8P3LXb7BAsQKTu4qpUjNIvE3CEKB0-mtItUSConZVmdAK3nFyCFf5qMHTi_P6ULVTJyIRBXJmFr-7wTkAduBPpJxKNqmcQg9M2atP2Cc6nMFvi83RPrXSl4tJ8qPb8JLBAUpfA78DX5iujDDIVHS_424gSxqXcX8rglTdFeH-qu0JXIHAPK8rMhqK-UZTpOqRIq29PRtErD08oGBt2xAR9IS8T_VrDUtcOIhNWvsd2swXHEJI7wnL-jUToWLpVmQp3M35e5o_HVKU6RPrX9vp6e56Vb7R6FRowW2FplANsjld5C-d5yp42tLE2NQ=w800-h600-no


GoW HDMI

B3nkYYESZgKMSi2B_y0zlGyyYDuBKlMrroKrXOXCaCYQtROaLjGRd3relwbqHaDjPt9yJuLb47xpZrFX-ZcwuSDk1wQIp7_eRAJ2ksUVm0tiXSf5M-s-bfQn7trr2TUp-q1v46mTySg4WfU_dS_3M3AFnOX8pq2i5yaSLa4i782cO2sP6H-uFveWnwD_FijFwwAwSt22ahslfsMjBRbm2ikgdqwq2osL88njkWGeeMAaXfZYgswQDAAofKi7CaEWfXKIp5iH6YF6D_aPfbe3102FfH2UCM0qNionzFp_336mhvUyK0qX1lukvQDGv72mRsEJAIjFJDVHub2X9CSpMKpZtdxAZY6SKNvkCpsu0IfO1k5qLFfCEwX8M6qygVcvIID7eUYUx5VBDnvkZVobeMgzPGi0_pGm9dIXf3w4a0N5E5dXJFDaeuaXwCC0e7gjE4rnFEEjYg1kETGmDRupx54dB61xGedwQjFUbPL76ax3VNVwHzwb-M75QWAjorJzPIqX_4yMRFaai4O88b55ueE5k7fUMiDH7iZT5jgDmLqfodUPt-byjsYMcdqdLB-_TwZxo4UNvdnvng5NQDPdnuj3EB2unY85rD2oga3YaA=w800-h600-no


GoW AV2

WNKrq5fDw2gm9MwVd6e-xozh5zOU3FHRla5oSuvK1fizdVOhebtbJZesLetkVB0FbWbRuCs0R413OVVZCpfqhqMv0C_DZy4ZRvVdBEBUyQF6HykWONFn4DL1jGcSEhYiHNPV9ZclG5qhJWJI4UFD1vtUIFjZLlAU3KBwTT1ngc12kcuj4cebTx5cVfA_XNCEDzPgn20aqBF79rFjHEimqSFp5Q3NnuCGuHs41Mh1qBye_LqL_iiaEECMR19Vs7WpRthaoXfpfbO7mxg21K0l_BJCRkG5UwXz9zldBK9Fcph4NWxLAawFtUdeVHP89hoA7EH6bG7R0NdMjeCk2ju3SIg0XjiQPNYnca4oz0EBQTzx8u3ZThgiPhxzVyDd6xOu7iBm51asDtsRYIazkaAjhTcT0souE0Dm30rU2klx07sb8lffZi3UcXhQ4mzUgB-Omsazgi_6af-6CfizV5LJ4mHuFA9gwPBW8ldOlBI_lUo3Ucn85UVeE9TJUxNri6b6000fgh9TFAzavMIMBj8KSfw6sMIdq5CEdDO2ypRURwpPuiQrpfe8FO-k9NkGSKXKPDp2FXGKPqyBoKPrk90LtY-IvcHIC5DeYBnsmoWUjg=w800-h600-no


GoW HDMI2

EX03dlhHxMau8jTOt91pO49t2eH7SM1qnElT8G-xhrdqvm1tWo9Rmm02eoPDeCDcS_R6qYd8HqQ6wtm8lMuINNeq4axsuhUYTkK4Adw3ZEQA8eRVzMn4l-w-OpvmjUYYfeOVXhZnpZa0LPvEMqxXqWgsLChJ4v9E9rw6oDhJQDqwoc0aW7-oeIc362yuObuD1jgPUnkT4w9Od0EFTz22ezVPyVS7m-VxWSAquClaSfEpr1P60Q94i-zZvJxg46akui5CJJzw9UKWjfNpMDRLyzo2-4nrheibEd2j6j0PkG_PVxzNZ4_n5vhGOi9Wb61si8lleybQWpbrD3_CMjuIt_WNKs50T0GWDWoi9kL_Hljdta6Ryb3R-BmCilCRrplLrkbyLTGVYRNtfH5sEycEtMG2Fp1gVRxl0S3CoZoBz1dIxQy8sTZPWTNKJH8PlgZ2KvFGgqEyf1-YjknT4XrH9Uv8NhsK7_SxqWPsDV-x-OXa3iH8H53g2xuiPYYblcyKYj6ooc_8mfXaEM-txgeAqQ_B__D1b7X_mL0ae1wGhFIDXS1zjzmbYRetZdU1dQjlKauMo014vsboCGITmsBJOmehdnmCjVNDSq5lnHsqCg=w800-h600-no


The PS2 to HDMI board

rZMaw_5OnuAnbosoq65pqgBYaj4wpZGDgieZmZ4U8aEAuza6dasOYzw1gJTXWSLtyQxSkt26x-dhuGzSzqdwrWi8UQODvNv4rUzlgcbFxRLAgnuCPnIJlDghtxgNJfzDaAyHtcLlM59fzyOgoNtIzmZIMp9TQP3H4GLXC2z3i4AwQ8sp0xgDzclG8MQ7YeAHCATdccp1bHgyHUmUoiqUDFcSAsGa_aviJaGu8jTKkyQgJAtKjvxvBJZbXXFHB2p8r955I2vaB1Cuu6gJeBvNW1mJTqmBYtqT4POo4bQhwjUVgNOH-jRqbgufkVi7reOZoHhVoKl516sRs7L3dP-n9VRs6WleOGmbspA_o2SP186b0aJIYJZ2S7bXTQUW-Jd-GZhGktj_r9nLVwPX2YJFI1jNrrhmoX-bzJqSVzm20TjsygdCeYftvwiEbaT6UeYBwxz7Gi7gxHUoJ6KPWWH8AjGhpUv8ImScAQHYZeyN2uJs1VmWTU_y6cGC_PKTxecrYWSRjaTd7L1P7qBm065VVP7qrgCdrQOBnd4PQ8wM3sm0bYN1RcqdfZnBL8vV-QZ0UoVtclLW4ME6f4lob4ZVxD-SI8vEGWapj6eUhFyiyw=w600-h800-no


Screen board & test

To work with that board I got a 5.6 inch HDMI screen off Ebay which fit perfectly in the case and works with the voltage range I need.

screen 6v

gadZl33NEcCS9Rpgtw-4ev05QConRr8egQk1yrNxagr5SfM9xPoNWrtuZLzmgh3ZhsBNgPTW9RswaUOfmGI1bn7Y1bgmTDnatPkfN73L9eZcgSR5Wtw7hK8qHUYYrPQOoyLMYDm9TFUj4n-sQCkoflTUnQ16kppapbeS8t4POx5hGIamYvqQEVJPya7k6wcPqMC0QdK-Qt0UuCpbVZ10FtA1iXAi7ngwazWgtcCAetKsNLpRyNiV2QLRKeQBhDI4Nch6-EmFyU7hU8w2W8FS3yy7mOmIK3yDDxqQ4fLR7g_6ds27QaXbZVIbPTd4YZ7QT07g9t_DvpYxwheVoG5mPeEco5cpwpkgDFFWTzajHpjUN5vruX0X6Mt5yuLiZFVnSWjMQ4ncqNyl3MHd_Yhwd8WTUJjxTp0snellIaPLafkIN23V-HYGisR-3WpVKc6fJslrgcwrEGLyGLa1mLpQkwN22XTzLbxJy6OjcMnNVX-R6QKPOkrtGkakyN99keHKSZYYjdIAfgdsqhCTWHoxCtnPq3RMZnJ_pbxqbZ1HE7q6oKpLVcNpwsHbIjgNpcXvvrbyx_bx8i6QvkM3rgJowNzcb40mG3GYfSbgaUN_EA=w800-h600-no


screen 8.5v

rgV1ko08-pxSaJ27aiYZWriIJa9QvEJTWIX6t_aGKUd9Hozd6aYHGPzCHu_WjwmDojnfSa1LqTenIbPpSJRK0YlJLkx7lEa0niOGyGWpEuIRvqgaIoPlqXYicT0L13hONawveFkNexvIjyU4pcMqsMdYTMLnQZSOFm3vabYdrb8xfKUoFMCsRwCzvSo95Q0kujXYSmElFJUd9Ew1doTWmfcsDULGBerolnbfggcPYt32UcmB1pLpAxk9vCrApqSOFzaTCSIXa0akBQviLIuYDAcZRX3qlf8MlXEvknCrRzFE9Mx1EVSdwfx7GzS2P3aFjDoeXL7aDBGbfgfM01FAn4Ug_TuGg0hJaoQH_A6DxGFSI99IdEPnRqmnfyHUjTEbcrxuulICsF4MH9kcIqrG3UUaMwJJ18JIs93MJGoKVJ-z9l7CLruzDFhfTomOd5aHSrzpHwpFkZBUDfoguiblRZeTBdPFni1jVxDYSwMTNosZVyvR0aBY1pb1eubyVYfdSkc_yF59SzC2zNO_hBHSQ_K26goaBtRL7FYzHKIVB6JBlCQq-X0nyNtelZVo23VSrluRipETg0hSDEzEvCeh6bqyQrswxg9d-afZ1mvaUA=w800-h600-no


Screen board

Will need to relocate some of those caps, remove those pins to solder directly to the board and remove those other ports.
vgB4tKOzJHPS2zjm0RcymaV1k6E1yBJaG9gmUk06fYIVTZleuYdf588X7yS1wD6Zh1fhMNuabPswjLrNu1ER8nqSUrRgHfiyPgpfmVybdFb37pasa9NmZnvDlOu6FzVIwIsHq9HSAGZjWpL_w0uTQlm85KKpY3puSva_gZan6zUM63O5pcsuOmS6N1nxIGNha0iWrSjOt10-YZ2imVIaBkDYybvjQIpKmg2dXvzpikazxgBhs4k5HrJtxgZoUWLq8TaEbRPh15tQx6q8HHuuw5N-9PkROqAie5UilI5m0biyAZSMQt4myOTGz8CNDjJWnwEugrv9CMZuoOTQS7EZn4-q-cWPGBzGs6R_9KQDWIBU6C2saN3_5Qj7PKLM_FW4JZfqwcvZDZ5KHyIfPRh0iRh5qnmkbvw5-XrMl4RAokLZbaoI0esxA_vT_0sTfEcGBFTveGdUTj4JB7DhiZwBhslD5ZiZYniD04F9SkU63GRCVLA78ahtr8EUNRWjXulngaqlEsbCYfs1xxmb8yGop_aK-B2gNPx8eT1TNti04-HtjvNr4eD96A2CI7WHc5qggodq4wbRwsE17ip08Hcsa-PptREzKtkOZ2RMCBf4QQ=w800-h600-no
 
Last edited:
Tools & parts

Parts
this is most of the parts I will be using, still waiting on a few minor thing but this should be the bulk of it.

46-_ejFYkZe9BnUqyCgh3YKSTGOcMtqidVzqmN-SfeGuzh7BzAH14zJ42TBEnZrnpWCY6iX36kU9YKftLJdB2G37agVxAwjpTlPmCntlgECa_633r8Uf58T0gF8e2w24vI9JXQBuUyOIYuDIiu4EaUd5bQbjR-wTej6lGvnDy8MnXF56pMrCJRjM6-mOQDSBMa31BgmN3wEJhvcJWLmEWBbc169RARBemT16R7h01WoPZLI7OK9TMGHhWeZiPkrm5Azo0xICbcuon2UxRBMH0LNfzYUSZ_xDUgZ7PpG2E05_Z1eFX4WDCKJLPxPXlEg6XGNJwiZg5fHqDpaIODYQlmZJ96XxuF3YRfStdN_85gygcx7_e_novRNhJIV_EHs3G9fRpgSySpOU515asxgVNV4hOX7Dw0MtWKADEw5_fsS18CGWLnXtQKGFOMQ5UZIB8FN5J3RpNR4p53HCbTxll3Jq4jsl9ahQ_2djAeX5Y1xvBUYpZwth12e1qy8AL6buq1FMGUiG6rtBNB5A7fN2dgJ5ah-WxZubyGInvRjtShIvxHtVlEU8KUXcHZYUT32GdSj_wSJWAlE9c80PEhwLaQi99p6-b-oMdcOb5tU03g=w800-h600-no


New toys
And got some new toys to help me with this process, specifically got amazed by that Hakko desoldering gun, made the whole desoldering process much easier.

eQUYoe2EXF7O3Yu29Jx1ZVpenfsTSG_gm37tYvXPw-R2KlA9QY8Wwuh0ip2LiGG7vsHyspLqi10NrBun-8fBHOxYiTBDbRFpfLnNz5LOXY79T7qkSmyTK3sK3xD2AKBBmgn0XEdmBlOYaZIZKYVWabfoxMeOlrG4d0R2SGvzOj_gsIwzRjm45oxDYjnxxho65ik6R-KFgvinfJ9kfsWHomlhM7ldd_1rOW4kDyqkbxLTnExTr69c4_cN2xMcwZBEH_MER4IfKwFHd6ybcoJSZzPCANPX0DEAR-7BEEB-Rr4C5OZhGor-Lv3S-vRIZP8TG4rZ09ioU4qOLeXSqG28t9UGrnfCSa0FT5h_4TxslaEfzsoJN3NN75yZJ3H4x33IgSWhhbdBgQxgPqmGvDDEoTOzjIvjxzYpXDLP0dwBzB4Wlldw61dLG5kyFpEnScpqqYwvnNsbYHGW1S90vABghYc5pMaLRk7Kvgi1_qKm-vnR8maKHYPUnlfV2wTGv86zEjDdn6ogCOqwdZjrahwqYv9B08gFtlx1YPVUrv4coDyPAjstYoPshZFMAcb9GGlVoy0A5dSwsWwMDuo2i5wSQE_1b4Hrj-UsrfL9iBCJMQ=w800-h600-no


Pi Setup

Now when I was playing with that project all those years ago I was looking at different approach to load games at full speed without a disk drive.

I went through a few method, some more finicky then other, and end up thinking that it would be better to use raspberry Pi SMB setup after watching that video.

So fast forward, I have been playing with this for the last few weeks and got a working setup with my raspberry Pi 2.

Pi 2 flat

I went on sliming it down by removing the GPIO pins, usb’s, ethernet ports and camera connector. I got a bit too violent with the second set of USB ports and end up breaking a tiny resistor on the board.

Luckly it was close to the second usb’s port so doesn’t affect my setup.

ii6VMzwnjoT6IoqC4bYVyx7FrmW5tFRS9jzEjUiz1NlCc9UPc-vZtXrFsqbGEV8UFSRu_nS_8gyre4tCZK5WnJ4qZnOUfEb9874jOrY-97lJ2Xi2gD-7iYoFPjjsL0pq2fo9W5LJ9iE1D1w80FsRKD7IQElyEjwVOoQTbW9diTAV1fuCMmM62mJS8NUstXGGxMcp7uhKJIcYpcPbNqieXpnAabGcOu6W8Y11cryuON6WRLhjMk2IgHkbiF3tJxx_R4BXGLBsf-iY56x37TYp_zbX7WevtLo_W5iT2etQqnWl4EGvvj9o-KDCXU3BPN17QbycW7-CTUuNtNstwtLCrdLvABRtrV3Tekc58lgEnowYwCMGF1qS_8BA6hQtLDgS9hLaXOfDkWYx0uuJn7Yp0vZR7ZCqjg6drSRFk4WqEYeOqrV4bMCvzWmxtKucC-I-0zM2LliT2PLZupj1-LDwCTZ4B8dE610a-VVRYGoTmGuv7bVGpRouule7T7A0pY-JazGmWs4mR5TR8O7AojDtf7UQTrecNjTSXp-Qe1fjK-TdQIjzT8Ka7dTN05tQiVJCxEeFvzVqZR2qmH9URG0lSxvt2G6A3IaqnohywPdB7g=w800-h600-no


Pi + OPL testing
Then I soldered a usb port. soldered the ethernet port to a breadboard and wired it to the pi board so that I could test this. All worked as expected.

xJ4dM90BmkHMNl-Xk6CDroJ2_xaAknAu5r4hqSsOXQf212tJZ0B4i_si3qf-QWQ1hY2C-kDsUsBAEAwW3L4cDiUcr9tZVXMRGs2fIMiMSMtMjFs9MAYe8Mbk2icF_HTyl4_1rgLdrFdYpevkUmxK8GayNjn_1D09IPTNHtXwiWCTNkiy-BiwmrwIUyHR0wJmfpgvOkg1Chf7r7SPJTJ-Y90n74d1EP-ZA_vhe8kYRftMgRqpgUvb2Q2Ly2jTqAIiG0OAfCVTwtpK6YPFhKl2uSGLs6_HmeyYkhqeXTc3ItQCiUF7tqQEkKa-hyXJTQsGgmrpLY3mVd5vWrXxEUd4hHbcyULDirRoNULEPUWuczjhGguTbKDJpuvLr6_4qkayM31BzLY-SoSdAveERtIjBaA_-Tnvrkf6sr1cQFwRr09SaBOQNXcX2jwNcPTseHDPqzqfVHymaowLFSz3WOw-4VMrj4JRtvBV0xmrdDbYvpRpjeVjhOqOuMYErSZSeedAsZ0xxuR-Rnxmus9KlT3e03Y8J5BF0y9iL-F3x135Jggd6SeEsiHZ37Ky8Od1yDLqRMqbr_7S5vEAyPpey2DNHUnualaw-Guc4VgEBfZWkg=w800-h600-no


PI FMV testing
And just made a quick video to show how smooth it is.
Beware neck strain ahead, probably need to do this landscape next time...

I have been testing this with +10 games so far and haven’t come across a game where the FMV would slow down. Let’s see how it goes.


Until next time folks…

PS: Sorry for the double post, couldn't fit all this under one reply
 
Last edited:
Back
Top