bentomo
Frequent Poster
Project is complete, click here to see it done!
Well looks like it's time to start my 3rd n64 portable. Now even smaller then before. And planned to be better then moonlight 64 and starlight 64 combined. IMHO I've come quite a way in the past year from where I started. My first post Thank you hammerstein for slapping me in the face and yelling "SNAP OUT OF IT!"

Anyway, here are the main features:
n64 with expansion pak
low led switching between green and red
direct rcp wiring
external memory pak slot
vga docking stating (actually project box will be smaller this time)
vacuum formed case
3.5" screen
3 hour battery live (if I can fit the extra batteries in it will be 6 hours)
portrait style case (like gameboy)
full set of controls
-------------------------------------------------------------------------------------------------------------------------------------
**UPDATE** 01/16/10
Here's the first update. I'm going to buy a new screen that has contrast control on it instead, rather then going around bridging resistors on my screen and possibly frying it. I have other uses for the screen in the video. I also may make a guide for the audio amp later.
http://www.youtube.com/watch?v=Tu2h4PtHrL0
-------------------------------------------------------------------------------------------------------------------------------------
**UPDATE** 01/23/10
Did some work today and got the top half of my case cut out.
http://i73.photobucket.com/albums/i208/MNDOGYDUDE105/100_0789.jpg
-------------------------------------------------------------------------------------------------------------------------------------
**UPDATE** 01/25/10
Got some work last night finished, everything is going smoothly.
http://www.youtube.com/watch?v=aJvF4W4Yy3g
-------------------------------------------------------------------------------------------------------------------------------------
**UPDATE** 01/28/10
MO UPDATES! I got some work done on the front half of the case. Buttons holes are in with the d-pad. I don't have the joystick hole in or the start button yet.
Buttons
http://i73.photobucket.com/albums/i208/MNDOGYDUDE105/DSC02512.jpg
Memory slot cover spaced and glued in
http://i73.photobucket.com/albums/i208/MNDOGYDUDE105/DSC02501.jpg
The pak goes about a quarter inch in. Really helps the rumble pak from wiggling.
[utl]http://i73.photobucket.com/albums/i208/MNDOGYDUDE105/DSC02502.jpg[/url]
MORE TO COME!
-------------------------------------------------------------------------------------------------------------------------------------
**UPDATE** 01/31/10
I give you the magic of the drill press.
http://i73.photobucket.com/albums/i208/MNDOGYDUDE105/DSC02521.jpg
The two holes in the 4 are filled in because I want through them by accident. It says 64 boy.
http://i73.photobucket.com/albums/i208/MNDOGYDUDE105/DSC02522.jpg
-------------------------------------------------------------------------------------------------------------------------------------
**UPDATE** 02/02/10
I put up a video real quick before I take a breather and go to bed.
http://www.youtube.com/watch?v=3w3vqFhKt3o
-------------------------------------------------------------------------------------------------------------------------------------
**UPDATE** 02/26/10
Well I've got a nice update for you guys. I did an overall power draw on the system. I haven't done the expansion pak relocation or cartridge relocation yet since it doesn't affect the power ratings. I haven't fixed the lowled yet, it works with my variable power supply, just not on the n64. I'll just rewire that. If I do end up replacing the ram chips with expansion pak chips (which I won't do without a heat gun) it will save about 200mAh of battery life, that way I can play while charging, otherwise I'll need a 1.5 amp smart charger, I only have a 1.2 because for some reason battery space doesn't have it on there site anymore. Anyway here's the video.
http://www.youtube.com/watch?v=gJy_gHhJG80
Dang youtube made it hard to read the multimeters.
-------------------------------------------------------------------------------------------------------------------------------------
**UPDATE** 03/06/10
Got some final work done on the case, will be painting tomorrow.
http://i73.photobucket.com/albums/i208/MNDOGYDUDE105/DSC02569.jpg
http://i73.photobucket.com/albums/i208/MNDOGYDUDE105/DSC02568.jpg
http://i73.photobucket.com/albums/i208/MNDOGYDUDE105/DSC02567.jpg
http://i73.photobucket.com/albums/i208/MNDOGYDUDE105/DSC02566.jpg
http://i73.photobucket.com/albums/i208/MNDOGYDUDE105/DSC02565.jpg
http://i73.photobucket.com/albums/i208/MNDOGYDUDE105/DSC02564.jpg
--------------------------------------------------------------------------------------------------------------------------------------
**UPDATE** 03/07/10
The case is finally done, final construction soon to come.
http://www.youtube.com/watch?v=L8sV-kAc-D4
--------------------------------------------------------------------------------------------------------------------------------------
**UPDATE** 03/10/09
I have done some building on it but it needs more to be done, more updates soon.
http://i73.photobucket.com/albums/i208/MNDOGYDUDE105/100_0848.jpg
http://i73.photobucket.com/albums/i208/MNDOGYDUDE105/100_0849.jpg
http://i73.photobucket.com/albums/i208/MNDOGYDUDE105/100_0851.jpg
--------------------------------------------------------------------------------------------------------------------------------------
**UPDATE** 03/13/10
I have the first half done and only 14 days left until mgc, time to keep moving, and faster then before. Here are some pics for your delight.
http://i73.photobucket.com/albums/i208/MNDOGYDUDE105/100_0866.jpg
http://i73.photobucket.com/albums/i208/MNDOGYDUDE105/100_0865.jpg
http://i73.photobucket.com/albums/i208/MNDOGYDUDE105/100_0864.jpg
http://i73.photobucket.com/albums/i208/MNDOGYDUDE105/100_0863.jpg
http://i73.photobucket.com/albums/i208/MNDOGYDUDE105/100_0862.jpg
http://i73.photobucket.com/albums/i208/MNDOGYDUDE105/100_0861.jpg
Note that this is not the actual thickness of the inside, it looks a lot thicker do to the wires and controller sticking up, it will be pushed down when the whole thing is done. Also a youtube video.
http://www.youtube.com/watch?v=KY31howKUEc
More to come!
--------------------------------------------------------------------------------------------------------------------------------------
**UPDATE** 03/14/10
Got a little more work done. I've saved the hardest part for last, the expansion pak relocation and rcp relocation.
http://i73.photobucket.com/albums/i208/ ... 0_0872.jpg
http://i73.photobucket.com/albums/i208/ ... 0_0871.jpg
Still figuring out where the voltages should go, but that's simple enough.
--------------------------------------------------------------------------------------------------------------------------------------
**UPDATE** 03/15/10
Well my tickets to MGC arrived today so I'm psyched, but the pressure's really on to finish it. And the inevitable has arrived, the only thing left to work on is the expansion pak relocation and rcp relocation. (working on the docking station on the side) I've done all of the trimming and case work so now I need to finish the board.
http://i73.photobucket.com/albums/i208/MNDOGYDUDE105/100_0879.jpg
http://i73.photobucket.com/albums/i208/MNDOGYDUDE105/100_0884.jpg
http://i73.photobucket.com/albums/i208/MNDOGYDUDE105/100_0887.jpg
So the hardest part has arrived, but that's enough for today.
---------------------------------------------------------------------------------------------------------------------------------------
**UPDATE** 03/18/10
Another update. I got the second hardest thing done, only took 3 hours. Unfortunately it didn't work the first time so I had to do it again, that was a day wasted, oh well, still 7 days to MGC!
http://i73.photobucket.com/albums/i208/MNDOGYDUDE105/DSC02582.jpg
http://i73.photobucket.com/albums/i208/MNDOGYDUDE105/DSC02583.jpg
http://i73.photobucket.com/albums/i208/MNDOGYDUDE105/100_0889.jpg
http://i73.photobucket.com/albums/i208/MNDOGYDUDE105/100_0894.jpg
---------------------------------------------------------------------------------------------------------------------------------------
**UPDATE** 03/20/10
I've done some work on the rcp wiring, almost finished, a little more tweaking and it will be finished, here's a little video to keep you posted.
----------------------------------------------------------------------------------------------------------------------------------------
**UPDATE** 03/23/10
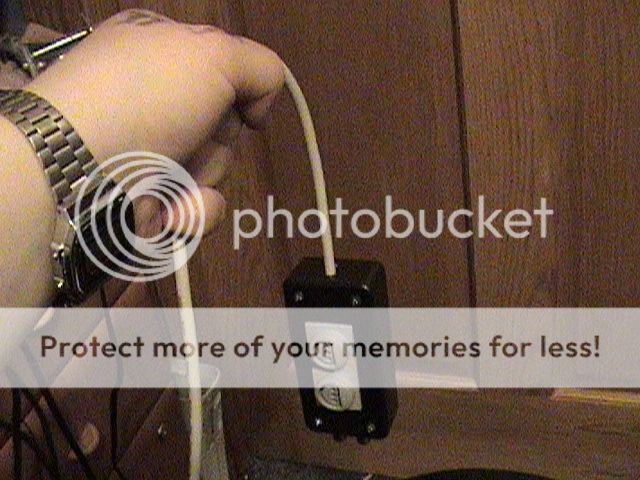
Turns out this will take some more time to finish and won't be done soon enough for mgc, so it will be running on an external battery for now. It's not done though, more work will be done to fit the batteries inside. I did finish the docking station though.
This is the 64boy nearly complete, will be reorganized to get the batteries in.

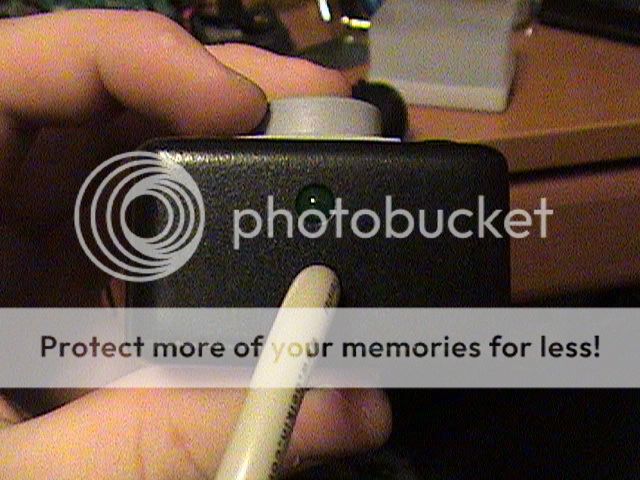
Got the docking station done too, works well. Green led lights up when it's connected.
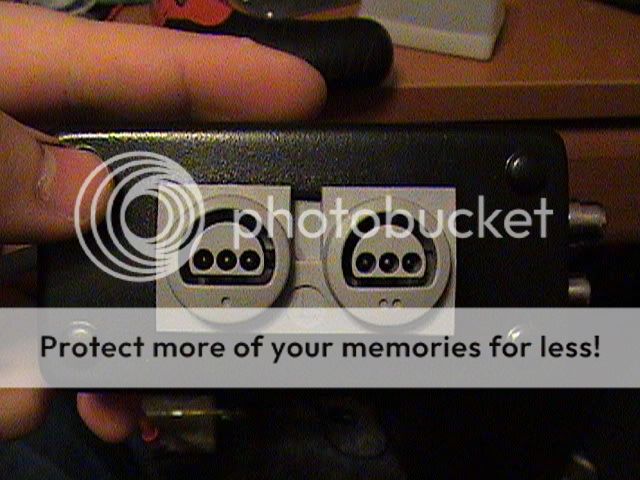
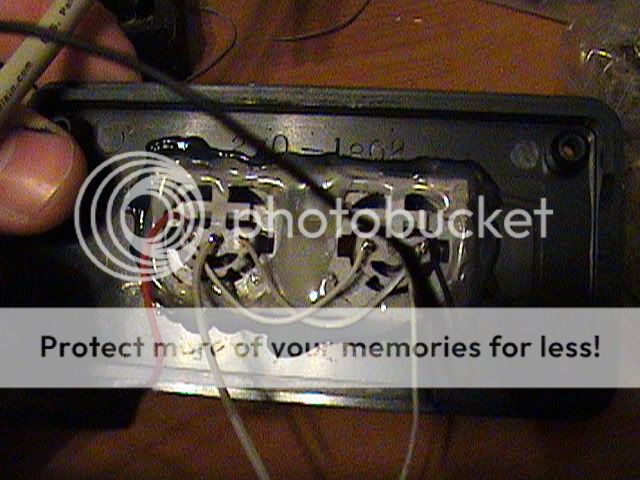
1st and 2nd player ports.
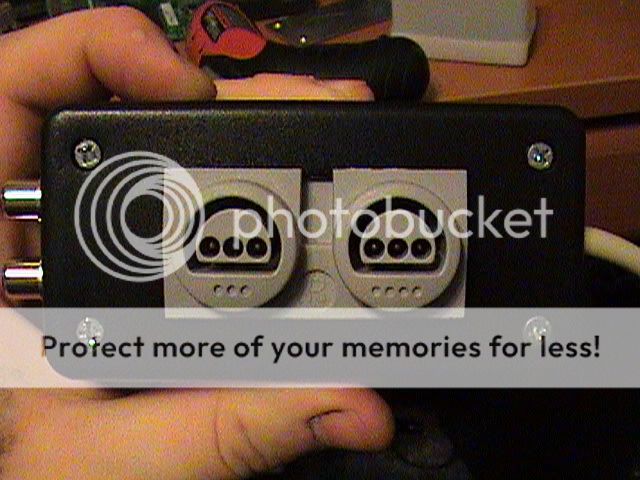
3rd and 4th player ports.
These are the ports for analog video, the 3 ports aren't colored because the colored ones would fall apart if they were cut that small. You can tell which is which because the video is next to s video, and the audio ports are left and right, indicating left and right audio channels. And yes I do right important stuff to remember on my hands.
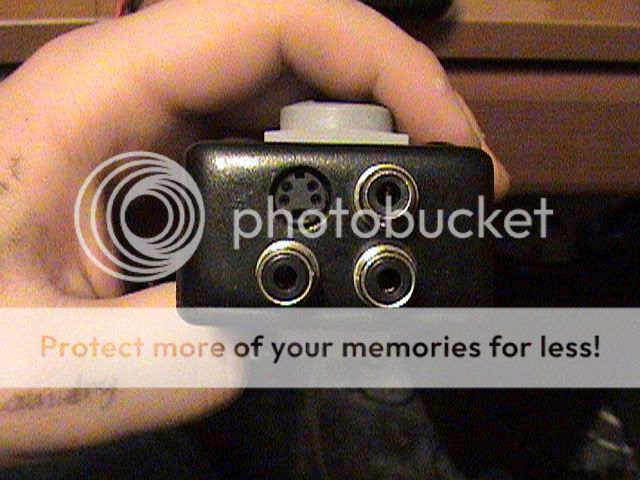
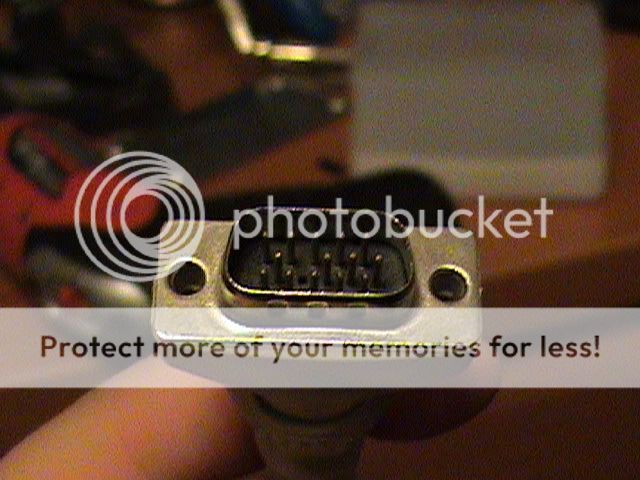
Uses a 15 pin vga header.
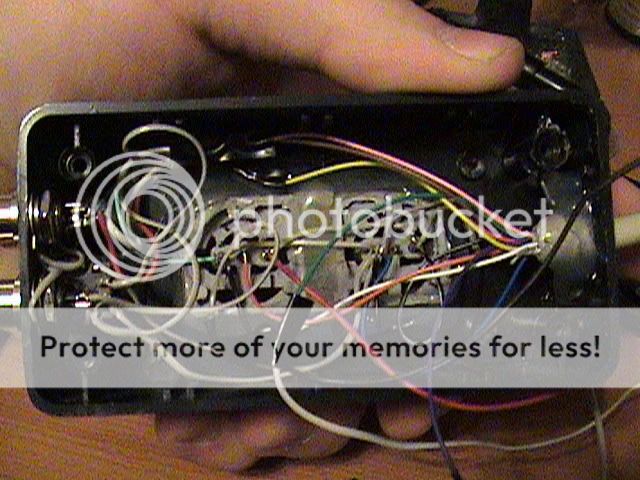
3rd and 4th player insides
All the other ports are on the other half.
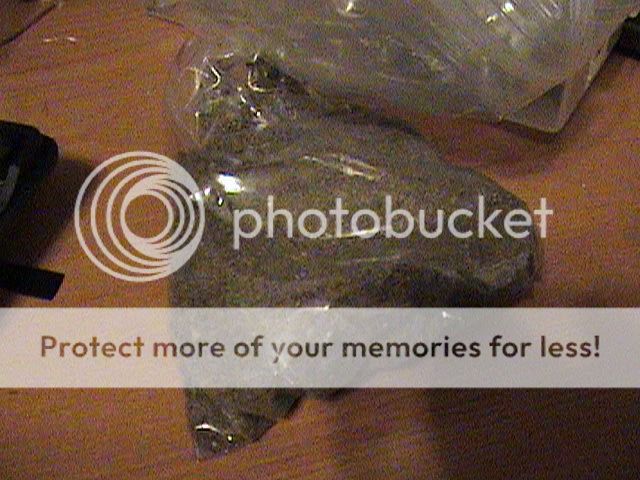
Authentic minnesotan dirt used to weigh it down.
Also works as a mace for self defense.
Well looks like it's time to start my 3rd n64 portable. Now even smaller then before. And planned to be better then moonlight 64 and starlight 64 combined. IMHO I've come quite a way in the past year from where I started. My first post Thank you hammerstein for slapping me in the face and yelling "SNAP OUT OF IT!"
Anyway, here are the main features:
n64 with expansion pak
low led switching between green and red
direct rcp wiring
external memory pak slot
vga docking stating (actually project box will be smaller this time)
vacuum formed case
3.5" screen
3 hour battery live (if I can fit the extra batteries in it will be 6 hours)
portrait style case (like gameboy)
full set of controls
-------------------------------------------------------------------------------------------------------------------------------------
**UPDATE** 01/16/10
Here's the first update. I'm going to buy a new screen that has contrast control on it instead, rather then going around bridging resistors on my screen and possibly frying it. I have other uses for the screen in the video. I also may make a guide for the audio amp later.
http://www.youtube.com/watch?v=Tu2h4PtHrL0
-------------------------------------------------------------------------------------------------------------------------------------
**UPDATE** 01/23/10
Did some work today and got the top half of my case cut out.
http://i73.photobucket.com/albums/i208/MNDOGYDUDE105/100_0789.jpg
-------------------------------------------------------------------------------------------------------------------------------------
**UPDATE** 01/25/10
Got some work last night finished, everything is going smoothly.
http://www.youtube.com/watch?v=aJvF4W4Yy3g
-------------------------------------------------------------------------------------------------------------------------------------
**UPDATE** 01/28/10
MO UPDATES! I got some work done on the front half of the case. Buttons holes are in with the d-pad. I don't have the joystick hole in or the start button yet.
Buttons
http://i73.photobucket.com/albums/i208/MNDOGYDUDE105/DSC02512.jpg
Memory slot cover spaced and glued in
http://i73.photobucket.com/albums/i208/MNDOGYDUDE105/DSC02501.jpg
The pak goes about a quarter inch in. Really helps the rumble pak from wiggling.
[utl]http://i73.photobucket.com/albums/i208/MNDOGYDUDE105/DSC02502.jpg[/url]
MORE TO COME!
-------------------------------------------------------------------------------------------------------------------------------------
**UPDATE** 01/31/10
I give you the magic of the drill press.
http://i73.photobucket.com/albums/i208/MNDOGYDUDE105/DSC02521.jpg
The two holes in the 4 are filled in because I want through them by accident. It says 64 boy.
http://i73.photobucket.com/albums/i208/MNDOGYDUDE105/DSC02522.jpg
-------------------------------------------------------------------------------------------------------------------------------------
**UPDATE** 02/02/10
I put up a video real quick before I take a breather and go to bed.
http://www.youtube.com/watch?v=3w3vqFhKt3o
-------------------------------------------------------------------------------------------------------------------------------------
**UPDATE** 02/26/10
Well I've got a nice update for you guys. I did an overall power draw on the system. I haven't done the expansion pak relocation or cartridge relocation yet since it doesn't affect the power ratings. I haven't fixed the lowled yet, it works with my variable power supply, just not on the n64. I'll just rewire that. If I do end up replacing the ram chips with expansion pak chips (which I won't do without a heat gun) it will save about 200mAh of battery life, that way I can play while charging, otherwise I'll need a 1.5 amp smart charger, I only have a 1.2 because for some reason battery space doesn't have it on there site anymore. Anyway here's the video.
http://www.youtube.com/watch?v=gJy_gHhJG80
Dang youtube made it hard to read the multimeters.
-------------------------------------------------------------------------------------------------------------------------------------
**UPDATE** 03/06/10
Got some final work done on the case, will be painting tomorrow.
http://i73.photobucket.com/albums/i208/MNDOGYDUDE105/DSC02569.jpg
http://i73.photobucket.com/albums/i208/MNDOGYDUDE105/DSC02568.jpg
http://i73.photobucket.com/albums/i208/MNDOGYDUDE105/DSC02567.jpg
http://i73.photobucket.com/albums/i208/MNDOGYDUDE105/DSC02566.jpg
http://i73.photobucket.com/albums/i208/MNDOGYDUDE105/DSC02565.jpg
http://i73.photobucket.com/albums/i208/MNDOGYDUDE105/DSC02564.jpg
--------------------------------------------------------------------------------------------------------------------------------------
**UPDATE** 03/07/10
The case is finally done, final construction soon to come.
http://www.youtube.com/watch?v=L8sV-kAc-D4
--------------------------------------------------------------------------------------------------------------------------------------
**UPDATE** 03/10/09
I have done some building on it but it needs more to be done, more updates soon.
http://i73.photobucket.com/albums/i208/MNDOGYDUDE105/100_0848.jpg
http://i73.photobucket.com/albums/i208/MNDOGYDUDE105/100_0849.jpg
http://i73.photobucket.com/albums/i208/MNDOGYDUDE105/100_0851.jpg
--------------------------------------------------------------------------------------------------------------------------------------
**UPDATE** 03/13/10
I have the first half done and only 14 days left until mgc, time to keep moving, and faster then before. Here are some pics for your delight.
http://i73.photobucket.com/albums/i208/MNDOGYDUDE105/100_0866.jpg
http://i73.photobucket.com/albums/i208/MNDOGYDUDE105/100_0865.jpg
http://i73.photobucket.com/albums/i208/MNDOGYDUDE105/100_0864.jpg
http://i73.photobucket.com/albums/i208/MNDOGYDUDE105/100_0863.jpg
http://i73.photobucket.com/albums/i208/MNDOGYDUDE105/100_0862.jpg
http://i73.photobucket.com/albums/i208/MNDOGYDUDE105/100_0861.jpg
Note that this is not the actual thickness of the inside, it looks a lot thicker do to the wires and controller sticking up, it will be pushed down when the whole thing is done. Also a youtube video.
http://www.youtube.com/watch?v=KY31howKUEc
More to come!
--------------------------------------------------------------------------------------------------------------------------------------
**UPDATE** 03/14/10
Got a little more work done. I've saved the hardest part for last, the expansion pak relocation and rcp relocation.
http://i73.photobucket.com/albums/i208/ ... 0_0872.jpg
http://i73.photobucket.com/albums/i208/ ... 0_0871.jpg
Still figuring out where the voltages should go, but that's simple enough.
--------------------------------------------------------------------------------------------------------------------------------------
**UPDATE** 03/15/10
Well my tickets to MGC arrived today so I'm psyched, but the pressure's really on to finish it. And the inevitable has arrived, the only thing left to work on is the expansion pak relocation and rcp relocation. (working on the docking station on the side) I've done all of the trimming and case work so now I need to finish the board.
http://i73.photobucket.com/albums/i208/MNDOGYDUDE105/100_0879.jpg
http://i73.photobucket.com/albums/i208/MNDOGYDUDE105/100_0884.jpg
http://i73.photobucket.com/albums/i208/MNDOGYDUDE105/100_0887.jpg
So the hardest part has arrived, but that's enough for today.
---------------------------------------------------------------------------------------------------------------------------------------
**UPDATE** 03/18/10
Another update. I got the second hardest thing done, only took 3 hours. Unfortunately it didn't work the first time so I had to do it again, that was a day wasted, oh well, still 7 days to MGC!
http://i73.photobucket.com/albums/i208/MNDOGYDUDE105/DSC02582.jpg
http://i73.photobucket.com/albums/i208/MNDOGYDUDE105/DSC02583.jpg
http://i73.photobucket.com/albums/i208/MNDOGYDUDE105/100_0889.jpg
http://i73.photobucket.com/albums/i208/MNDOGYDUDE105/100_0894.jpg
---------------------------------------------------------------------------------------------------------------------------------------
**UPDATE** 03/20/10
I've done some work on the rcp wiring, almost finished, a little more tweaking and it will be finished, here's a little video to keep you posted.
----------------------------------------------------------------------------------------------------------------------------------------
**UPDATE** 03/23/10
Turns out this will take some more time to finish and won't be done soon enough for mgc, so it will be running on an external battery for now. It's not done though, more work will be done to fit the batteries inside. I did finish the docking station though.
This is the 64boy nearly complete, will be reorganized to get the batteries in.
Got the docking station done too, works well. Green led lights up when it's connected.
1st and 2nd player ports.
3rd and 4th player ports.
These are the ports for analog video, the 3 ports aren't colored because the colored ones would fall apart if they were cut that small. You can tell which is which because the video is next to s video, and the audio ports are left and right, indicating left and right audio channels. And yes I do right important stuff to remember on my hands.
Uses a 15 pin vga header.
3rd and 4th player insides
All the other ports are on the other half.
Authentic minnesotan dirt used to weigh it down.
Also works as a mace for self defense.