hailrazer
Frequent Poster
Well the Archos Gamepad finally came out :

And while it is a pretty good emulating device , it has one GLARING problem. That darn D-pad.
Notice that it is 4 separate buttons. Now for a lot of games that just won't do. It makes it difficult to perform diagonals/combos/special moves.
What to do .... what to do.....
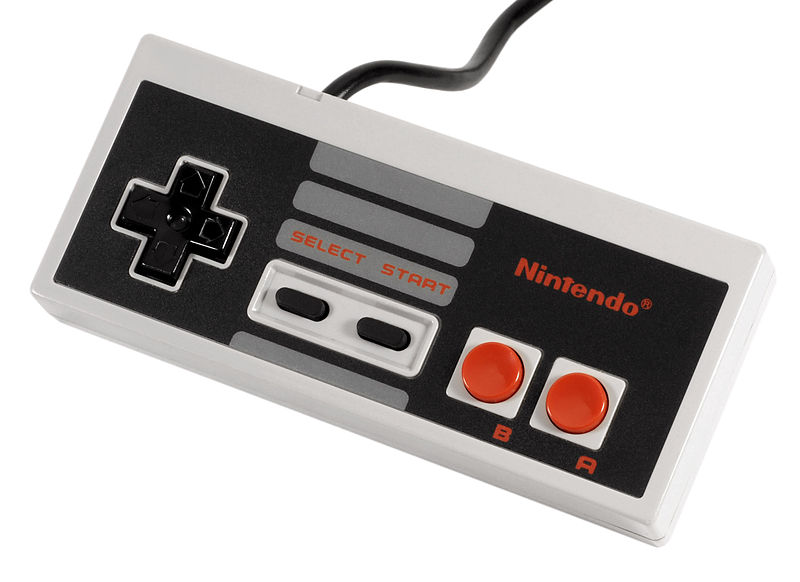
Well what had a GREAT D-Pad ? Hmmm........ Oh yea.
So let's see about getting that D-pad in the Gamepad.
First we'll need to disassemble the Gamepad. Hmmm no screws. Okay well VERY CAREFULLY you will need to use a credit card to pry the two halves apart. Here is a pic of how another person did it.

Now let's look at the insides of this bad boy.


Now here's the area we will be modifying. We need to remove the 5 screws and the d-pad pcb will lift out:

Here is the so-called Archos d-pad housing :
We will have quite a bit of modifying to do here.

And here is the membrane/buttons removed. Notice the buttons are glued on.
We will have to carefully cut those buttons off the membrane later.

Now will the Nes D-pad fit? Yes sir, but it will need to be trimmed a bit")

So let's get to work modifying the D-pad housing. I used a dremel cutting blade to CAREFULLY cut out the middle section into a cross/t pattern. I cut it small then filed it a little bit bigger for wiggle room. Then I used a dremel fine tip grinding attachment to get rid of the extra plastic inside the d-pad housing to get a flat surface for the Nes D-pad to sit on. I used a razor blade to trim/scrape the hard to access edges.
Here is the result :

Now we need to modify the Nes D-pad a little bit. We need to decrease the overall size. I just used the dremel sanding drum and took off a mm or so around the edges. To get from this:

To this :

Now we need to grind the nub on the back off almost all the way :

Now does it fit ?

PERFECT !!!
Also at this point I added 2 small pieces of tape to the D-pad's Right side. The reason is that the Gamepad is lower on that side. Adding the tape will make D-pad presses to the right easier and more responsive :

Now it's time to get those buttons off the membrane. CAREFULLY pry the buttons back and use a razor blade to cyt the glue. DON'T CUT THE MEMBRANE OR TEAR IT !!
Here's what it should look like when done :

Re-Assemble your D-Pad pcb. Then pop back together your Archos Gamepad. Be sure to take out any Micro S-d card you have installed or you might break it when putting the Gamepad back together.
Here is the finished result :


And while it is a pretty good emulating device , it has one GLARING problem. That darn D-pad.
Notice that it is 4 separate buttons. Now for a lot of games that just won't do. It makes it difficult to perform diagonals/combos/special moves.
What to do .... what to do.....
Well what had a GREAT D-Pad ? Hmmm........ Oh yea.
So let's see about getting that D-pad in the Gamepad.
First we'll need to disassemble the Gamepad. Hmmm no screws. Okay well VERY CAREFULLY you will need to use a credit card to pry the two halves apart. Here is a pic of how another person did it.
Now let's look at the insides of this bad boy.
Now here's the area we will be modifying. We need to remove the 5 screws and the d-pad pcb will lift out:
Here is the so-called Archos d-pad housing :
We will have quite a bit of modifying to do here.
And here is the membrane/buttons removed. Notice the buttons are glued on.
We will have to carefully cut those buttons off the membrane later.
Now will the Nes D-pad fit? Yes sir, but it will need to be trimmed a bit
So let's get to work modifying the D-pad housing. I used a dremel cutting blade to CAREFULLY cut out the middle section into a cross/t pattern. I cut it small then filed it a little bit bigger for wiggle room. Then I used a dremel fine tip grinding attachment to get rid of the extra plastic inside the d-pad housing to get a flat surface for the Nes D-pad to sit on. I used a razor blade to trim/scrape the hard to access edges.
Here is the result :
Now we need to modify the Nes D-pad a little bit. We need to decrease the overall size. I just used the dremel sanding drum and took off a mm or so around the edges. To get from this:
To this :
Now we need to grind the nub on the back off almost all the way :
Now does it fit ?
PERFECT !!!
Also at this point I added 2 small pieces of tape to the D-pad's Right side. The reason is that the Gamepad is lower on that side. Adding the tape will make D-pad presses to the right easier and more responsive :
Now it's time to get those buttons off the membrane. CAREFULLY pry the buttons back and use a razor blade to cyt the glue. DON'T CUT THE MEMBRANE OR TEAR IT !!
Here's what it should look like when done :
Re-Assemble your D-Pad pcb. Then pop back together your Archos Gamepad. Be sure to take out any Micro S-d card you have installed or you might break it when putting the Gamepad back together.
Here is the finished result :