lovablechevy
Active Member
ok, it's about time that i get this info in here...
as stated before, these mods are not for beginners. the soldering is small, extremely precise, and difficult. if you do not have great soldering skills, then you need to either pass this mod up or get to work on improving. make sure you read over all the info before attempting anything!! i cannot be held responsible for any damages that may occur from attempting this mod. to your system, electrical parts, or person. attempt the following at your own risk. you have been warned.
on to the info.
there are 2 sections to this. section 1 covers building your own boards. section 2 covers buying a premade board.
section 1
first of all, it is very important to know which game gear you have before you start deciding which of these mods to do. how can you tell what game gear you have? simple! open it up and flip it to the back side of the board. look in the lower right hand corner and see how many asic chips there are. if there are 2 chips, you have an older game gear and have the choice of doing either of the two available mods. if there is only 1 chip, you only have the choice of doing one of the following mods.
so let's get started.
mod option #1: for the older 2 chip ggs only
first, it is a very excellent idea to read the gamegear-tv thread at the sms forums. segasonicfan has created the easiest schematic to follow.

using the above schematic, connect the tv out board to the gg as indicated here:
i have not personally done this mod. i can only give you the info and some other sites that discuss it.
site 1
site 2
mod option #2: for both the older 2 chip and newer 1 chip ggs
ok, on to the mod i have experience with. i can tell you from experience that this mod is Dang hard. all the information needed for it can be found here. the schematic is a lot more difficult:

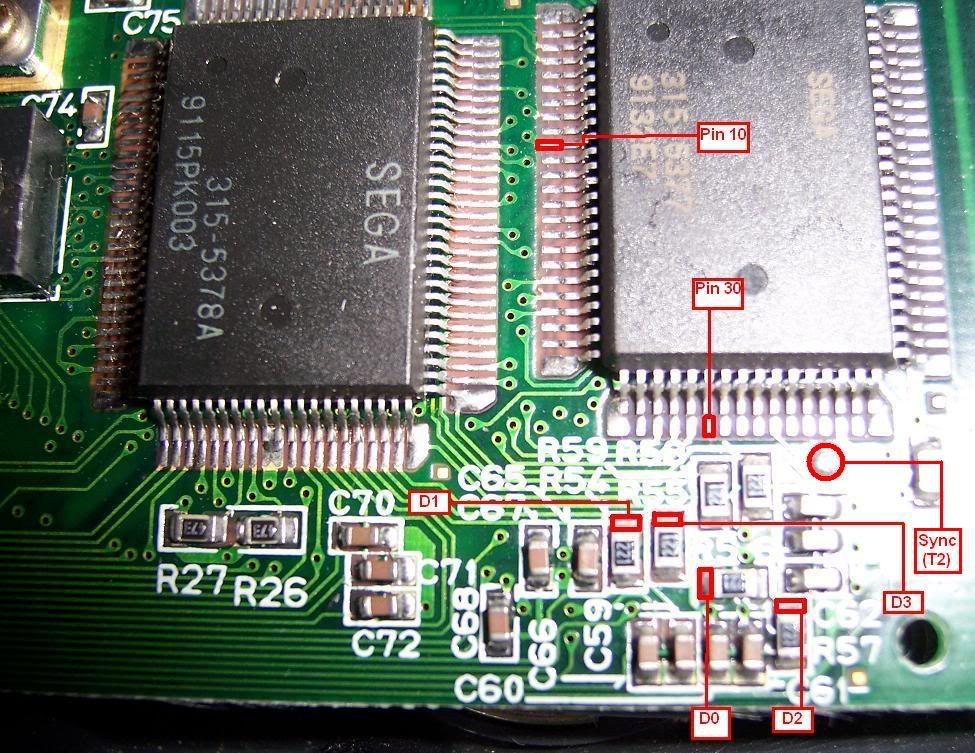
depending on which gg you have, use one of the following to connect your board up to the gg:
1 chip

2 chip

if you do all of this successfully, you should have something that looks like this:


i know that the site is hooking it up to a scart connector, but you can use it to hook it up to an ntsc tv as long as it accepts rgb.
hooking up to a psone screen
i am still ironing out the issues with using a screen instead of a tv with this mod. for some reason, it comes out in black & white.

you connect the rgb to the psone screen as follows:

section 2
for those of you who just want to get ahold of a premade board and not worry about the hassle of making it, there is good news for you!
you're gonna wanna go to this site. not only does he usually have premade boards available for purchase (simply email him - his address is at the bottom of this page), but he also offers the schematic to make your own:

this is ultimately the best option. even if you make it yourself. this board allows for composite, s-video, and rgb output. compared to the other boards which only allow for rgb. this means this can be used with any tv or screen.


2 chip instillation

1 chip instillation

this is the board i used in the handy gear. i can tell you it is 100% awesome. it works wonderfully. i hooked up the game gear to a psone screen using the composite and the rgb. and both looked wonderful.
very important reminder!
game gear games will only display in the middle center of whatever screen you use. it will not take up the entire screen. this is due to the resolution of the game gear that is hardcoded into the system. there are a very few limited games that display in sms mode, which will take up the entire screen. but always remember, if you try to replace the game gear screen with the same size screen, it will be a much smaller image. a clear, crisp image, but much smaller. using a 5" screen gives the same viewing as the original game gear screen
if there are any questions, i will be glad to try and answer them.
as stated before, these mods are not for beginners. the soldering is small, extremely precise, and difficult. if you do not have great soldering skills, then you need to either pass this mod up or get to work on improving. make sure you read over all the info before attempting anything!! i cannot be held responsible for any damages that may occur from attempting this mod. to your system, electrical parts, or person. attempt the following at your own risk. you have been warned.
on to the info.
there are 2 sections to this. section 1 covers building your own boards. section 2 covers buying a premade board.
section 1
first of all, it is very important to know which game gear you have before you start deciding which of these mods to do. how can you tell what game gear you have? simple! open it up and flip it to the back side of the board. look in the lower right hand corner and see how many asic chips there are. if there are 2 chips, you have an older game gear and have the choice of doing either of the two available mods. if there is only 1 chip, you only have the choice of doing one of the following mods.
so let's get started.
mod option #1: for the older 2 chip ggs only
first, it is a very excellent idea to read the gamegear-tv thread at the sms forums. segasonicfan has created the easiest schematic to follow.
using the above schematic, connect the tv out board to the gg as indicated here:
i have not personally done this mod. i can only give you the info and some other sites that discuss it.
site 1
site 2
mod option #2: for both the older 2 chip and newer 1 chip ggs
ok, on to the mod i have experience with. i can tell you from experience that this mod is Dang hard. all the information needed for it can be found here. the schematic is a lot more difficult:
depending on which gg you have, use one of the following to connect your board up to the gg:
1 chip
2 chip
if you do all of this successfully, you should have something that looks like this:
i know that the site is hooking it up to a scart connector, but you can use it to hook it up to an ntsc tv as long as it accepts rgb.
hooking up to a psone screen
i am still ironing out the issues with using a screen instead of a tv with this mod. for some reason, it comes out in black & white.
you connect the rgb to the psone screen as follows:
section 2
for those of you who just want to get ahold of a premade board and not worry about the hassle of making it, there is good news for you!
you're gonna wanna go to this site. not only does he usually have premade boards available for purchase (simply email him - his address is at the bottom of this page), but he also offers the schematic to make your own:
this is ultimately the best option. even if you make it yourself. this board allows for composite, s-video, and rgb output. compared to the other boards which only allow for rgb. this means this can be used with any tv or screen.
2 chip instillation
1 chip instillation
this is the board i used in the handy gear. i can tell you it is 100% awesome. it works wonderfully. i hooked up the game gear to a psone screen using the composite and the rgb. and both looked wonderful.
very important reminder!
game gear games will only display in the middle center of whatever screen you use. it will not take up the entire screen. this is due to the resolution of the game gear that is hardcoded into the system. there are a very few limited games that display in sms mode, which will take up the entire screen. but always remember, if you try to replace the game gear screen with the same size screen, it will be a much smaller image. a clear, crisp image, but much smaller. using a 5" screen gives the same viewing as the original game gear screen
if there are any questions, i will be glad to try and answer them.