Cutting up an official GC controller.

Ashen

GameCube Révolutionary
Please note: Duplication in part or in whole of any part of this guide, its contents or visual references is strictly prohibited without the express consent of the author.

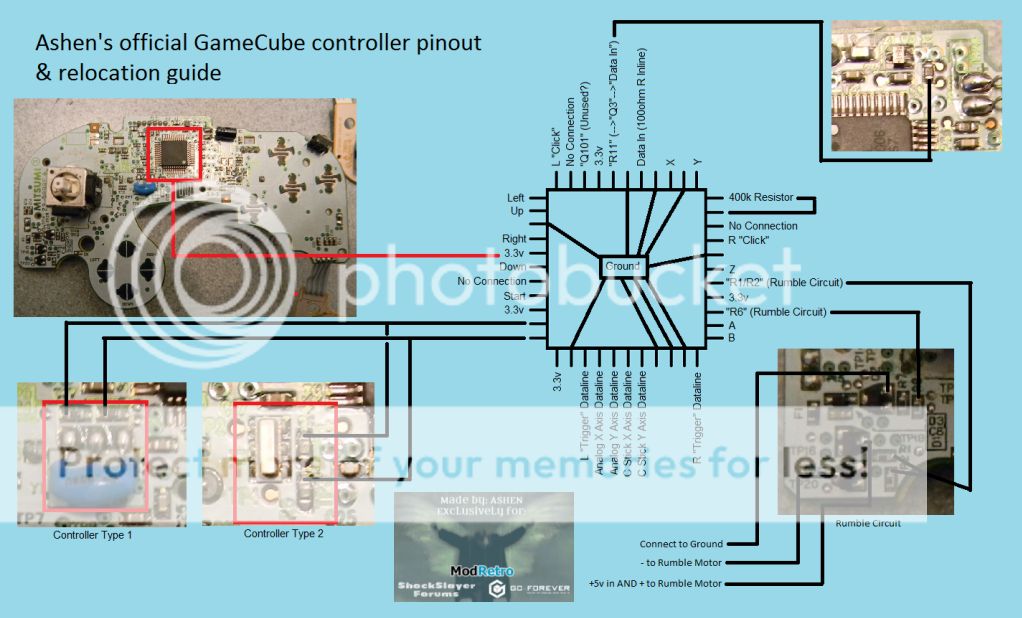
Been doing a bit of work to see how small I can get the official GameCube controller, these are my notes so far. The pinout for the controller chip is accurate. You can wire all of the button signals right to the chip itself. If you don't care about retaining rumble I think we may actually be able to just remove the chip and wire everything directly to it. I'll be doing some tests over the next few days. Anyway here is what I've got so far. I figure where I've shown in these pics its safe to cut back to and retain full functionality. The Rumble part of the controller can be completely relocated.

1.png

2.png

3.png
 
"Look at all these components"
"They must all be for filtering and rumble"

XD

Looking forward to seeing how much we can trim.

SS
 
I cut a controller tonight as depicted above and everything is working so far besides rumble. Need to troubleshoot that part a bit.

I havent gotten to removing the chip and just trying that yet.
 
Heh, my controller is a bit different than yours, starting with the joystick to the caps/board design.Imma poke around and see what I can do.
 
Ashen, I accidentally cut a bit more than the what the pic shows. Pic:
Untitled2.jpg

Is that still ok?
Thats not the exact amount I cut but whatever.
 
I cut mine, hooked up rumble, but it just constantly rumbled. Poked wires around till the magic smoke escaped, gave up on it. XD

SS
 
One way to find out. :p

SS, If you were using the GC pad tester program the gamepad will constantly rumble until a+z are pressed, even if you unplug the controller and plug it back in. :/
 
Ashen said:
SS, If you were using the GC pad tester program the gamepad will constantly rumble until a+z are pressed, even if you unplug the controller and plug it back in. :/
It was rumbling constantly as soon as he turned the GC on. He wasn't using the program. He tried changing the wires around and that's when the magic smoke happened. At least I think that's what occurred (he was streaming).
 
Ahhh.. Well, I dunno... hehe

Updated first post with new pics that won't make Beta's eyes bleed. Everything should be pretty accurate now. Also added some pics of the different controller boards to show where is safe to cut on both types.
 
Hey there again Ashen. (I also posted this on BenHeck forums btw)

I've been working arroun the controller since today afternoon and my idea is to cut the controller arround ABYX part.
http://www.youtube.com/watch?v=SkaSO6Gz53I

I saw that vid of youres and there's some stuff I'd like to ask you that will help me and some other fellows that might have hte same question after me. I been hopping arround looking for controller stuff and found this (done by bentomo): http://i73.photobucket.com/albums/i208/ ... 0_1194.jpg
http://i73.photobucket.com/albums/i208/ ... 0_1195.jpg

On youre movie there's a grey power cable going from the controller to somewhere in the ABXY board bit. Am I right in guessing that what you did was to sand there a bit till you found the metal plate and soldered the wiere there just for 5V feed? Let me know.

Second, how would you feed the R trigger tough? from what I observed, there's some "go trough to the other side" somewhere but I need to know if it is inside or outside my cut area. If not, where should I put a feeding wire?

Thanks for all the help. I'll be waiting on youre answer =)
 
Hey, I'm trying to wire some pins to the main controller chip very much like the youtube video Ashen posted. Someone mentioned using IDE cable for this kind of work but does anyone have a link to the kind of wire that they use?

The pins on the main chip look really tiny and I dont want a nightmare of soldering/desoldering. Any quick tips on the best technique to solder the wires to the chip pins? Really all I've done previously is soldering the potentiometer pins and I thought those were small.
 
Back
Top