Nintendo 64 gamecube joystick problem

Thielink

Member
Hi,
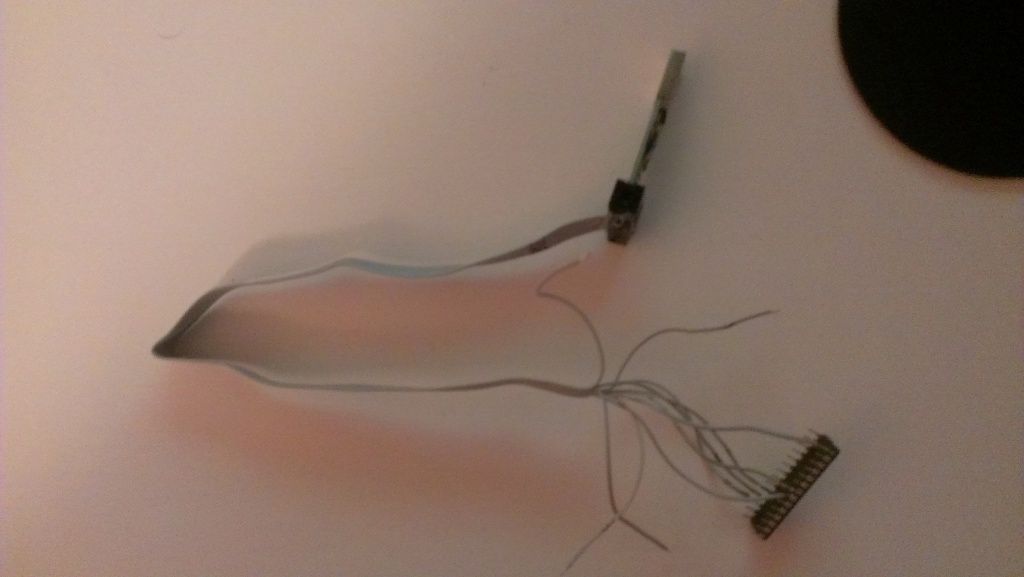
I have a nintendo 64 controller (the brand yobo ) and i have a gamecube joystick . I wired it up as it sayin this tutorial : http://kyorune.com/modding/article.php?id=82 But my joystick look like is not enought sensitive ( the character barely move ) . I've benn said that i needed to put a resistor on the joystick (as this tutorial http://kyorune.com/modding/article.php?id=27 ) but it didn't work . Here is a picture of my problem :
problem.jpg
 
Try measuring the potentiometers on both the original stick and the GC stick. I had the same problem but with a third party ebay controller a while back. I don't think a resistor will do it since the controller is sensing the difference in resistance. Meaning that a 30k pot still has a range of 30 k ohms even if you add a resistor. The initial value just gets higher. The second link you posted was for using a stick instead of the c buttons. I experimented a little with changing resistors on the controller board but that didn't work for me. Then my controller died and that was the end of the fun. :neutral2:.. But on the other hand have I never worked with a yobo controller and they might work differently.
 
So you are telling me that there is nothing to do ? That pretty bad because i tried on another controller from ebay ( maybe one like your (this one http://www.ebay.ca/itm/New-Grey-Game-Co ... 19d48b7469 )) and it's alway the same result :( . If there is nothing to do how do i get a gamecube joystick in a nintendo 64 controller ? what kind of controller do i need and what kind of joystick ?


Thank you
 
I bought the same one from ebay.
Do you have a multimeter? Set it to resistance and put one wire on the middle pin and the other on one of the outer. Push the stick in one direction and thats the lowest value of the pot, the other direction the highest value. Mine had a 50k ohm potentiometer, so I assume thats what yours have. I was going to use a gc stick instead for my first portable. I hooked it up but it felt like it didnt give me full range so I ended up using the normal stick. Now am I in the process of making my second portable and was going to use the same controller again and decided to give my gc stick a second try and it kind of worked. Mario was atleast moving forward... I just measured my gc stick and it has a 30k ohm pot. I have tried with PS1 sticks that are 10k ohm and does didnt work at all, just like you described. Measure your gc stick, make shure its wired up right and hope for the best. :)
I did break my controller when I cut it and didnt rewire ground :gonk:, so dont forget that :wink:

What would be ideal I guess is to find a stick thats 50k ohm. Then its guaranteed to work :). I havent found one yet...

What Im using now in my new portable is an official nintendo controller and an Atmega8a that translates a potbased (modern) analog stick to the wierd crap nintendo controllers have. It works great with PS1 and gamecube sticks.

PS I made a thread just like this one when I had problems... No solution though :(. viewtopic.php?f=33&t=9759 Joey did post a link to a site that you can order from, but minimum order is 1000 pieces :/. Atleas that confirms that they do exist somewhere out there... DS
 
which atmega8 do i need? i will probably need to program it but i don't know how ... Do you have a tutorial or something?

Thank you
 
Just throwing this out there.

I used a atmega8-16pu, but any atmega8 should work.You can build a programmer easily with just a few resistors and an lpt connector.. only if your pc has a printer port.. you can build a usb one, but it takes a lot more work

Check out these links, they will help out a lot. The first link is a thread that I read through a lot of when I was programming my microcontroller, post #36 by micro has a link to a pdf he put together, its a great tutorial on how get it working on the official nintendo controller
http://nfggames.com/forum2/index.php?topic=3574.msg28186#new
https://upload.wikimedia.org/wikipedia/commons/a/ab/Atmega8_lpt_programmer.svg
 
I bought my usb programmer on ebay, I they cost just under 5 dollars. I would post a link but i'm on my phone atm. Just search for usb asp on ebay.
 
I also had a few problems when programming my chip but got help on GC-forever forums. Heres the thread. Exactly what doesn't work? The flashing or after with the controller? It's important to set the fuses. Are you using BASCOM or avrdude?
Here's a pic of my setup. The cable is an IDE ribbon cable cut the right width (didn't want to cut the cable I got with the programmer) :wink: . I just soldered the right leads to the legs of the chip.
IMAG0179.jpg


Hope I could help a little. :)
 
Here's a great page about the pinout. :)

This image is your programmer seen from "behind".
ISP%2010%20way%20pinout.png

Then take a look at the schematics in the PDF.
Ex. Pin 1 (MOSI) on the programmer goes to pin 17 on the microcontroller.
Pin 2 two (VCC) goes to pin 7.
And so on, just follow the schematics :). Do you have the resistor hooked up?

To make the actual connection I took an IDE cable and cut it so it would fit in the programmers "slot". Mark one of the wires furthest to the side, that one will be to Pin 1 (MOSI) on the programmer. Solder the wire to the appropiate pin on the Atmega8. Repeat for all wires. Some wires aren't needed, just leave them out.
Then should the hardware part be done :wink:.

Did you choose programmer? It says in the PDF that to choose "STK200/STK300 Programmer" but you should choose "USB-ISP Programmer".

I wasn't able to program my chip through BASCOM, so I used AVRDude instead. It's cmd only so everything goes via text.

Would test for you but don't have any microcontrollers... :/
 
thank you for your fast response but here is not the problem , i know wich pin is wich on the programmer but i need to know what to wire on the micro controller(for exemple for the vcc what am i going to get 5v with .) and yes i set the programmer to usbasp in bascom .


Thank you
 
Try eXtremeBurner or MyAvrProgTool, they are so simple to work with.

If the program is not recognizing the MCU, then it's 99,99% that theres a pin missing. Recheck your connections between the programmer and the MCU. You wired a pullup resistor between the VCC and RESET, right?
 
You will se a little indention on one side of the chip. Match that side with the side in the pdf tutorial.
Since your programmer is USB it can provide the 5 volts.
 
Back
Top