TacoSlayer
Active Member
How to make a Ps2 portable guide
By Darkslayer Ever wanted to make a ps2p but don't know how? Well here is how. Ps2 are pretty hard to work with so it recommended to have some background electronic knowledge and experience. Disclamer not for n00bs
Note the ps2 used in this guide was the 79001 series
This is not a step by step guide it is more of an overview on how to make one
Parts need
Ps2 slim 7900x 79001 is recommended. 2 is recommended
Ps2 controller third party or you can get a small one from rcd http://bacman.co.uk/bacforum/viewtopic.php?f=177&t=3805
Another ps2 in case you fry the first one (optional)
A case I’ll talk about it later
ps2 AV cord
ps2 power cord
Ps2 memory card 8mb-64 mb OFFICIAL memory card is recommended
Psone memory card (optional only needed if you want to play psone games)
James Bond Agent under Fire(optional only need if you are going to use free mcboot)
Free mcboot website http://bootleg.sksapps.com/tutorials/fmcb/index.php
Video installation
Authentic Chinese 5’ Lcd screen (These will cost you a hundred dollars each, but are the best 5” screens at that price) http://www.ebay.com/itm/VGA-AV-driv...ultDomain_0&hash=item2a1c33cca1#ht_5902wt_904
Batteries batteryspace.com]
Tact Switches (found on ebay, squishy or clicky)
2-way switches (found at your local radioshack or online)
Battery Indicator
A few LEDs
various Resistors
Charger + charge jack
Switching headphone jack (stereo headphone jack on ebay)
Dynex speaker
You’re going to need a lot of wire of many different sizes. You will want IDE cable, controller cord wiring, thick wire, and colorful wire. (You can find lots of good wire from a thrift store. Look for old controllers, broken computers for the IDE cable, and power cords for thick wire)
Tools need
Ruler (both inches and cms) Goggles
Electrical tape/Liquid Electrical tape
Clear tape can be useful for labeling wires
Sharpie
Soldering iron 40w/adjustable
Solder
Flux
Multimeter
Wire strippers
Hot glue gun
Hot glue sticks superglue
Epoxy (putty) (JB weld is a good brand)
Epoxy (glue) (JB weld is a good brand)
Dremel/rotory tool
Dremel bits
X-acto knife
Screwdriver kit
Electric drill
Sandpaper 40-300 grit
Alligator clips
Case making
You have two options when making cases. You can either frankencase or vacuum form your case. Frankencasing is chopping up controller parts and gluing them to the base of you portable. Most people use a zn-40 or a zn-45 from polycase.com Vacuum forming is when you make a mold usually out of wood and get a heated sheet of styrene and push it down on the mold and use a vacuum to remove the air causing the styrene to be a perfect replica of the mold. You would want your case to fit you electronics because if it was too small that would pretty stupid right . Here are some helpful links that go more info detail
Frankencasing
Triton’s http://forums.benheck.com/viewtopic.php?f=13&t=11807
Hailrazer’s http://forums.benheck.com/viewtopic.php?t=25815[/url
Vacuum forming
Dowining’shttp://forums.modretro.com/viewtopic.php?f=8&t=8438
Bentomo‘shttp://forums.modretro.com/viewtopic.php?f=8&t=1952
Taking part the ps2
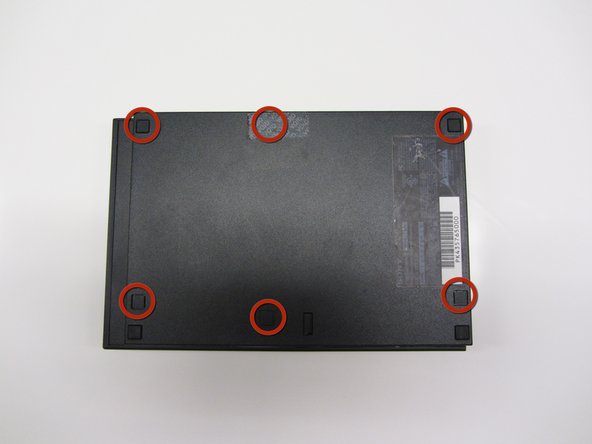
Check to see if it works if it doesn't get a refund and buy a new one. Flip the unit over to the back.Remove the rubber bumpers revealing hidden screws 5 underneath. There is one more screws under the security sticker. This will void you warranty duh. You should have removed 6 screws in total.
 Now gently pry the case open. You should see a metal shielding with a fan on top. Remove the fan by pulling the plug connecting the fan to the shielding. Underneath should be another screw which you must remove to remove the motherboard to the shell. Three cables connect the optical drive to the motherboard. Just pull the flex cable out of the socket.
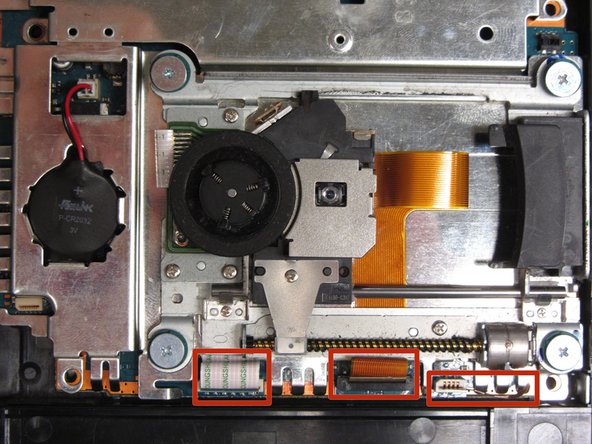 Now gently take out the motherboard. Take of the shielding and save it for later we are going to use the heatsink. Now we have the bare motherboard. Back to the shielding. Locate the heatsink on the shielding. Push hard on it and bend the surrounding metal back and forth. It should come out easily.
Wiring things up
Run the ps2 system off 7.4Vs
With no mods whatsoever it will run as low as 7.1v when using the disc drive. Without the disc drive using Free McBoot and a Usb thumbdrive to play games it will go down around 5.7v.
However when using a disc drive and 7.4v batteries , it will stop working before the batteries are half dead. But now thanks to a mod by Hailrazer you can run the PS2 79xxx series motherboards as low as 6v. A 300mA or higher 5v switching regulator is all that is needed. You need to make sure it is outputting 5v or very close to that. Here's a drop in replacement good down to 6.25V. http://www.digikey.ca/product-detail/en ... -ND/334840
This one costs more, but has an even lower dropout. http://www.digikey.ca/product-detail/en ... -ND/771602. Now follow the diagram below
Ps2 basic trim and prepping
Here is an overview of a the guide Darkwing did Full guide here http://forums.modretro.com/viewtopic.php?f=64&t=12562
Bridging the sensor lid switch, only for PAL system (79002, 79003, 79004)you will need to cut a small piece of wire, then remove the protective plastic on both part and separate both ends into two, twist them and prepare the wire as you would usual with solder.
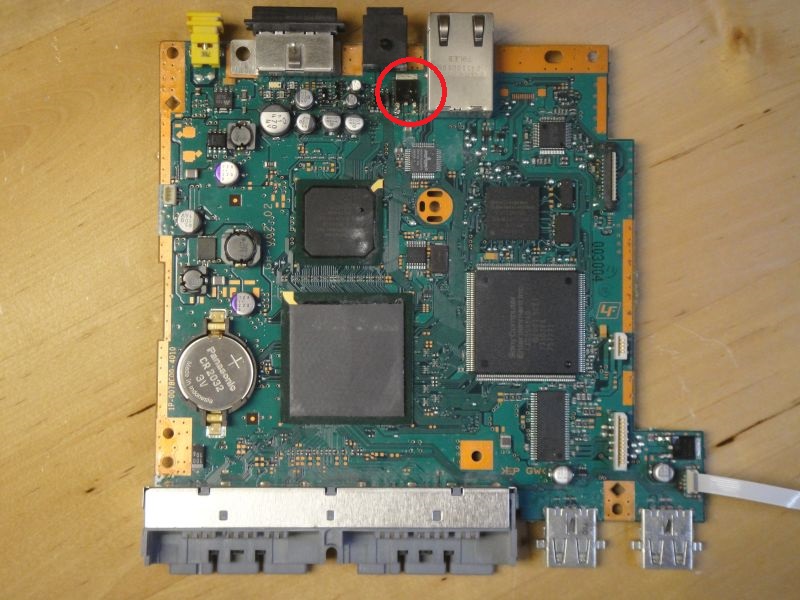
How to remove DC port, AV port, Ethernet port, Memory card/Controller port, and Optical audio drive
First with the Needle-nose plier bend the small metallic part on both end of the port.
Once it's done you need to gently do a backward / forward motion with the whole metallic plate until you can feel the bits which are holding it at the base snapping.
Watch out for the components next to it, you don't want to break one of those.
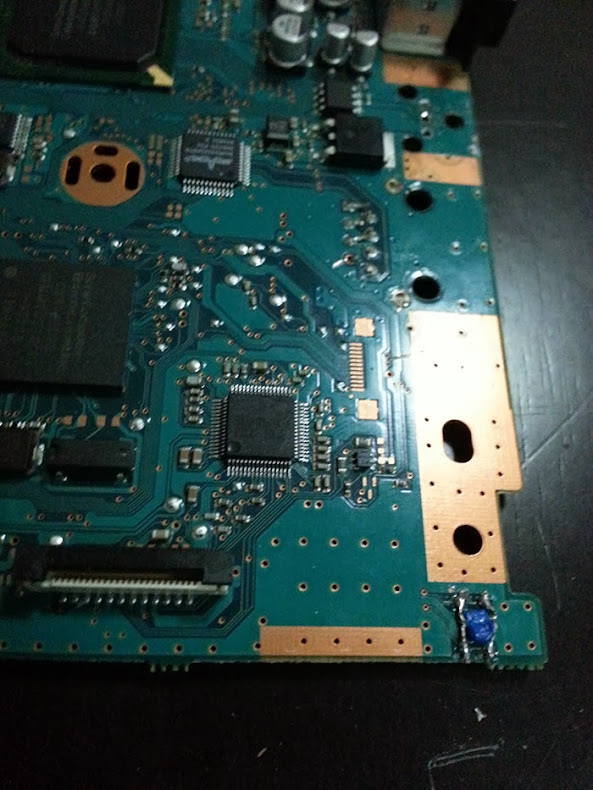
Squaring off the ps2 motherboard
cut along the red line with a dremelhttps://lh5.googleusercontent.com/-..._YXs/w593-h790-no/06-3-Squaring-the-board.jpg
You can also cut the small bit sticking out which is in-between the controller port.
Final you can trim a few millimeters on the USB part from the two large solder point; they are only there to hold the USB port. When finished trimming sand the edge trimmed because the ps2 is multilayered and you don’t want the different layers touching one another or it will fry the board. http://i628.photobucket.com/albums/uu4/Ashen12345/ps2_solder_points.png
Extending disk drive cables
check this guide to extend the http://kyorune.com/modding/article.php?id=64
Av port Wiring
Thanks to Metalblank’s psone/ps2 av guide we can now wire everything up.
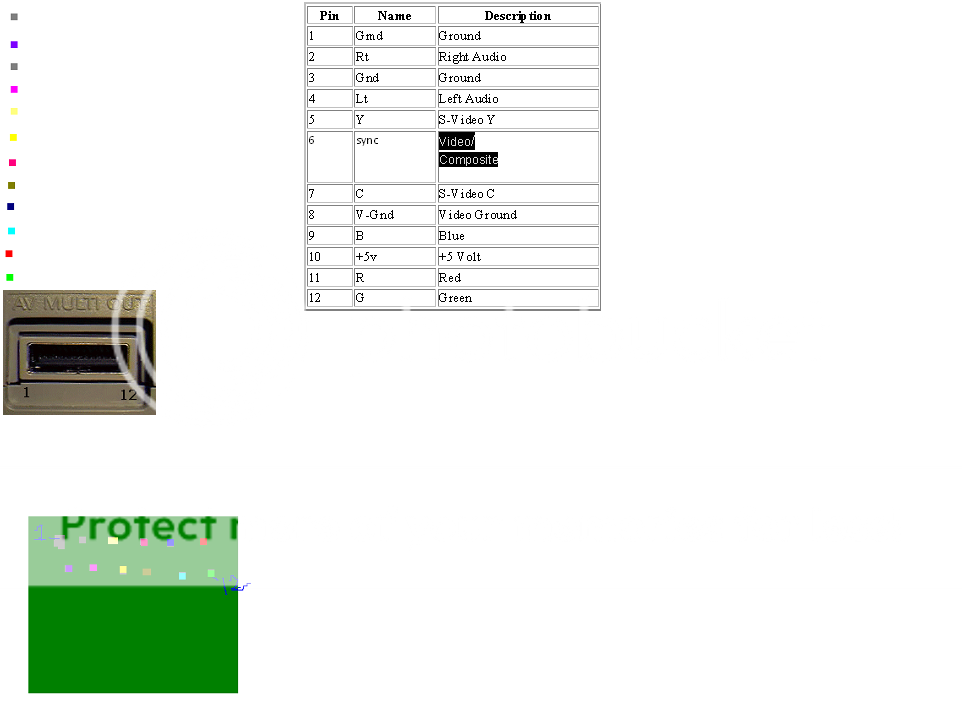 Now we get the ps2 av cable and cut off the video (yellow)plug and strip that wire. There should be two things there-a yellow wire and strands of copper wire. The copper wire is the grounding and the yellow wire is composite video signal. Twist the exposed copper wire together and strip the composite wire as well. Solder the copper wire to number 8 on the diagram and the composite wire to number 6 on the diagram. Then solder the ground and the composite wire to their respectful positions on the screen’s driver board(check the data sheet). The ps2 can also output rbg if your screen can support it. Using a converter chip you can get the ps2 to output a vga signal http://forums.modretro.com/viewtopic.php?f=6&t=9954
Test to see how low you the screen can go(voltage) most screens can usually go down to 7.4volts. If this is the case you probably can connect safely at same power supply of the Ps2.When applied power both the screen and the ps2 should turn on.
audio amp guide viewtopic.php?f=7&t=9355
All that’s left to do is to wire up the memory card and controller.
For the controller if you are using RDc mini controllers here is the pinout

If you are using a third party controller just scratch away at the traces and solder tact switches to it.
After that’s done put everything in to the case and you are done
I know I didn’t put anything about batterys but here are some help links that show how to wire batterys up ect
http://forums.benheck.com/viewtopic.php?f=43&t=34576
viewtopic.php?f=7&t=9167
here is how to make a low battery circuit viewtopic.php?f=7&t=3640
If there is something I have left out, put misleading info or forgot to give you credit just tell me and I’ll go fix it
Pics & info borrowed from Ashen, Tchay, Shockslayer, Metalblank , Darkwing, Hailrazer , Downing, Triton, Bentomo
By Darkslayer Ever wanted to make a ps2p but don't know how? Well here is how. Ps2 are pretty hard to work with so it recommended to have some background electronic knowledge and experience. Disclamer not for n00bs
Note the ps2 used in this guide was the 79001 series
This is not a step by step guide it is more of an overview on how to make one
Parts need
Ps2 slim 7900x 79001 is recommended. 2 is recommended
Ps2 controller third party or you can get a small one from rcd http://bacman.co.uk/bacforum/viewtopic.php?f=177&t=3805
Another ps2 in case you fry the first one (optional)
A case I’ll talk about it later
ps2 AV cord
ps2 power cord
Ps2 memory card 8mb-64 mb OFFICIAL memory card is recommended
Psone memory card (optional only needed if you want to play psone games)
James Bond Agent under Fire(optional only need if you are going to use free mcboot)
Free mcboot website http://bootleg.sksapps.com/tutorials/fmcb/index.php
Video installation
Authentic Chinese 5’ Lcd screen (These will cost you a hundred dollars each, but are the best 5” screens at that price) http://www.ebay.com/itm/VGA-AV-driv...ultDomain_0&hash=item2a1c33cca1#ht_5902wt_904
Batteries batteryspace.com]
Tact Switches (found on ebay, squishy or clicky)
2-way switches (found at your local radioshack or online)
Battery Indicator
A few LEDs
various Resistors
Charger + charge jack
Switching headphone jack (stereo headphone jack on ebay)
Dynex speaker
You’re going to need a lot of wire of many different sizes. You will want IDE cable, controller cord wiring, thick wire, and colorful wire. (You can find lots of good wire from a thrift store. Look for old controllers, broken computers for the IDE cable, and power cords for thick wire)
Tools need
Ruler (both inches and cms) Goggles
Electrical tape/Liquid Electrical tape
Clear tape can be useful for labeling wires
Sharpie
Soldering iron 40w/adjustable
Solder
Flux
Multimeter
Wire strippers
Hot glue gun
Hot glue sticks superglue
Epoxy (putty) (JB weld is a good brand)
Epoxy (glue) (JB weld is a good brand)
Dremel/rotory tool
Dremel bits
X-acto knife
Screwdriver kit
Electric drill
Sandpaper 40-300 grit
Alligator clips
Case making
You have two options when making cases. You can either frankencase or vacuum form your case. Frankencasing is chopping up controller parts and gluing them to the base of you portable. Most people use a zn-40 or a zn-45 from polycase.com Vacuum forming is when you make a mold usually out of wood and get a heated sheet of styrene and push it down on the mold and use a vacuum to remove the air causing the styrene to be a perfect replica of the mold. You would want your case to fit you electronics because if it was too small that would pretty stupid right . Here are some helpful links that go more info detail
Frankencasing
Triton’s http://forums.benheck.com/viewtopic.php?f=13&t=11807
Hailrazer’s http://forums.benheck.com/viewtopic.php?t=25815[/url
Vacuum forming
Dowining’shttp://forums.modretro.com/viewtopic.php?f=8&t=8438
Bentomo‘shttp://forums.modretro.com/viewtopic.php?f=8&t=1952
Taking part the ps2
Check to see if it works if it doesn't get a refund and buy a new one. Flip the unit over to the back.Remove the rubber bumpers revealing hidden screws 5 underneath. There is one more screws under the security sticker. This will void you warranty duh. You should have removed 6 screws in total.
Wiring things up
Run the ps2 system off 7.4Vs
With no mods whatsoever it will run as low as 7.1v when using the disc drive. Without the disc drive using Free McBoot and a Usb thumbdrive to play games it will go down around 5.7v.
However when using a disc drive and 7.4v batteries , it will stop working before the batteries are half dead. But now thanks to a mod by Hailrazer you can run the PS2 79xxx series motherboards as low as 6v. A 300mA or higher 5v switching regulator is all that is needed. You need to make sure it is outputting 5v or very close to that. Here's a drop in replacement good down to 6.25V. http://www.digikey.ca/product-detail/en ... -ND/334840
This one costs more, but has an even lower dropout. http://www.digikey.ca/product-detail/en ... -ND/771602. Now follow the diagram below
Ps2 basic trim and prepping
Here is an overview of a the guide Darkwing did Full guide here http://forums.modretro.com/viewtopic.php?f=64&t=12562
Bridging the sensor lid switch, only for PAL system (79002, 79003, 79004)you will need to cut a small piece of wire, then remove the protective plastic on both part and separate both ends into two, twist them and prepare the wire as you would usual with solder.
How to remove DC port, AV port, Ethernet port, Memory card/Controller port, and Optical audio drive
First with the Needle-nose plier bend the small metallic part on both end of the port.
Once it's done you need to gently do a backward / forward motion with the whole metallic plate until you can feel the bits which are holding it at the base snapping.
Watch out for the components next to it, you don't want to break one of those.
Squaring off the ps2 motherboard
cut along the red line with a dremelhttps://lh5.googleusercontent.com/-..._YXs/w593-h790-no/06-3-Squaring-the-board.jpg
You can also cut the small bit sticking out which is in-between the controller port.
Final you can trim a few millimeters on the USB part from the two large solder point; they are only there to hold the USB port. When finished trimming sand the edge trimmed because the ps2 is multilayered and you don’t want the different layers touching one another or it will fry the board. http://i628.photobucket.com/albums/uu4/Ashen12345/ps2_solder_points.png
Extending disk drive cables
check this guide to extend the http://kyorune.com/modding/article.php?id=64
Av port Wiring
Thanks to Metalblank’s psone/ps2 av guide we can now wire everything up.
Test to see how low you the screen can go(voltage) most screens can usually go down to 7.4volts. If this is the case you probably can connect safely at same power supply of the Ps2.When applied power both the screen and the ps2 should turn on.
audio amp guide viewtopic.php?f=7&t=9355
All that’s left to do is to wire up the memory card and controller.
For the controller if you are using RDc mini controllers here is the pinout
If you are using a third party controller just scratch away at the traces and solder tact switches to it.
After that’s done put everything in to the case and you are done
I know I didn’t put anything about batterys but here are some help links that show how to wire batterys up ect
http://forums.benheck.com/viewtopic.php?f=43&t=34576
viewtopic.php?f=7&t=9167
here is how to make a low battery circuit viewtopic.php?f=7&t=3640
If there is something I have left out, put misleading info or forgot to give you credit just tell me and I’ll go fix it
Pics & info borrowed from Ashen, Tchay, Shockslayer, Metalblank , Darkwing, Hailrazer , Downing, Triton, Bentomo